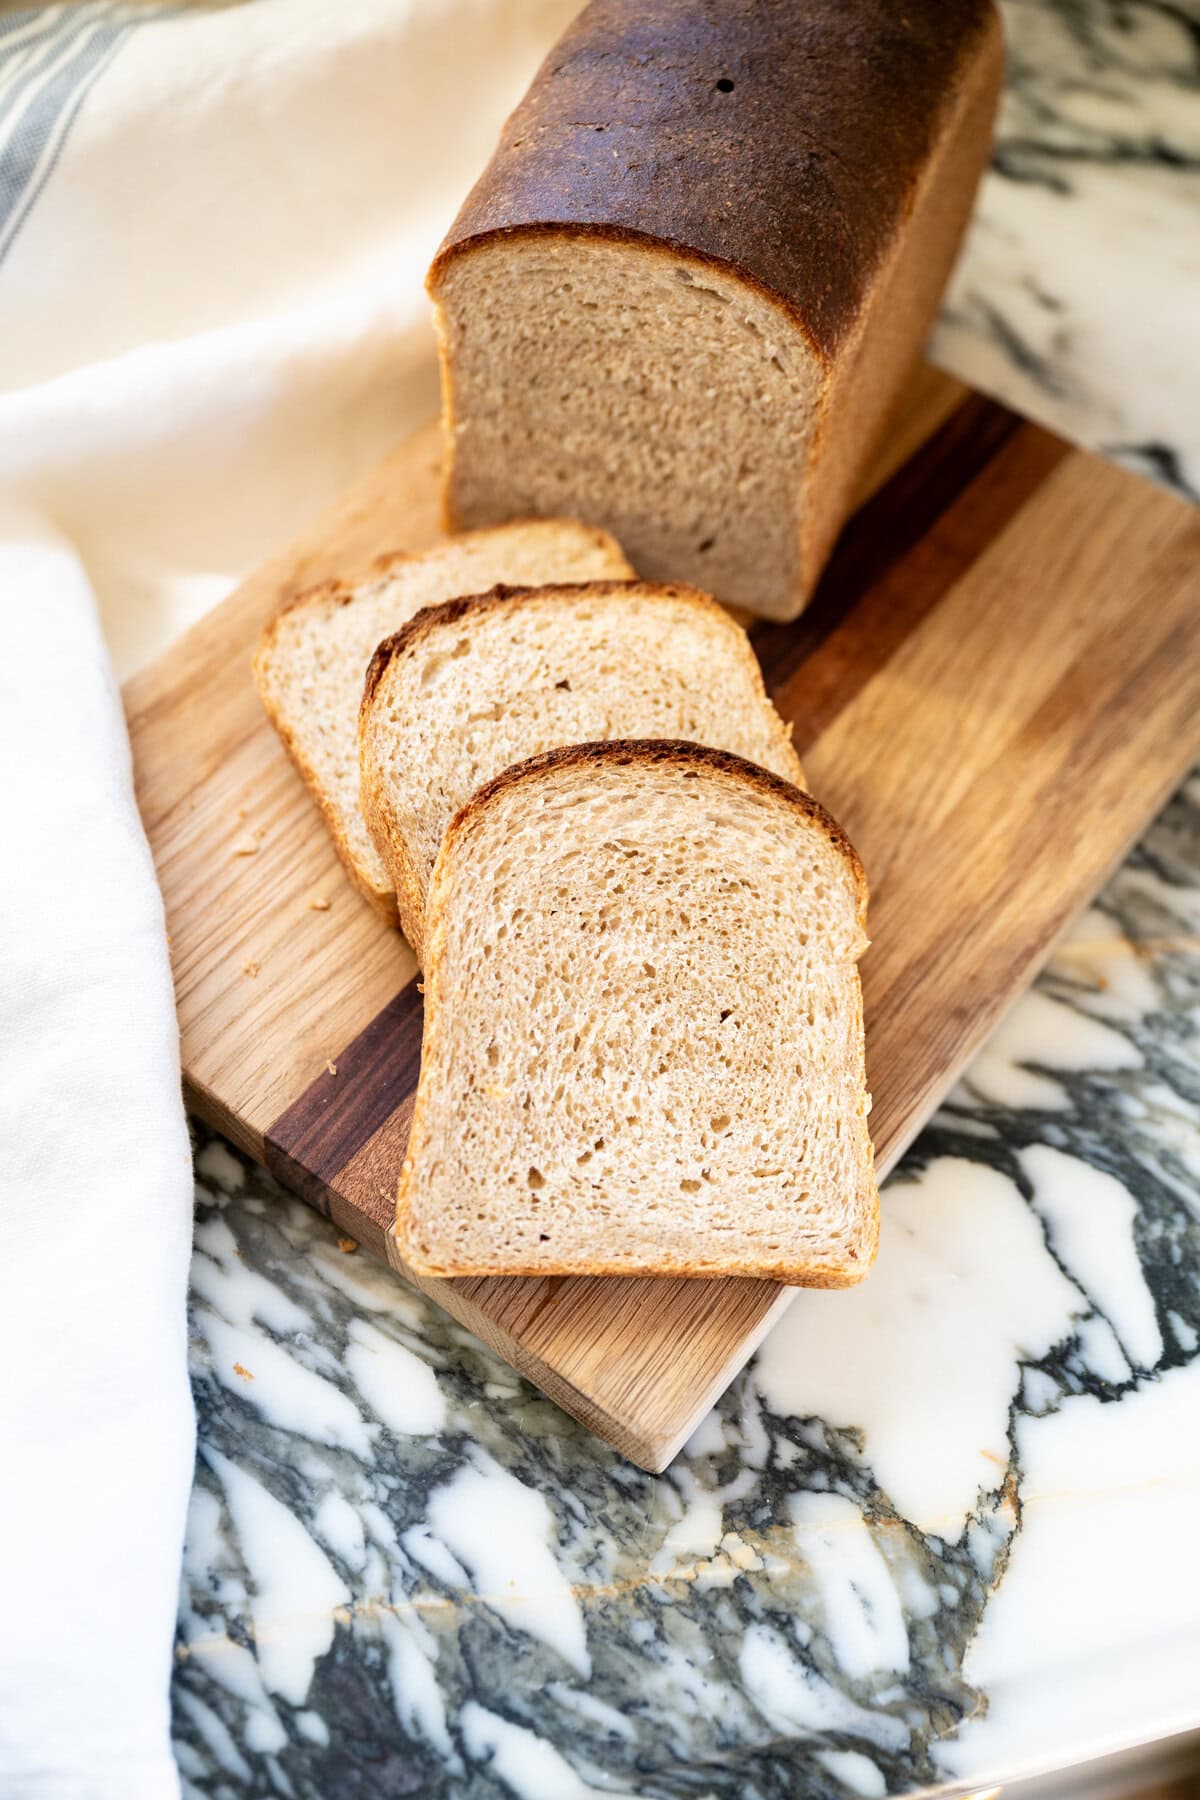
If you are looking for a soft whole wheat sourdough sandwich bread that actually stays fluffy, slices beautifully, and does not turn dense or heavy, this is the recipe you want to make.
This loaf is lightly sweetened with honey and enriched with milk and oil to create a tender, bakery-style crumb that stays soft for days. A 50/50 blend of whole wheat flour and bread flour gives you the perfect balance of structure and softness, so the loaf rises tall in a pan while still tasting wholesome and deeply flavorful.

Unlike rustic artisan sourdough, this bread is designed specifically for everyday sandwiches and toast. It uses a simple overnight fermentation schedule that fits easily into real life baking, whether you are experienced with sourdough or baking your first loaf.
As a private chef, this is one of my most reliable sourdough sandwich loaves because it delivers consistent results, a soft crust, and a beautiful even crumb every single time.
Quick Summary:
Soft sourdough sandwich bread made with whole grains, honey, and a 50 50 blend of flours that yields a tall loaf with consistent crumb and soft crust.
Table of contents
- Why You Will Love This Whole Wheat Sourdough Sandwich Bread
- What Makes This a Great Whole Wheat Sourdough Bread
- Why This Whole Wheat Sourdough Sandwich Bread Works
- Ingredients You Will Need
- Best Flour Mix for Soft Sandwich Bread
- How to Make Whole Wheat Sourdough Sandwich Bread
- Recipe Tips and Tricks
- How to Store and Freeze Your Bread
- Serving Ideas
- Variations (Use This Base Dough)
- FAQs: Whole Wheat Sourdough Sandwich Bread
- Final Thoughts
- More Sourdough Bread Recipes to Try:
- Love This Recipe?
Why You Will Love This Whole Wheat Sourdough Sandwich Bread
- Tender soft crust that stays soft because you brush the top with melted butter right after baking
- Rich nutty flavor from whole wheat flour and honey
- Great structure from bread flour for a good dough rise
- Perfect for everyday sandwiches and toast
- Reliable fermentation schedule with overnight bulk fermentation for convenience
Example: Make it the next day and cut thick slices for peanut butter and fresh fruit jam.
What Makes This a Great Whole Wheat Sourdough Bread
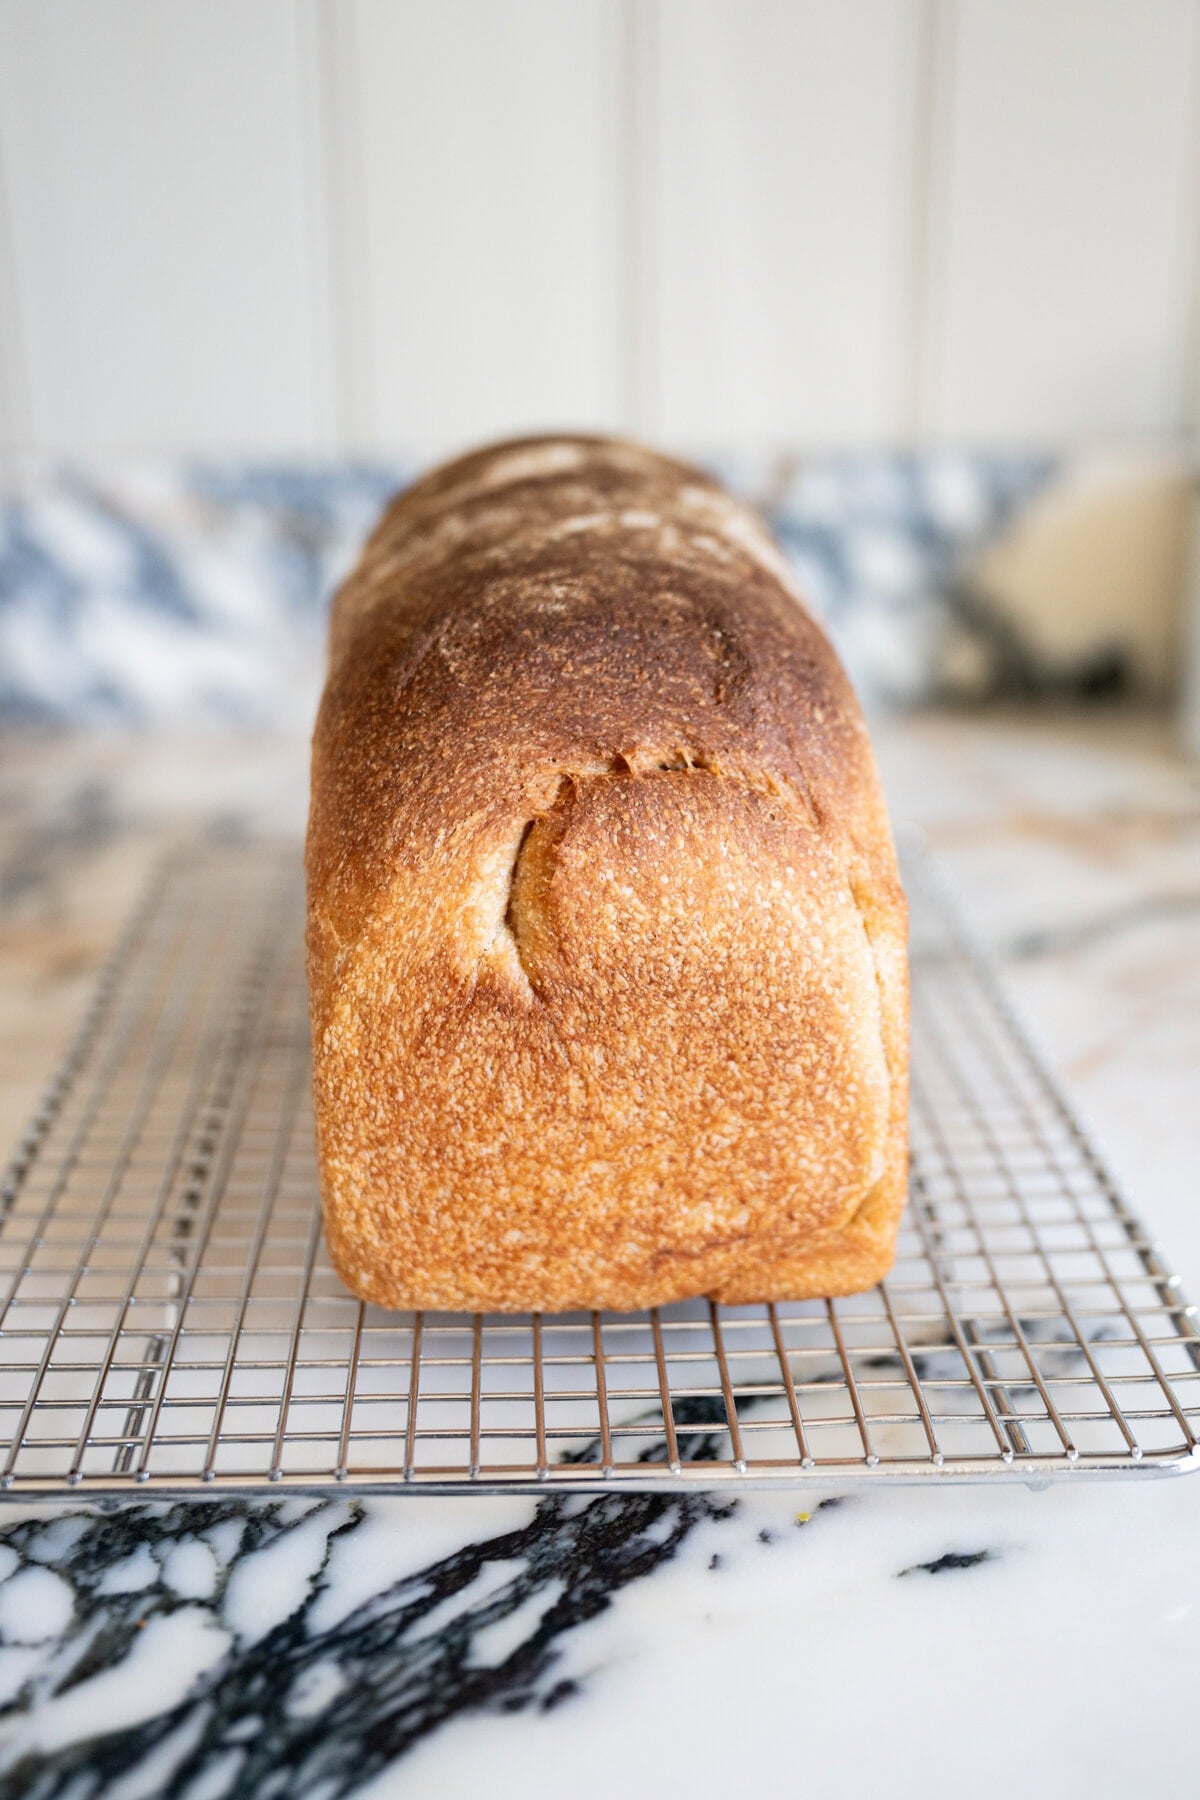
Not all sourdough bread is made the same. Unlike rustic sourdough boules this whole wheat sourdough bread is shaped and baked in a loaf pan so that you get even vertical rise and straight sides for slicing.
If you prefer a thicker crust and a more rustic open crumb, you will also love my homemade artisan sourdough bread recipe, which is perfect for dipping and serving with soups.
Soft sourdough sandwich bread needs specific qualities:
- Soft crust from added milk and oil
- Even crumb from proper hydration and careful folding
- Good rise during both first rise and second rise
- Soft top of the loaf that does not harden like artisan sourdough
Pro Tip: An active sourdough starter that is bubbly and risen will give the best loaf rise.
Why This Whole Wheat Sourdough Sandwich Bread Works
This recipe is designed for balance, structure, and softness so you get a reliable sandwich loaf every time.
- Balanced flour blend: A 50/50 mix of bread flour and whole wheat flour gives the loaf both structure and flavor. Bread flour supports a good rise, while whole wheat adds nutty depth without making the bread heavy.
- Enriched dough for softness: Milk, oil, and honey work together to create a tender crumb. They keep the bread soft, lightly sweet, and moist for days.
- Strong fermentation method: Stretch and folds build gluten strength without kneading, helping the dough trap air for a lighter, more even texture.
- Overnight cold fermentation: A slow rise in the refrigerator deepens flavor, improves texture, and makes the dough easier to shape the next day.
- Loaf pan for consistency: Baking in a pullman pan creates a structured, even rise with clean slices, unlike rustic artisan sourdough.
- Butter finish for soft crust: Brushing the warm loaf with melted butter or coconut oil locks in moisture and keeps the crust soft instead of hard or chewy.
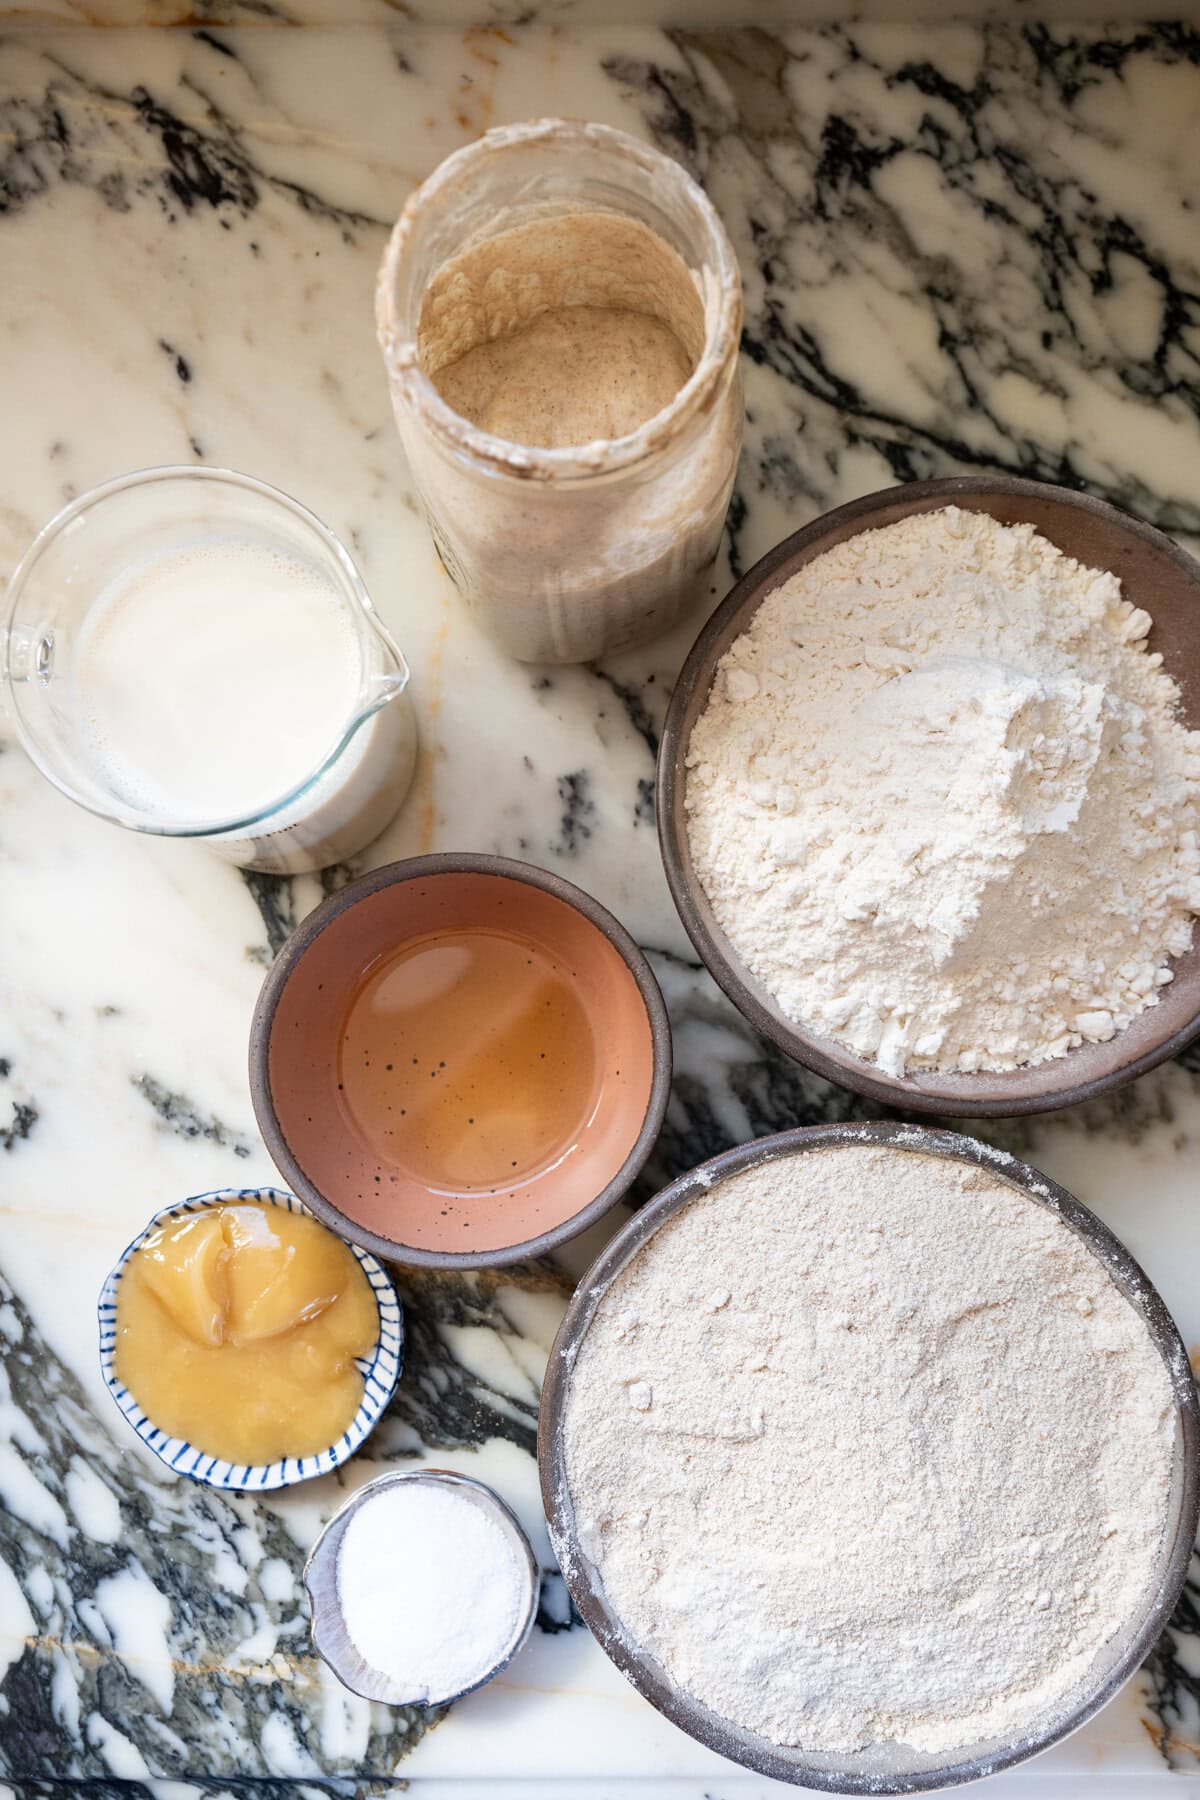
Ingredients You Will Need
This soft whole wheat sourdough sandwich bread uses simple pantry ingredients, but each one plays an important role in creating a soft, well-risen loaf with great flavor and texture.
If you are new to baking with wild yeast, you can follow my step-by-step guide on how to make sourdough starter from scratch so you always have an active starter ready for baking.
- Water (tap water): Provides hydration for the dough and activates the sourdough starter. Tap water works perfectly for this recipe.
- Active sourdough starter: This is your natural leavening agent made from wild yeast and bacteria. A bubbly, active starter is essential for a good dough rise and light texture.
- For a faster rise, you can increase the starter slightly. For a slower fermentation schedule, reduce it slightly.
- Milk: Adds richness and softness to the crumb. Milk helps create that tender, classic sandwich bread texture and improves browning on the crust.
- Oil (olive oil or avocado oil): Keeps the bread soft and moist for longer. Oil also helps create a more tender crumb, making this loaf stay fresh for several days.
- Honey: Lightly sweetens the dough and enhances flavor. Honey also helps soften the crumb and contributes to a beautiful golden brown crust during baking.
- Bread flour: Provides structure and strength to the dough. The higher protein content supports a good rise and helps the loaf hold its shape in the pan.
- Whole wheat flour: Adds nutty flavor, whole grain nutrition, and depth. It also absorbs more liquid, which contributes to a hearty but soft sandwich loaf when balanced with bread flour.
- Salt: Enhances flavor and strengthens gluten structure. Salt also helps regulate fermentation for a more balanced rise and better overall dough performance. I use Diamond Crystal Kosher Salt in all of my recipes unless otherwise noted.
- Butter or Coconut Oil: Softens the dark golden crust after baking when brushed onto the crust while the bread is still hot from the oven.
Best Flour Mix for Soft Sandwich Bread
Using 50 50 whole wheat and bread flour gives you whole grain flavor with enough gluten development to form a tall loaf in a bread pan. If you use too much whole wheat the loaf can end up dense and heavy.
If you mill your own flour, freshly milled whole wheat from wheat berries also works beautifully in this recipe. Fresh flour will absorb slightly more water and may create a more flavorful, slightly more rustic loaf, so adjust hydration as needed if the dough feels too stiff.
Pro Tip: If you want a lighter loaf experiment with some white whole wheat flour but keep at least 40 percent whole wheat to retain that nutty flavor.
How to Make Whole Wheat Sourdough Sandwich Bread
This method uses a simple mix, stretch and folds, and an overnight fermentation to develop flavor and structure while keeping the crumb soft and light.
1. Mix the dough
In a large mixing bowl, add the water and active sourdough starter. Stir with a fork or dough whisk until the starter is mostly dissolved.
Add the milk, oil, and honey. Mix until fully combined.
Add the bread flour, whole wheat flour, and salt. Stir until a shaggy, sticky dough forms and no dry flour remains.
Quick Summary: The dough should look rough and sticky but fully mixed at this stage.
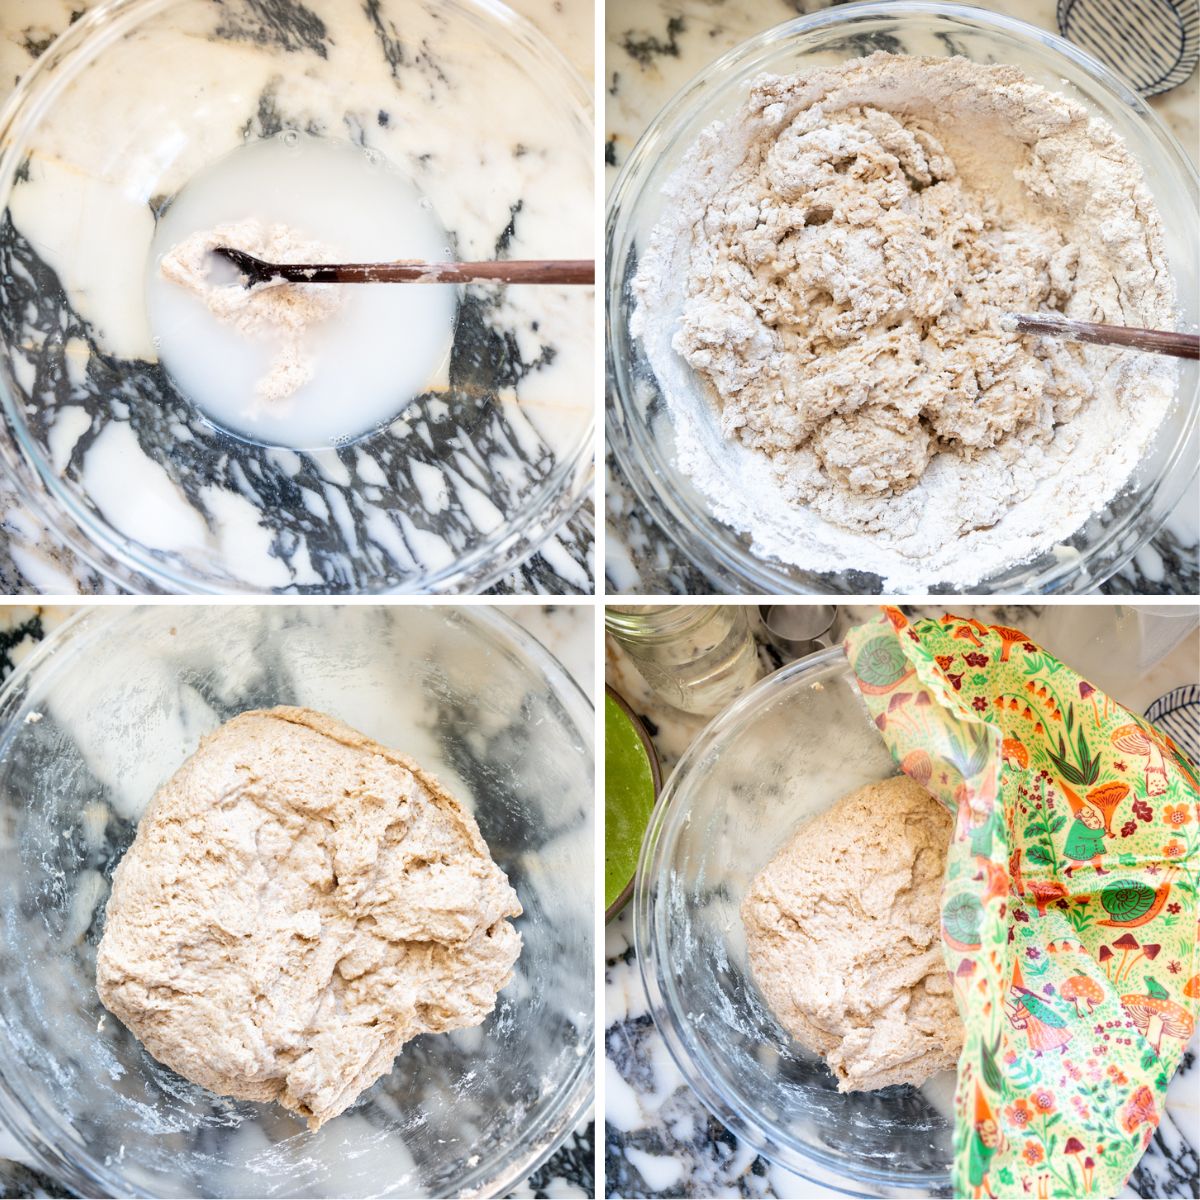
2. Rest the dough
Cover the bowl and let the dough rest for 30 to 60 minutes at room temperature.
This allows the flour to fully hydrate and makes the dough easier to strengthen during folding.
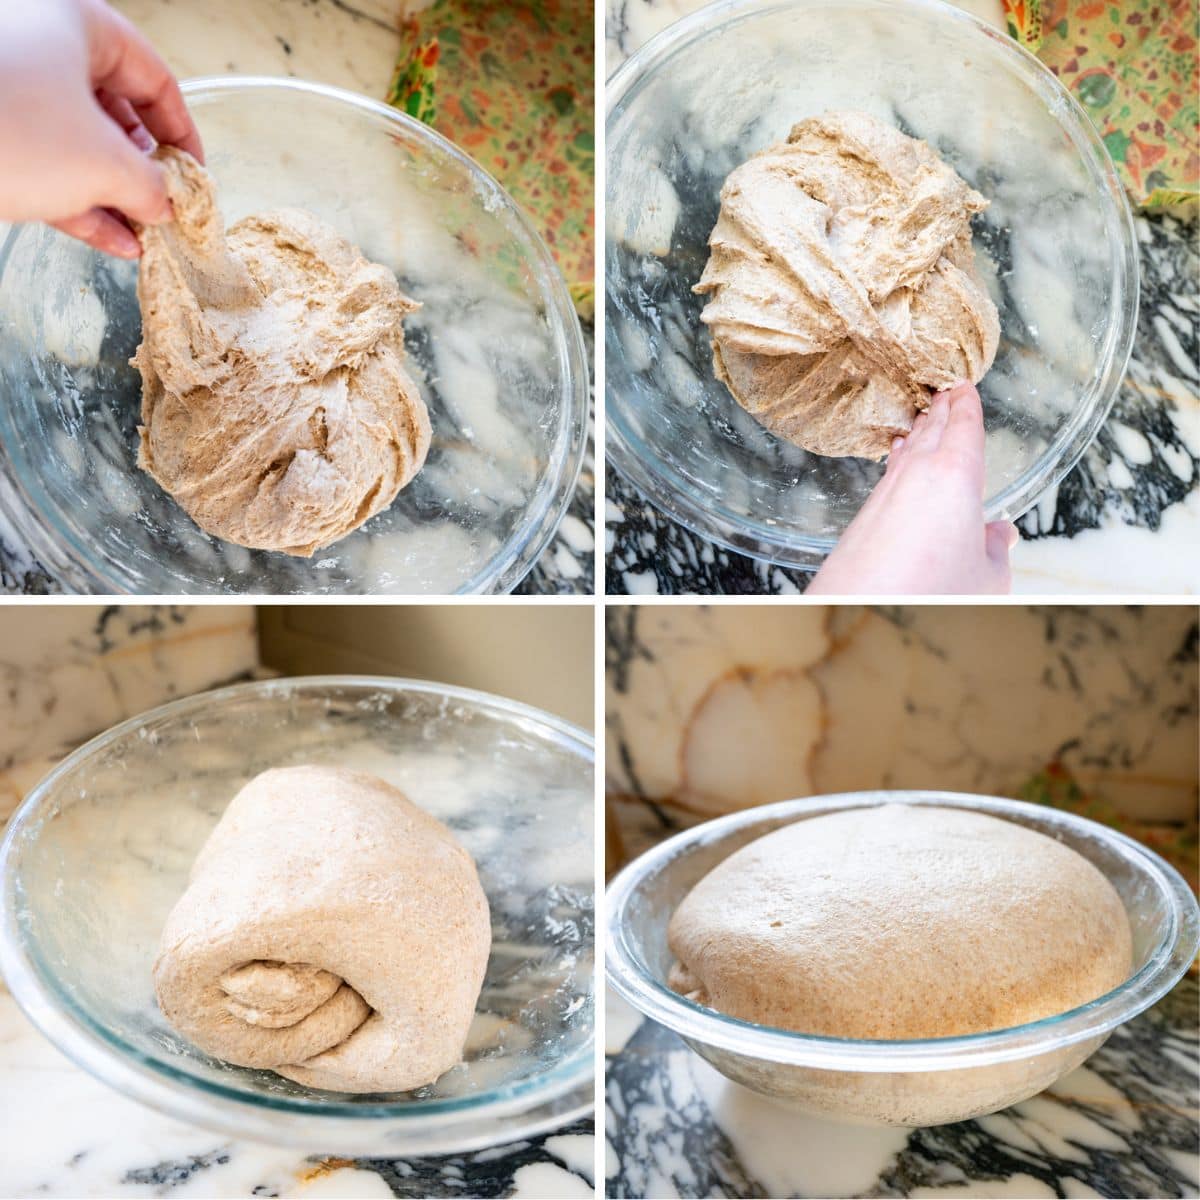
3. Strengthen the dough (stretch and folds)
With slightly wet hands, perform 3 to 4 rounds of stretch and folds or coil folds, spaced 15 minutes apart.
To stretch and fold:
- Grab one side of the dough
- Stretch it upward gently
- Fold it over the center of the dough
- Rotate the bowl and repeat on all sides
To coil fold:
- Pull far side of dough up and fold it under itself in a spiral
- Rotate the bowl 90 degrees and repeat in the alternate direction
The dough will become smoother and stronger after each round.
Pro Tip: If the dough feels very sticky at first, that is normal. Whole wheat flour absorbs liquid more slowly. Wetting your hands will help to keep the dough from sticking to them.
4. Bulk fermentation
Bulk fermentation time will vary depending on the temperature of your kitchen, as well as humidity and dough temperature. In a warmer, more humid environment, the dough will rise faster. In a cooler kitchen, fermentation will naturally slow down and take longer.
For example, in my coastal New England kitchen, I adjust this step seasonally. In colder months, I can sometimes leave the dough at room temperature for a longer rise. In warmer months, I shorten the room temperature fermentation and move the dough into the refrigerator sooner to prevent over proofing.
Same-day bake option (warmer kitchen):
If your kitchen is warm, cover the bowl and let the dough bulk ferment at room temperature until it has roughly doubled in volume and looks noticeably puffy.
Overnight bake option (cooler kitchen or flexible schedule):
If your kitchen is cooler, or if you prefer to bake the next day, allow the dough to bulk ferment at room temperature for a shorter period, then transfer it to the refrigerator to continue fermenting slowly overnight.
During bulk fermentation, the dough should increase in volume, feel lighter, and develop visible airiness.
You can also adjust fermentation speed by changing the amount of starter. Using a little more starter will shorten the rise time, while using slightly less starter will slow fermentation and extend the bulk rise.
Pro Tip: An overnight rest in the refrigerator improves flavor, strengthens the dough, and makes shaping much easier the next day.
5. Shape the dough
The next morning, remove the dough from the refrigerator.
Turn it out onto a lightly floured surface and gently press it into a rectangle.
Fold the dough into thirds like a letter. Then roll it tightly from the short end into a log shape.
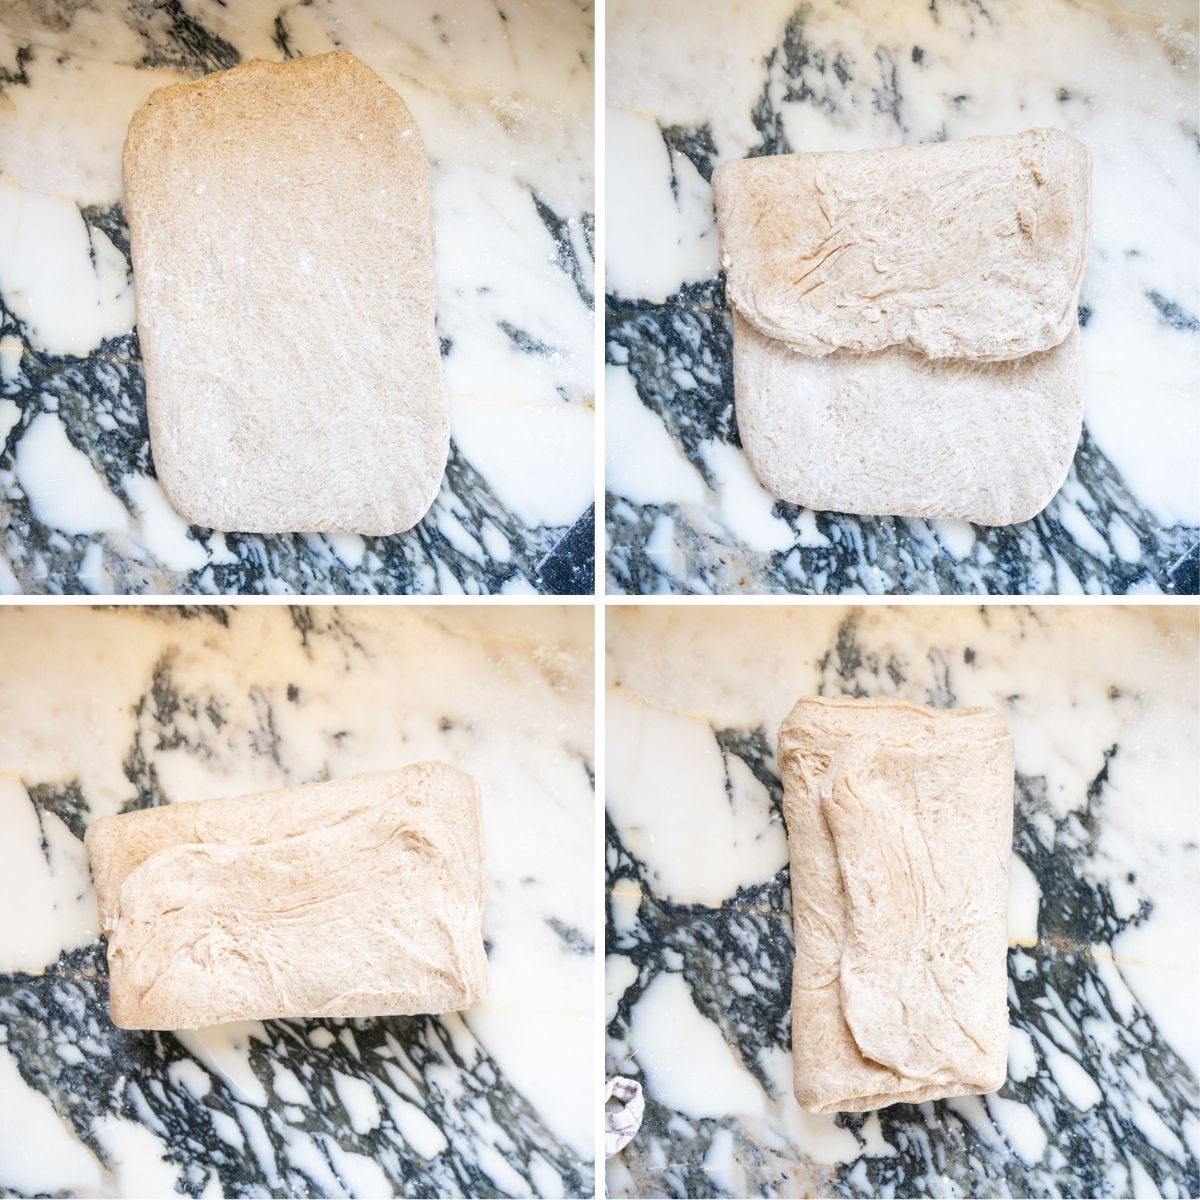
6. Prepare the loaf pan
Grease a loaf pan or Pullman pan well with butter or cooking spray.
Place the shaped dough into the pan seam-side down and cover loosely with plastic wrap or a plastic bag.
7. Final proof
Let the dough proof at room temperature until it rises to just below or near the rim of the pan.
This step is essential for a soft, well-risen sandwich loaf.
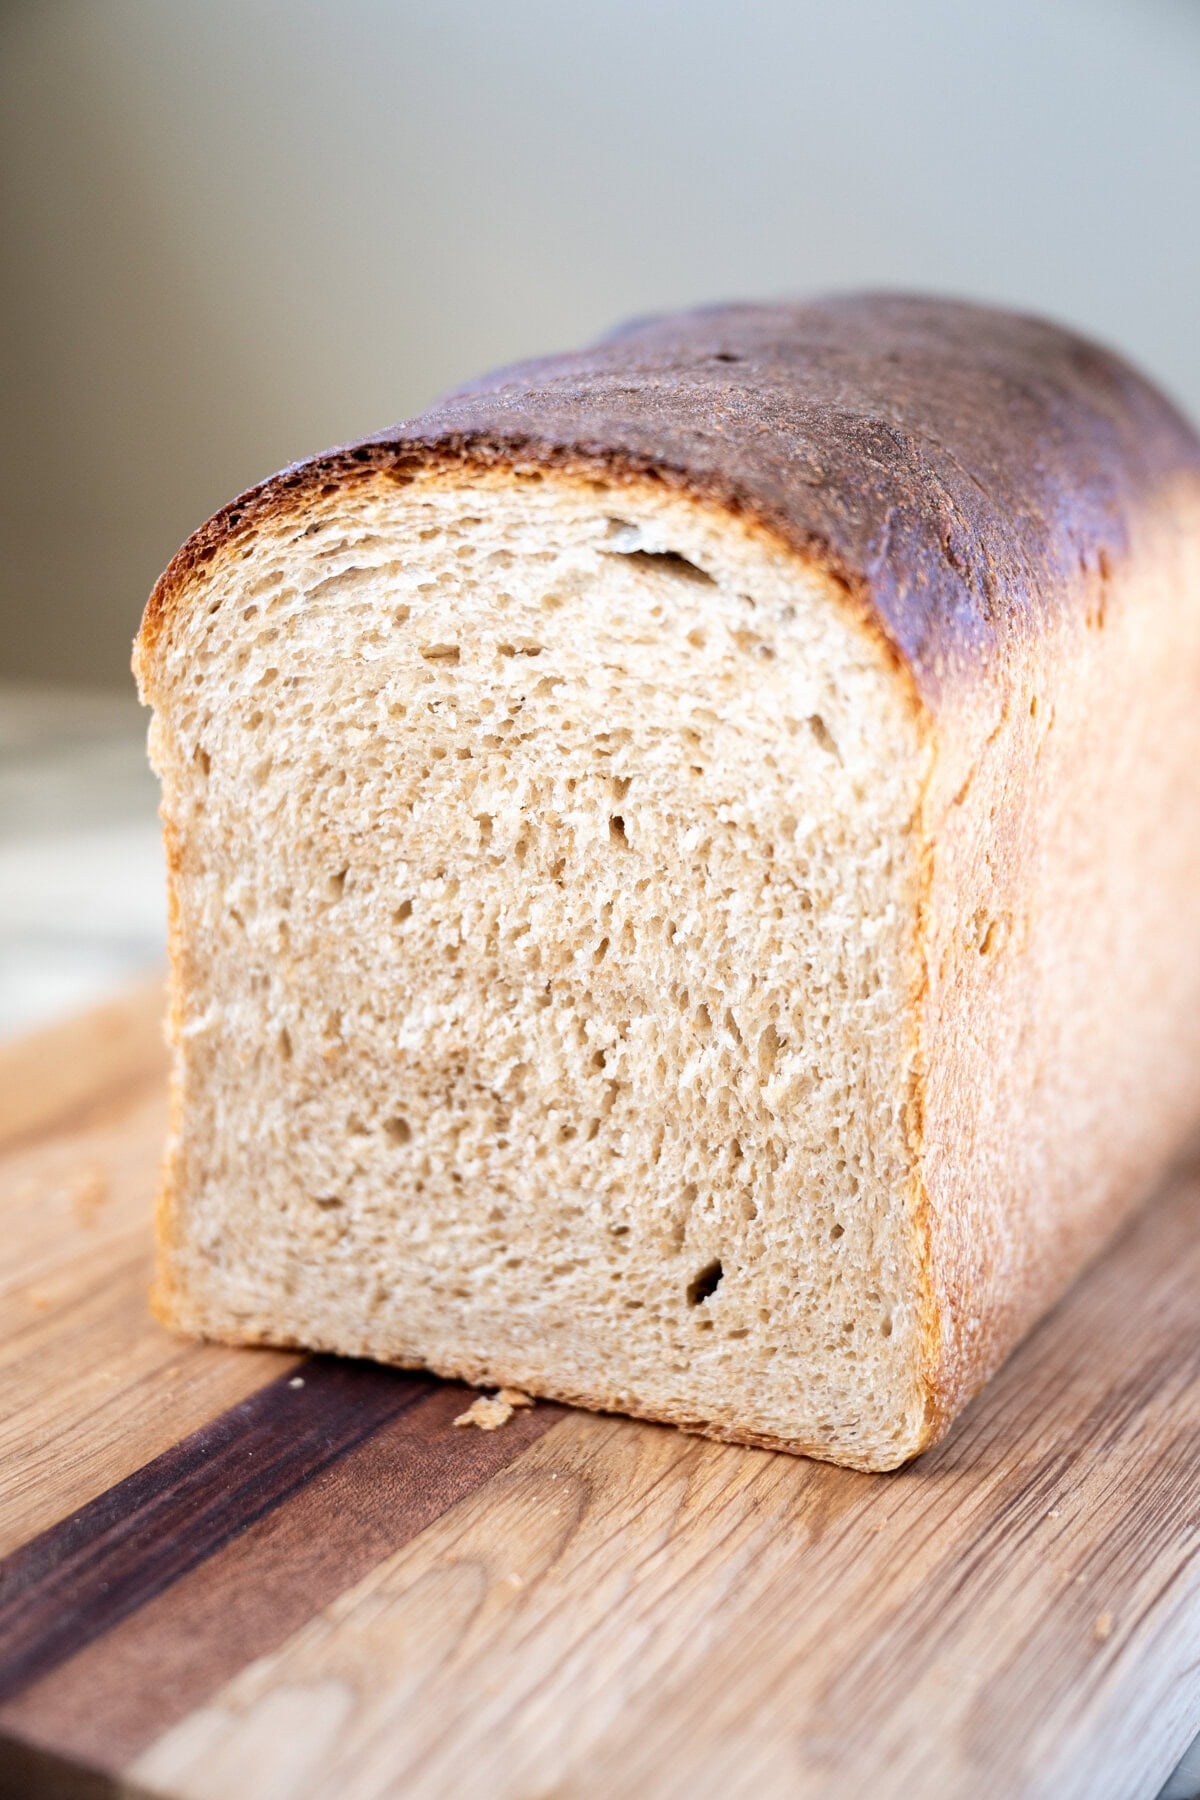
Quick Summary: The dough should look airy, slightly domed, and fill most of the pan before baking.
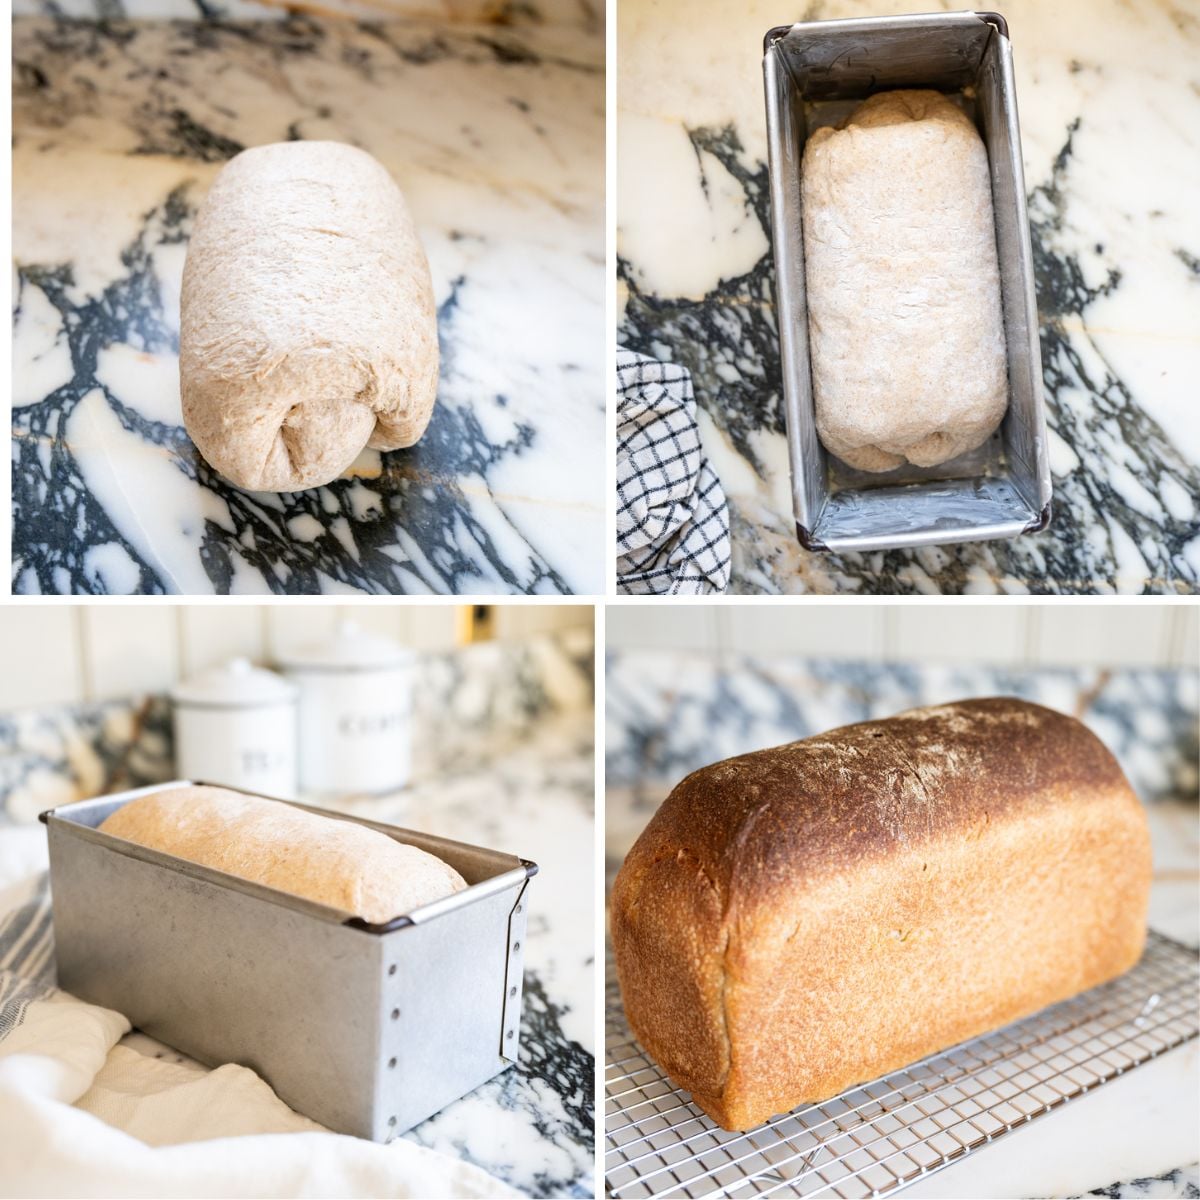
8. Bake the bread
Preheat the oven to 375°F about 30 minutes before the dough finishes proofing.
Bake for 40 to 45 minutes until the crust is golden brown and the internal temperature reaches 190°F to 200°F.
9. Finish and cool
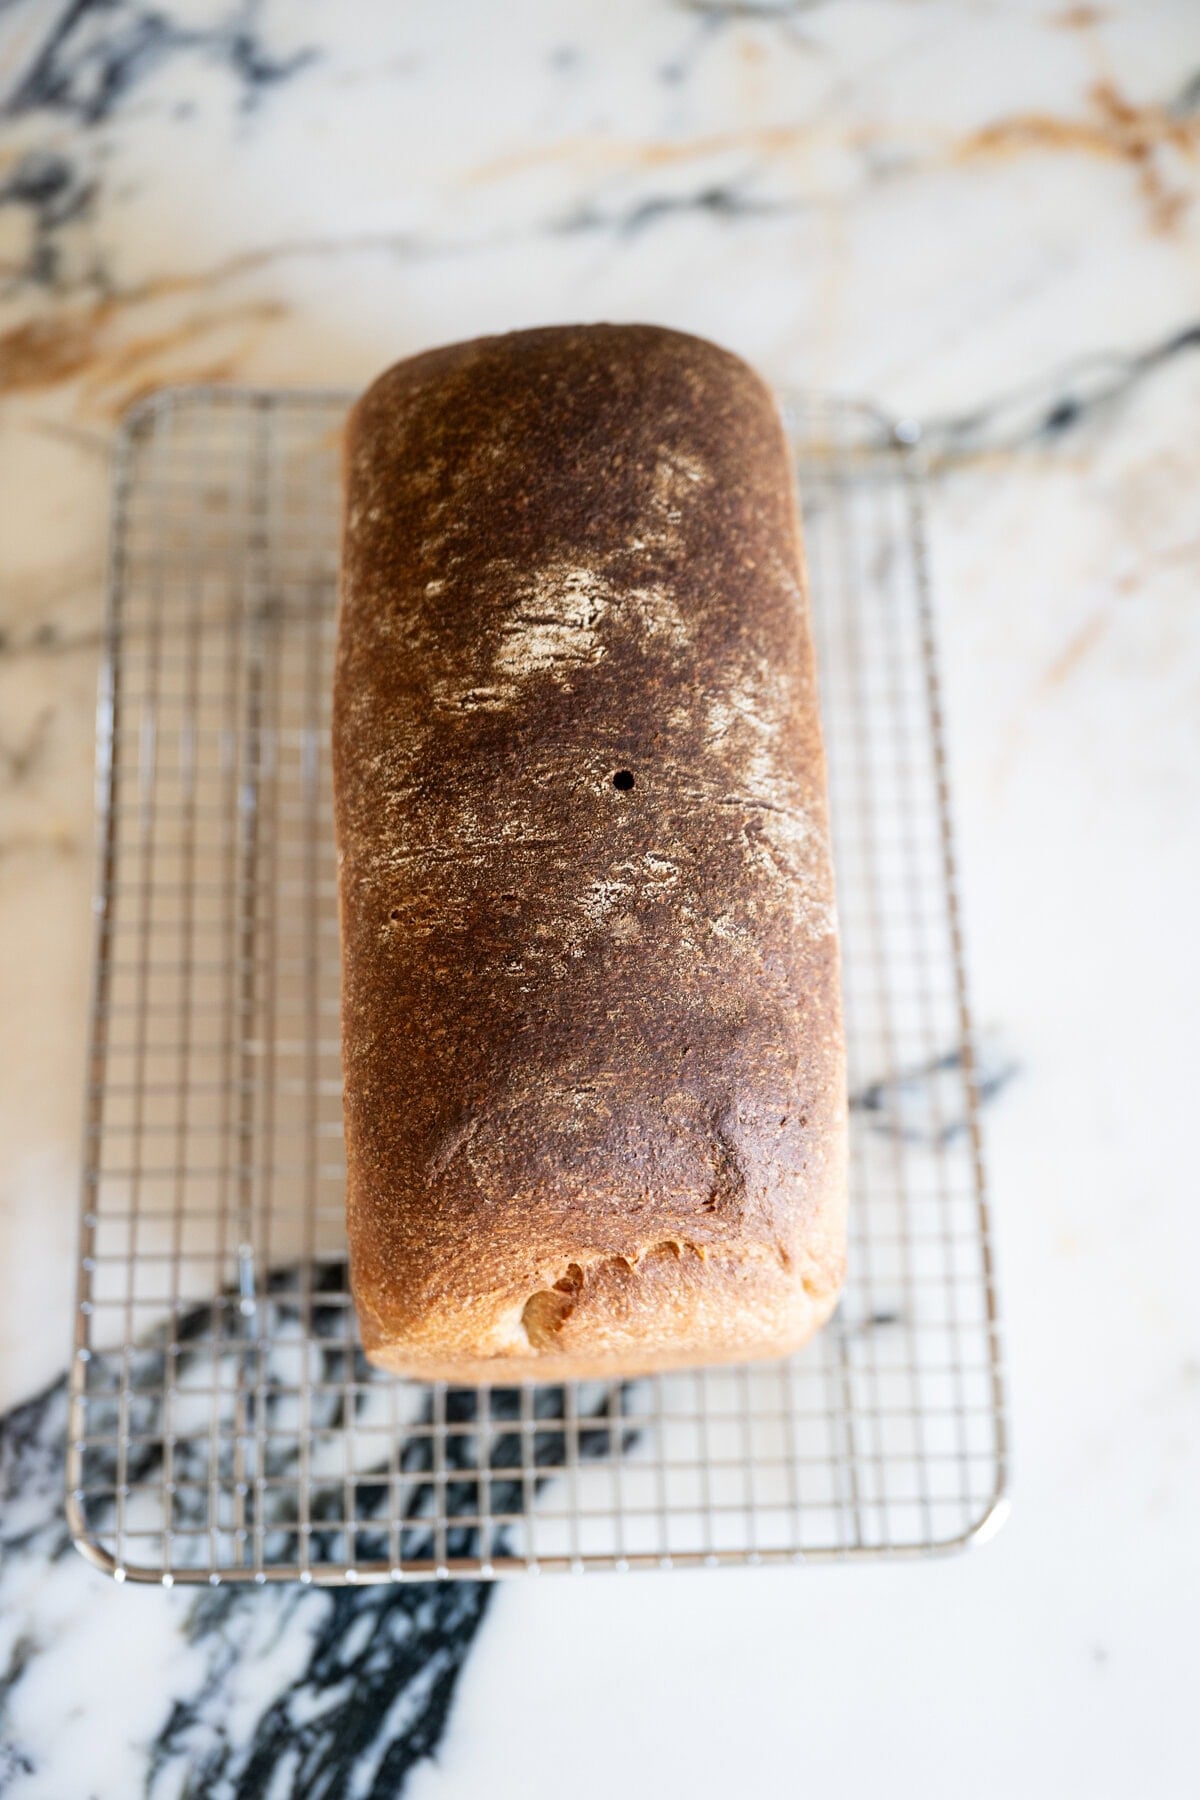
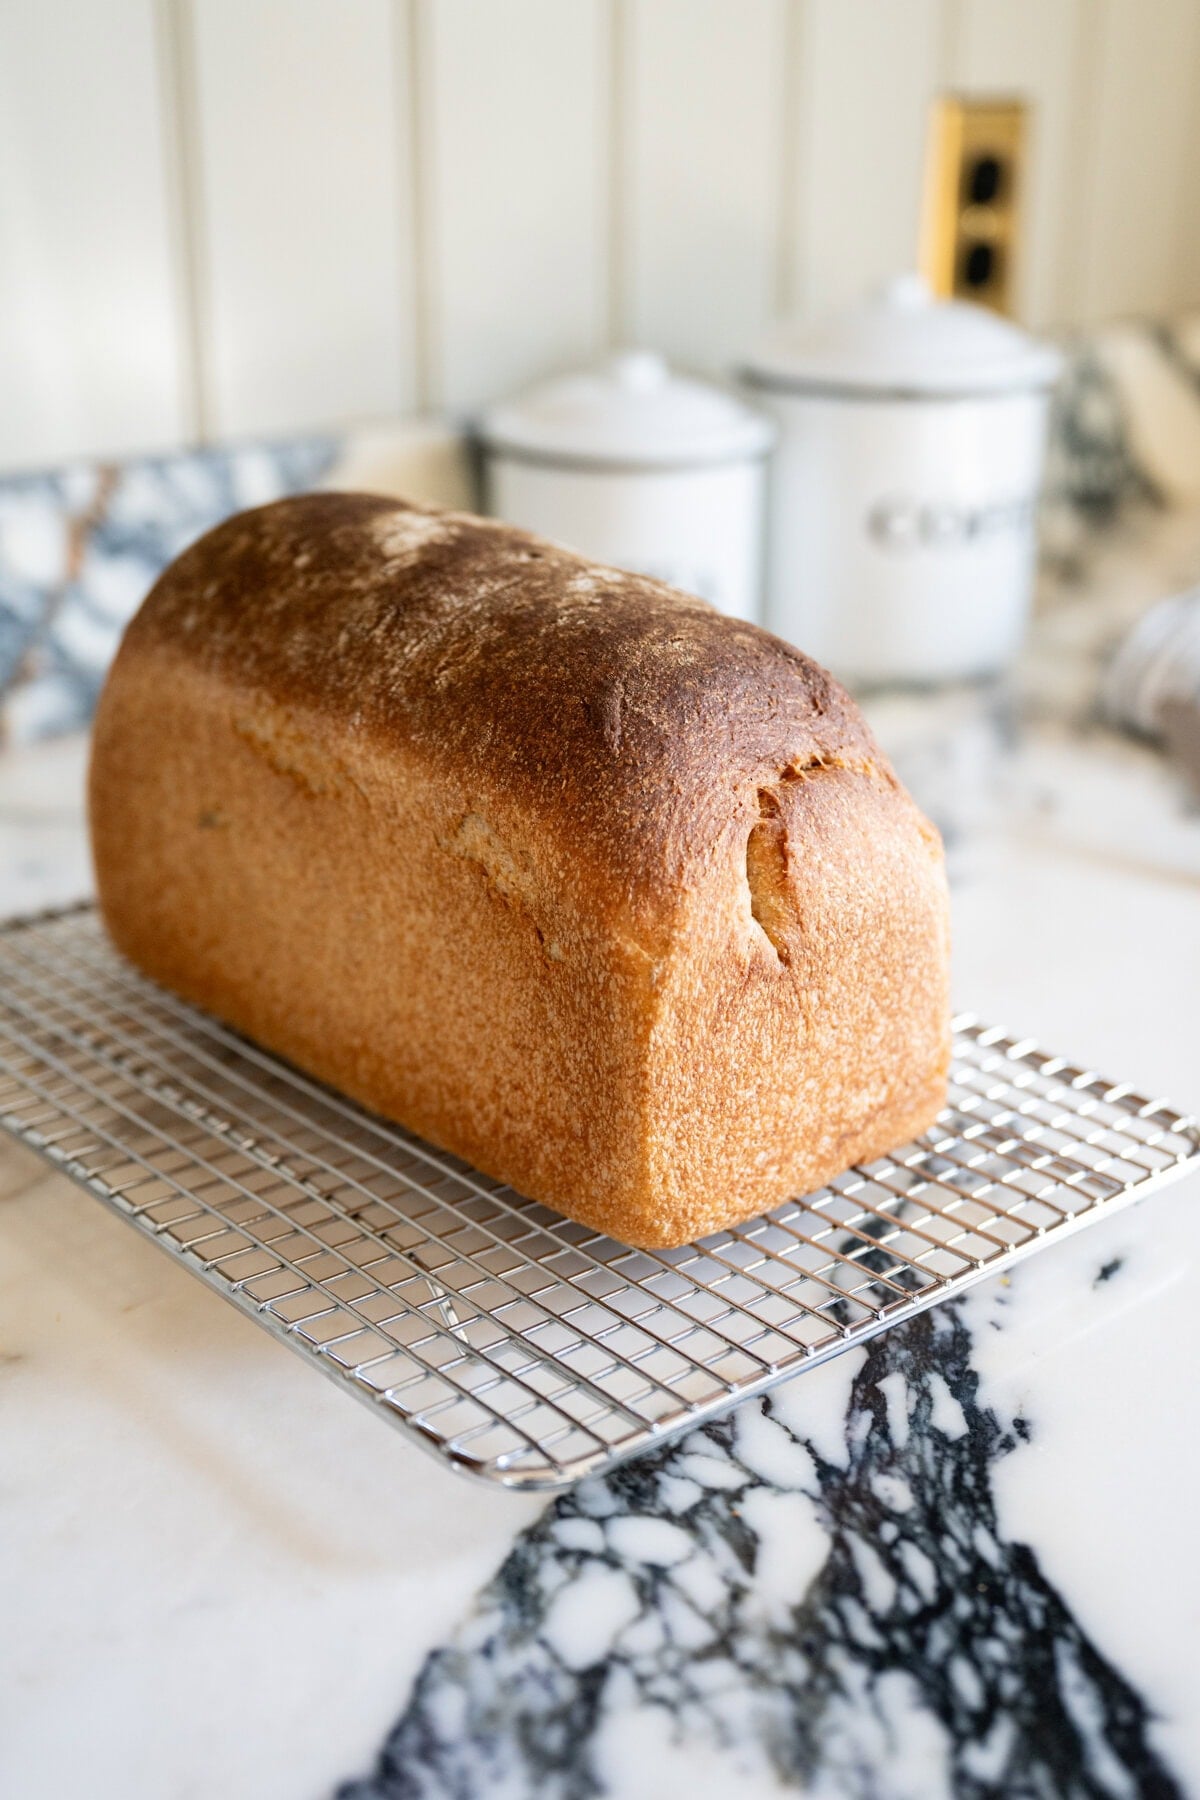
Remove the loaf from the pan immediately after baking.
Brush the top of the loaf with melted butter or coconut oil while it is still warm to keep the crust soft.
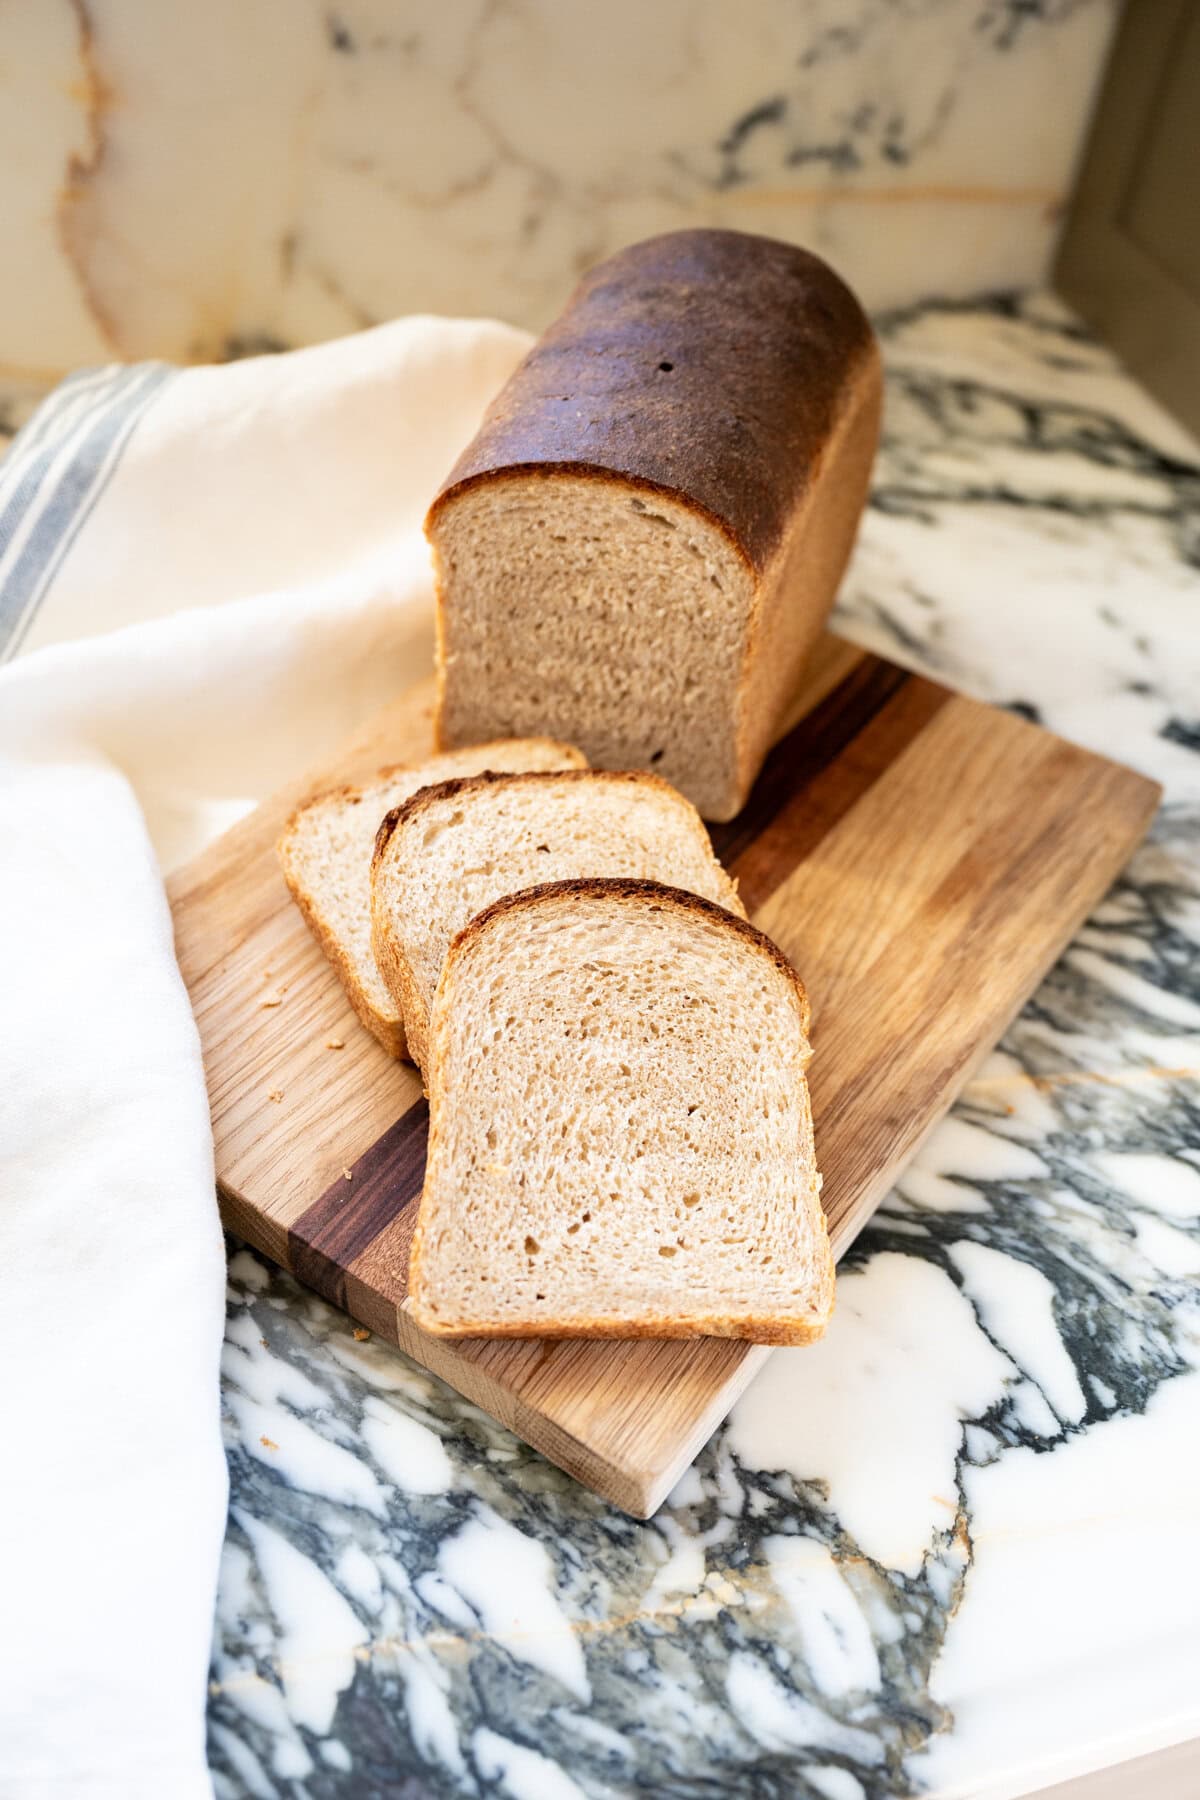
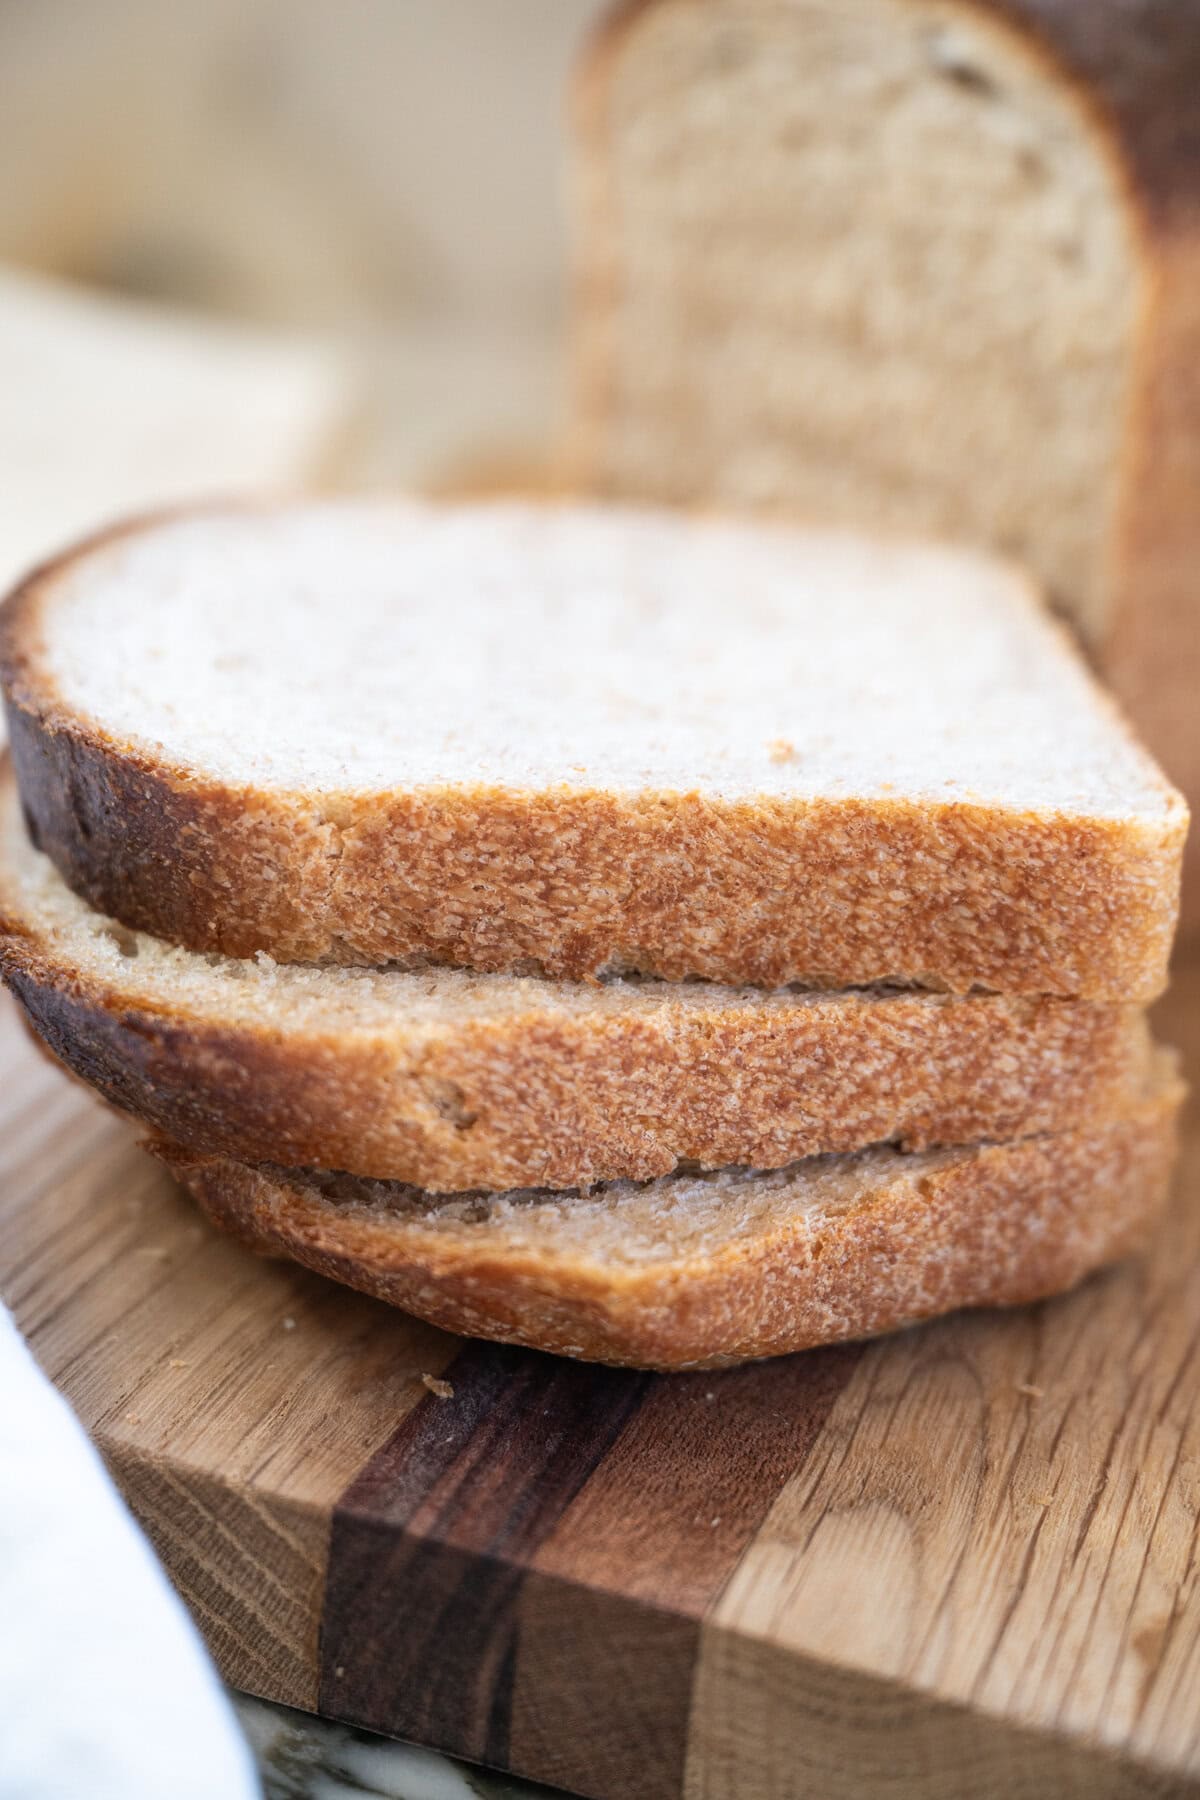
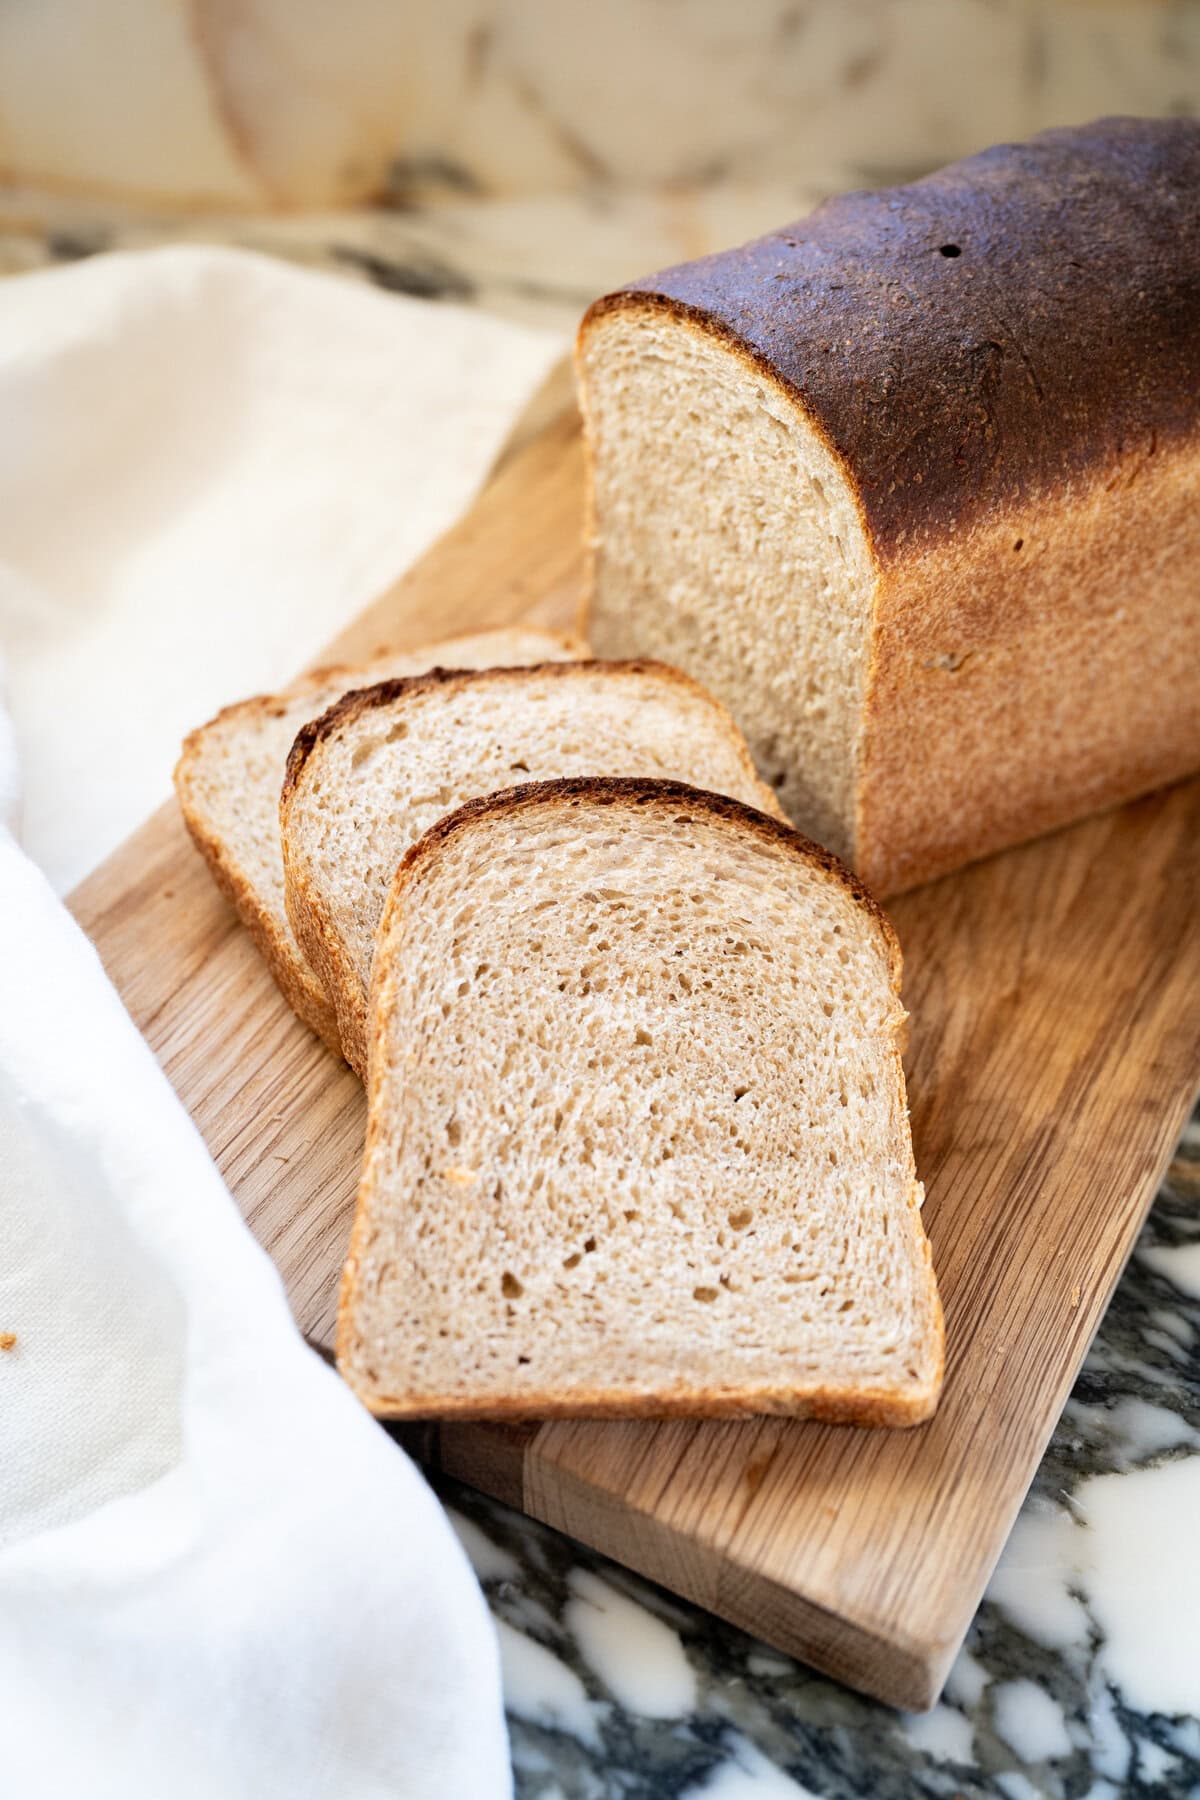
Transfer to a wire rack and cool for at least 1 hour before slicing.
Pro Tip: Cooling fully is essential for a clean slice and stable crumb structure.
Recipe Tips and Tricks
- Use an active starter: Your sourdough starter should be bubbly and able to double within 4 to 6 hours after feeding for the best rise.
- Use a kitchen scale: Weighing ingredients is the best way to get consistent results, especially with sourdough and whole wheat flour.
- Do not rush bulk fermentation: A longer rise builds better flavor and prevents dense bread.
- Keep hands wet during folds: Lightly wet hands make stretch and folds much easier with sticky dough.
- Avoid adding extra flour: Too much flour during shaping can make the loaf dry and heavy.
- Proof until the dough fills the pan: The dough should look airy and rise close to the rim for the softest crumb.
- Use a thermometer for doneness: The bread is fully baked when the internal temperature reaches 190°F to 200°F.
- Remove from the pan right away: This prevents the crust from steaming and turning soggy.
- Brush with butter while warm: This keeps the crust soft and gives the loaf a classic sandwich bread finish.
- Cool before slicing: Let the loaf cool at least 1 hour so the crumb sets and slices cleanly.
- Double the recipe: This recipe doubles well if you want to make two loaves. Simply double all ingredients and divide the dough evenly between two loaf pans.
How to Store and Freeze Your Bread
- Room Temperature Storage – Store your loaf in an airtight container or bread bag for up to 3 days.
- Freezing – Slice the loaf then freeze slices in a zipper bag. This keeps your bread fresh longer and makes it easy to toast straight from frozen.
If you bake often, consider doubling the recipe and freezing one loaf sliced for easy weekday toast and sandwiches.
Serving Ideas
- Tuna or chicken salad sandwiches or open-faced tuna melts
- Toasted with avocado and olive oil
- Peanut butter and jam or honey for breakfast
- Turkey and greens sandwiches
- Classic grilled cheese on fresh bread
Example: Turn leftover slices into French toast or bread pudding for brunch.
If you are looking for another soft sourdough option to serve with dinner, try my easy sourdough naan recipe, which is quick to cook and perfect with dips and curries.
Variations (Use This Base Dough)
This recipe is a perfect starting point for future sourdough recipes.
Try:
- replacing 50 g of whole wheat flour with rye flour
- adding sunflower seeds or flax
- adding oats on top of the loaf
- swapping honey for maple syrup
- using white whole wheat flour for a lighter flavor
- turning it into a cinnamon raisin loaf
- making it vegan-friendly by using plant milk and plant butter
This recipe also doubles beautifully if you want to make two loaves at once. This is what I usually do, then I turn the second loaf into a cinnamon raisin sourdough sandwich bread for a sweeter option that is perfect for toast. You can find the full shaping and swirl instructions in my Cinnamon Raisin Sourdough Sandwich Bread recipe.
If you love soft, chewy sourdough breads, you should also try my sourdough focaccia bread recipe, which is one of the easiest and most rewarding sourdough bakes.
FAQs: Whole Wheat Sourdough Sandwich Bread
Yes, either can be used here. Just be aware that a whole wheat starter may ferment faster, so watch the rise time carefully.
Your starter should double in size within 4 to 6 hours after feeding and look bubbly. If it rises slowly or smells overly acidic, feed it a couple of times before baking.
Sticky dough is normal early on. Wet your hands and continue folding. The dough will strengthen after a couple of rounds. Avoid adding too much flour, which can make the loaf dry.
Whole wheat flour absorbs more water and contains bran, which slows gluten development. This means whole wheat sourdough often needs a longer fermentation time to fully rise.
Yes, but it will take longer and will produce a more pronounced sour-tasting bread.
Yes. Replace the milk with non-dairy milk for similar results or with more water, but the crumb will be slightly less tender and less rich.
Over fermentation can increase acidity. Shorten the bulk fermentation slightly or reduce the fridge time if your starter is very active.
This usually happens when the sourdough starter is not active enough or the dough has not fermented long enough. Your starter should be bubbly and able to double after feeding before baking.
Soft sourdough sandwich bread comes from milk, oil, and honey in the dough, plus proper fermentation. Baking in a loaf pan and brushing the crust with butter after baking also keeps it soft.
Dense sourdough sandwich bread is usually caused by under fermentation, an inactive starter, or too much whole wheat flour. Make sure your dough is well risen, airy, and doubled in size before baking.
The bread is done when the crust is golden brown and the internal temperature reaches 190°F to 200°F. It should sound hollow when tapped on the bottom.
Bulk fermentation will vary by location, but usually takes at least 3-5 hours and up to 8-12 hours depending on temperature and humidity, followed by a final proof in the pan until the dough reaches near the rim and looks airy and puffy.
Brushing butter (or coconut oil) on warm sourdough sandwich bread keeps the crust soft and moist. It also improves texture and helps the bread stay fresh longer.
Final Thoughts
This whole wheat sourdough sandwich bread is a true everyday staple. It is soft, lightly sweet from honey, and balanced with the nutty flavor of whole wheat flour, making it both wholesome and comforting.
What makes this loaf so reliable is the process. The bulk fermentation and overnight rest give you flexibility, while the loaf pan ensures a consistent shape and soft, even crumb every time.
It is the kind of bread that works for everything from morning toast to simple sandwiches, and once you bake it a few times, it quickly becomes part of your weekly routine.
Final Tip: Be patient with the final proof. Letting the dough fully rise in the pan is what gives you the softest texture and best sliceable loaf.
And if you are in the mood for a fun weekend baking project, my sourdough bagel recipe is another favorite that uses the same naturally fermented starter.
More Sourdough Bread Recipes to Try:
- Start Here: How to Make Sourdough Starter from Scratch
- Cinnamon Raisin Sourdough Sandwich Bread Recipe (Swirl Loaf)
- Homemade Artisan Sourdough Bread Recipe
- Sourdough Focaccia Bread Recipe (Easy – No-Knead)
- Artichoke Olive and Spinach Stuffed Sourdough Star Bread
- Sourdough Bagel Recipe | Easy Homemade Chewy Bagels
- Easy Sourdough Naan Recipe (No Yeast, No Oven!)
Love This Recipe?
Please leave a star rating of the recipe and let me know what you think in a comment below. This small act is a great way to show your support for the food blogs you read and love.

Soft Honey Whole Wheat Sourdough Sandwich Bread
Equipment
- 1 9 x 4 inch pullman loaf pan or standard 1 pound loaf pan
Ingredients
- 110 g water at room temperature
- 40 g sourdough starter recently fed and active
- 240 g milk at room temperature
- 40 g honey
- 30 g extra-light olive oil or any neutral-tasting oil
- 250 g bread flour
- 250 g whole wheat flour (can replace 50 g with rye flour)
- 10 g kosher salt
- 2 tbs butter or coconut oil for greasing pan and brushing top of loaf
Instructions
- In a large mixing bowl, add the water and active sourdough starter. Break up the starter with a fork or dough whisk until mostly dissolved.
- Add the milk, oil, and honey and mix until fully combined.
- Add the bread flour, whole wheat flour, and salt. Mix until a sticky dough forms and all ingredients are fully incorporated.
- Cover the bowl and let the dough rest for 30 to 60 minutes at room temperature.
- With wet hands, perform 3 to 4 rounds of stretch and folds (or coil folds) every 15 minutes.
- Cover and bulk ferment at room temperature (or transfer to the refrigerator to slow the fermentation) until the dough is puffy and doubled in volume. *See detailed notes about bulk ferment times in the post.
- Turn the dough out onto a lightly floured surface and gently press into a rectangle. Fold in thirds like a letter, then roll tightly from the short side into a log shape.
- Grease a loaf pan or pullman pan well with butter or cooking spray. Place the dough seam-side down into the prepared pan. Cover loosely with plastic wrap or a proofing bag.
- Proof at room temperature until the dough rises close to the rim of the pan and looks airy.
- Preheat the oven to 375°F about 30 minutes before the loaf finishes proofing.
- Bake for 40 to 45 minutes until deep golden brown and the internal temperature reaches 190°F to 200°F.
- Run a butter knife or offset spatula around the edges and remove the loaf from the pan immediately to prevent sweating.
- Brush the top of the loaf with melted butter while still warm to keep the crust soft.
- Cool on a wire rack for at least 1 hour before slicing.
Kaity Farrell
Have a question? Ask me here in the comments! If you’ve made the recipe, please leave your star rating and review. Thanks!