If you have ever wanted to bake a truly crusty artisan loaf at home with a deep sourdough flavor, a chewy interior, and a beautifully blistered crust, this is the artisan sourdough bread recipe to bookmark.
This is the exact method I use as a private chef when I need consistent, bakery-style sourdough loaves. It is reliable, flexible for different schedules, and approachable for beginner bakers. You will build a simple leaven, use an autolyse to strengthen the dough naturally, and develop gluten with coil folds instead of kneading. The result is homemade sourdough bread that looks and tastes like it came from a professional bakery.
If you’re still early in your sourdough journey, start with my guide on how to make sourdough starter from scratch before baking your first artisan loaf.

This recipe makes two artisan sourdough loaves, which is perfect if you want one loaf for the next morning and one to freeze for later.
Quick Summary: This artisan sourdough bread is made with bread flour, rye flour, filtered water, salt, and an active sourdough starter. The dough is strengthened with an autolyse and coil folds, bulk fermented overnight, shaped into two loaves, cold-proofed in banneton baskets, scored with a razor blade, and baked in a preheated cast iron Dutch oven until deep golden brown.
Table of contents
- Why You’ll Love This Artisan Sourdough Bread Recipe
- Ingredients (With What Each Ingredient Does)
- Equipment You’ll Need
- Step-by-Step Artisan Sourdough Bread Recipe
- Step 1: Make the Leaven
- Step 3: Add Leaven to Dough (1 to 3 Hours Later)
- Step 5: Add Salt Water to Dough (30 Minutes to 1 Hour Later)
- Step 6: Coil Folds (4 Rounds Over 1 Hour)
- Step 7: Bulk Fermentation (8 to 12 Hours)
- Step 8: Preshape Loaves
- Step 9: Bench Rest (30 Minutes)
- Step 10: Shape the Loaves
- Step 11: Cold Proof (Second Rise) 8 to 24 Hours
- Step 13: Score the Loaves
- Step 15: Cool Completely
- Timeline Option 1: Morning Start, Bake the Next Morning (Most Reliable)
- Timeline Option 2: Afternoon Start, Bake the Next Day
- Troubleshooting Artisan Sourdough Bread
- Serving Suggestions
- Variations (Easy Ways to Customize This Loaf)
- Recipe FAQs
- More Sourdough Recipes to Try Next
- Love This Recipe?
Why You’ll Love This Artisan Sourdough Bread Recipe
This bread has everything you want in a bakery-style loaf, but it is made with simple ingredients and clear step-by-step instructions.
- Crispy, crackly crust with beautiful blisters
- Soft, chewy crumb with artisan texture
- No stand mixer required
- Great recipe for beginner bakers
- Flexible timeline options for busy schedules
- Deep flavor from long fermentation
This is a classic easy sourdough artisan bread recipe that you can bake again and again with great success.

Ingredients (With What Each Ingredient Does)
Sourdough uses very few ingredients, so quality matters. Each ingredient plays an important role in the fermentation process and final structure.
Leaven
- Sourdough starter (100% hydration): The source of wild yeast that ferments and raises the dough.
- Bread flour: Builds structure and strength in the leaven.
- Rye flour: Boosts fermentation activity and adds depth of flavor.
- Water: Hydrates the flour and helps the leaven become bubbly and active.
Learn how to make sourdough starter from scratch before baking your first artisan loaf.
Dough
- Bread flour: Provides gluten strength for the best rise and chewy crumb.
- Rye flour: Adds flavor and helps fermentation.
- Water: Controls dough hydration and affects crumb openness.
- Kosher salt: Strengthens gluten, improves texture, and balances flavor.
Pro Tip: Filtered water is best if your tap water contains chlorine, since chlorine can slow wild yeast activity.

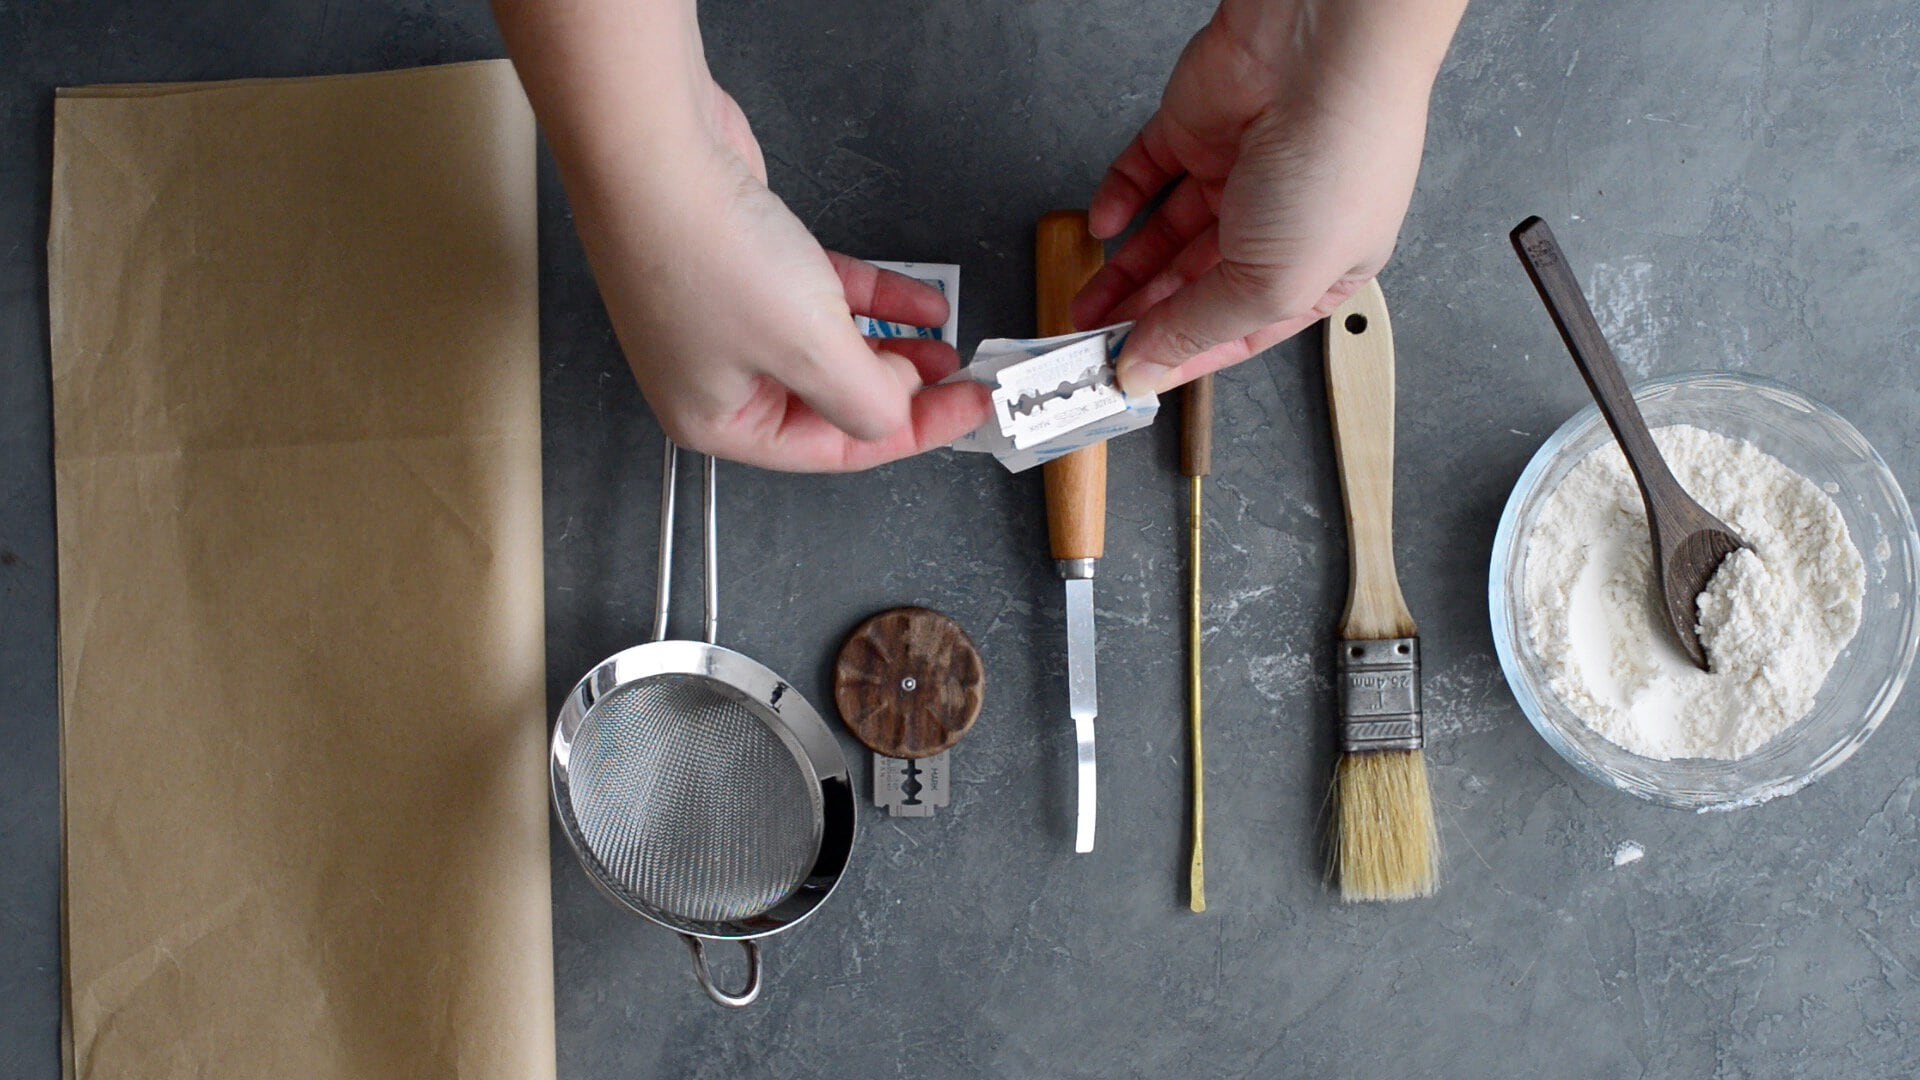
Equipment You’ll Need
- Large mixing bowl
- Dough whisk, spoon, or spatula
- Flexible bowl scraper
- Bench scraper (bench knife)
- 2 proofing baskets (banneton baskets) or bowls lined with towels
- Plastic wrap, plastic bag, or damp tea towel
- Cast iron Dutch oven with lid
- Razor blade or bread lame (or sharp knife)
- Sheet of parchment paper
- Cooling rack
- Optional: thermometer to check internal temperature
Pro Tip: If you are using bowls instead of bannetons, dust the towel heavily with rice flour to prevent sticking.

Before You Start: Is Your Starter Ready?
For best results, use an active starter that has been fed recently and is bubbly and strong.
Your starter is ready when:
- It doubles or triples in a few hours at room temperature
- It smells lightly tangy and slightly sweet
- It looks airy and bubbly throughout
Should You Use the Float Test?
The float test can be helpful, but it is not always reliable. Some active starters do not float depending on flour type and hydration. A better sign is a starter that consistently rises well after feeding.

Step-by-Step Artisan Sourdough Bread Recipe
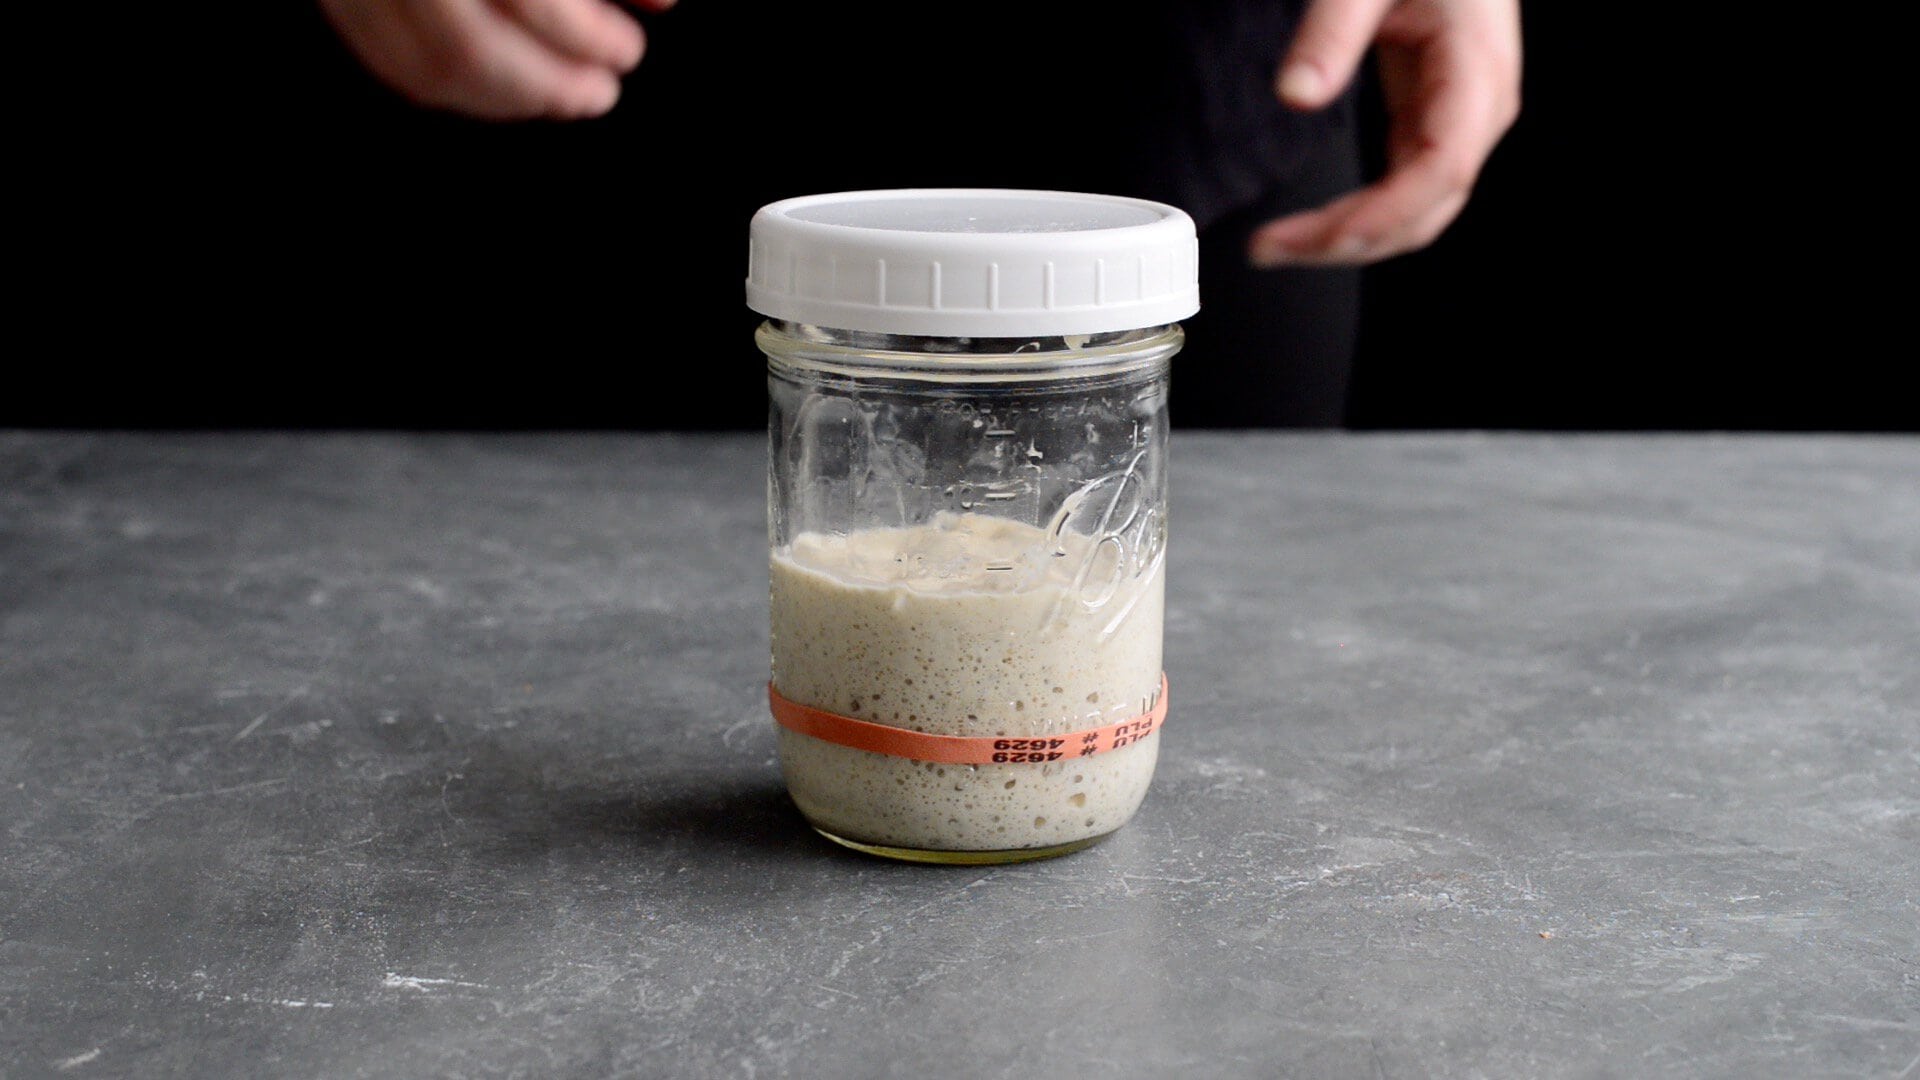
Step 1: Make the Leaven
- Measure 50 grams of starter into a clean jar.
- Add 20 grams bread flour and 5 grams rye flour.
- Add 25 grams water and mix vigorously with a small silicone spatula.
- Scrape down the sides of the jar.
- Loosely cover with a lid and mark the level with a rubber band.
- Place in a warm place to ferment.
The leaven should triple in volume in about 1 to 3 hours, depending on ambient temperature.
When it is ready, it should look bubbly, airy, and domed on top.
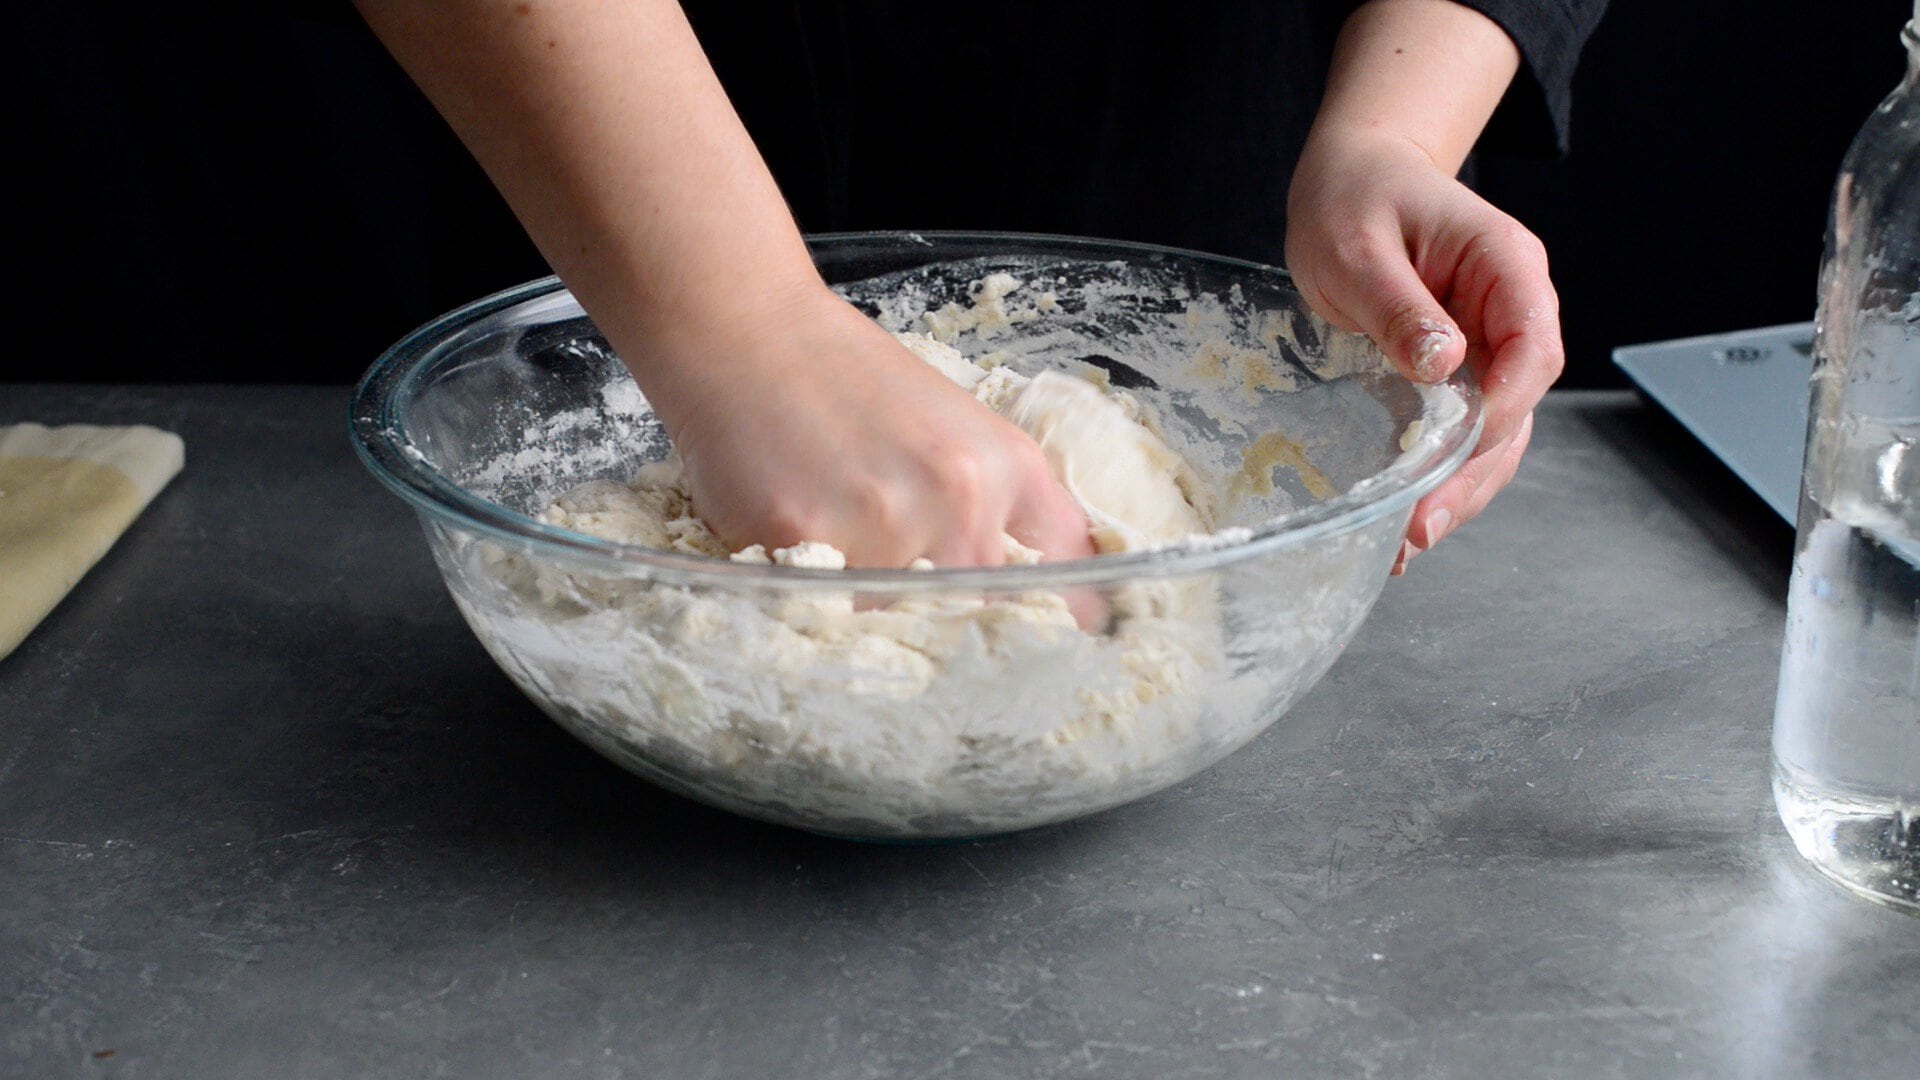
Step 2: Autolyse (Start Right After Preparing the Leaven)
Autolyse hydrates the flour and helps gluten develop naturally, giving you a stronger dough with less work.
- Add 900 grams bread flour and 100 grams rye flour to a large bowl.
- Add 750 grams water.
- Mix with a dough whisk, spoon, or spatula until shaggy.
- Switch to mixing by hand. Squish the dough together until no dry flour remains.
- Use a flexible bowl scraper to clean down the sides and gather the dough.
- Cover with plastic wrap, a plastic bag, or a damp towel.
- Let the dough rest until the leaven is ready (about 1 to 3 hours).
Quick Summary: Autolyse is simply flour and water mixed together and rested. It improves dough strength and crumb texture.
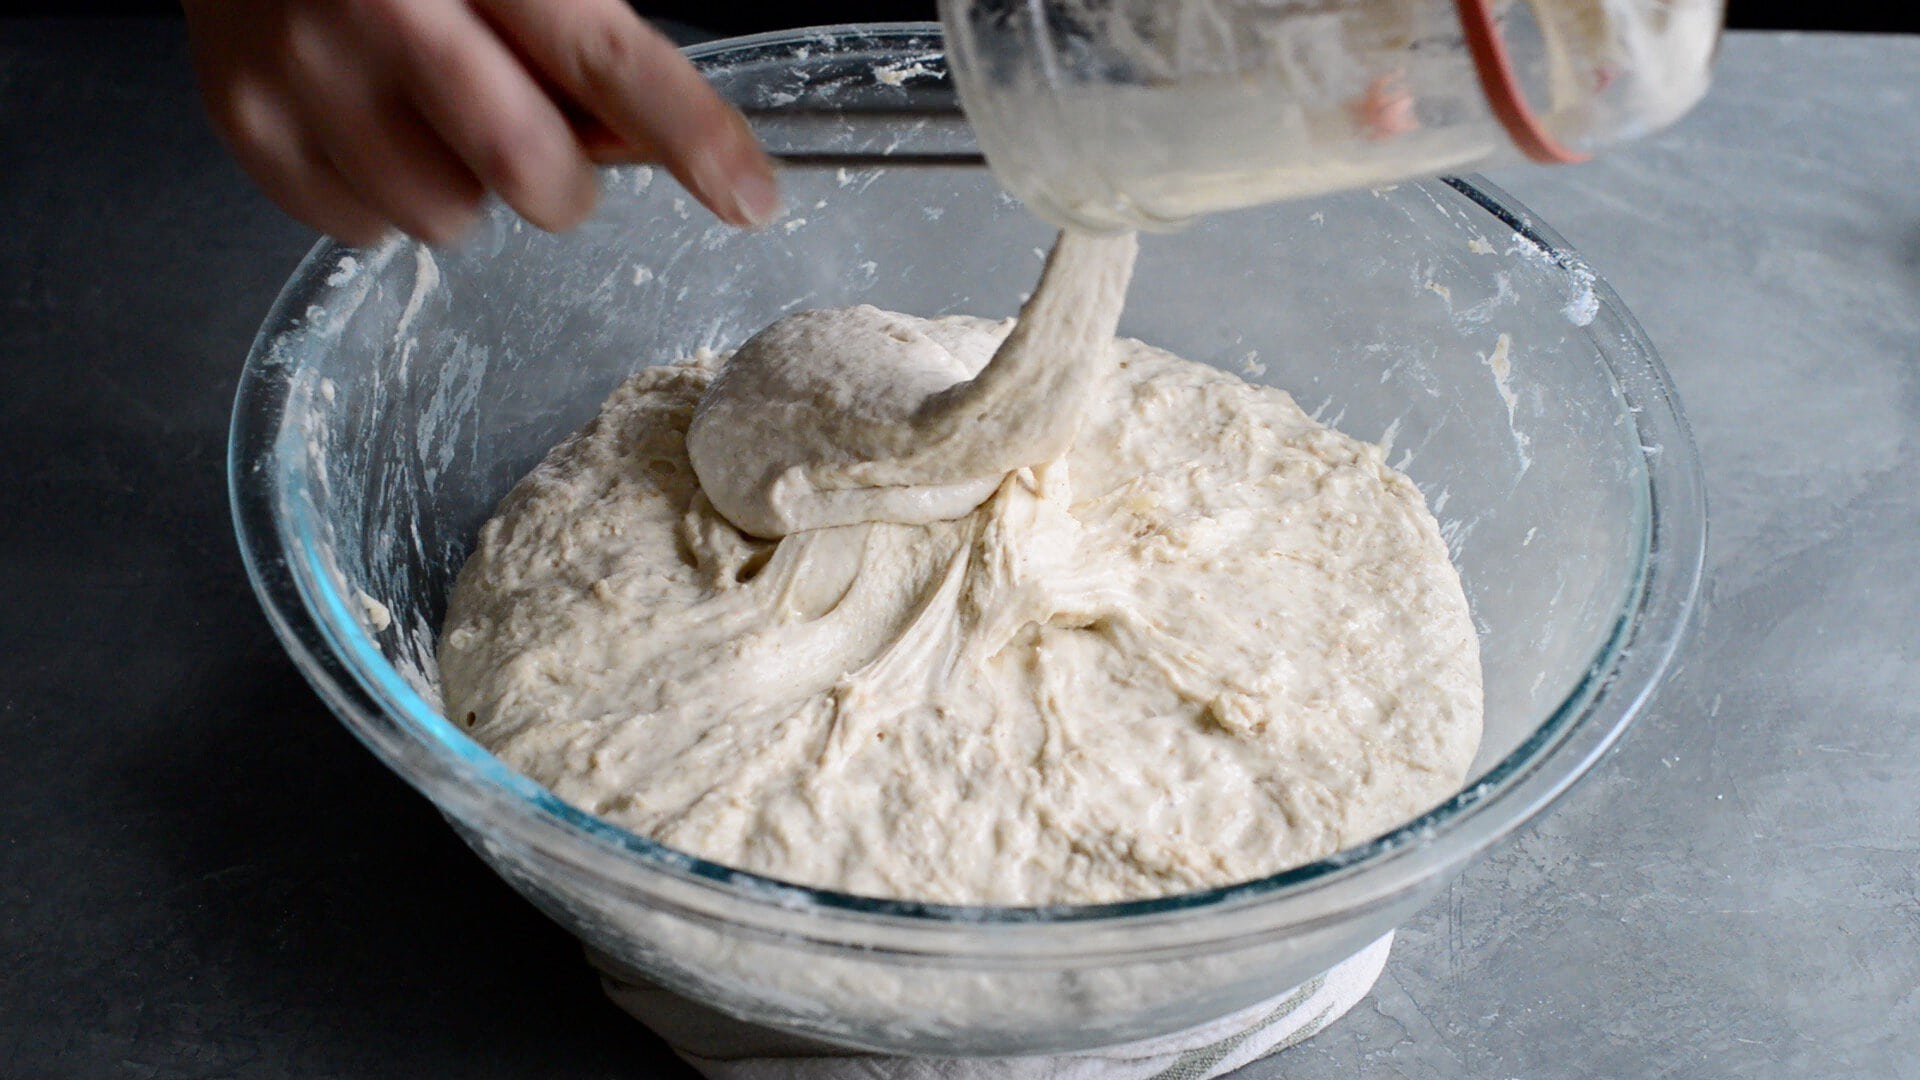
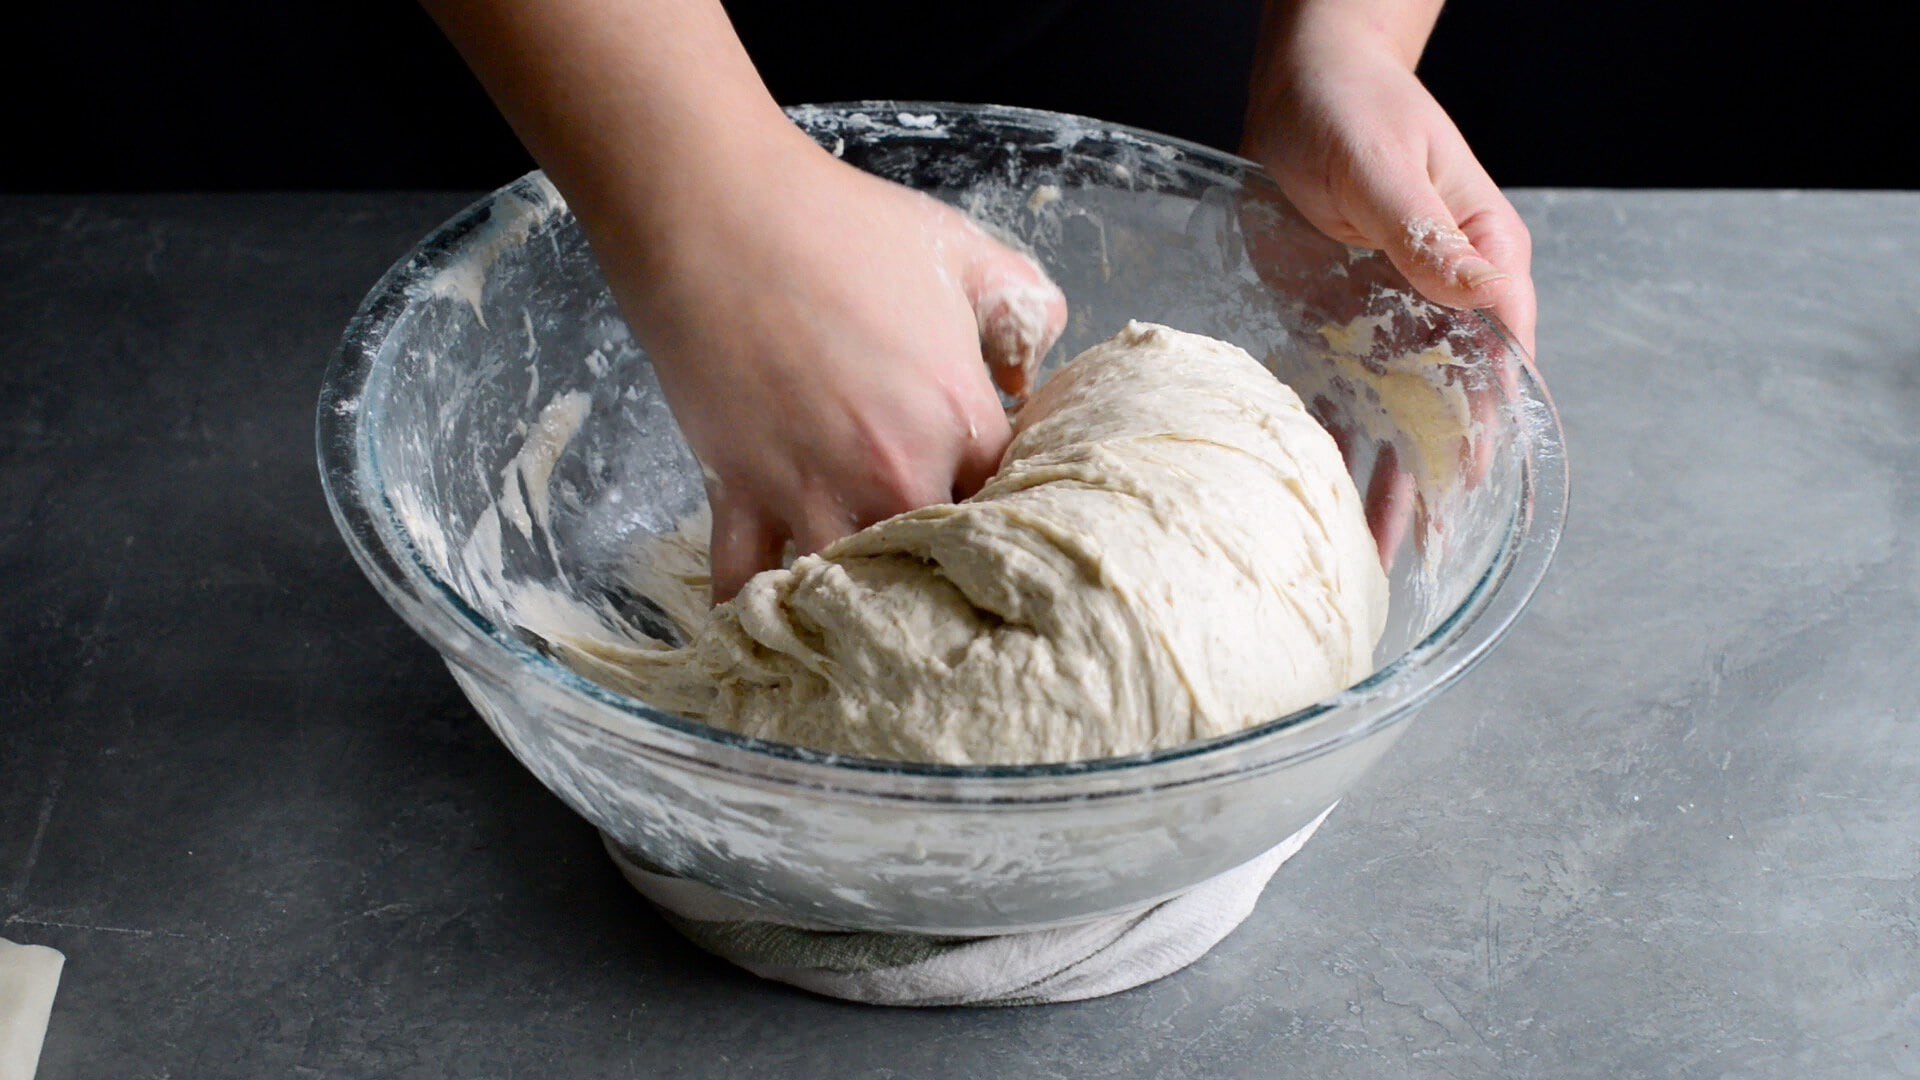
Step 3: Add Leaven to Dough (1 to 3 Hours Later)
- Add the active leaven to the autolyzed dough.
- Use a spatula to scrape all the leaven out of the jar.
- Mix the dough and leaven together by hand for about 5 minutes.
- Pull dough from the side of the bowl into the center, then squish the dough between your fingers until combined.
- Use a bowl scraper to scrape down the sides and gather the dough into a ball.
- Cover and let rest for 30 minutes to 1 hour.
This rest helps the wild yeast adjust to the dough before salt is added.
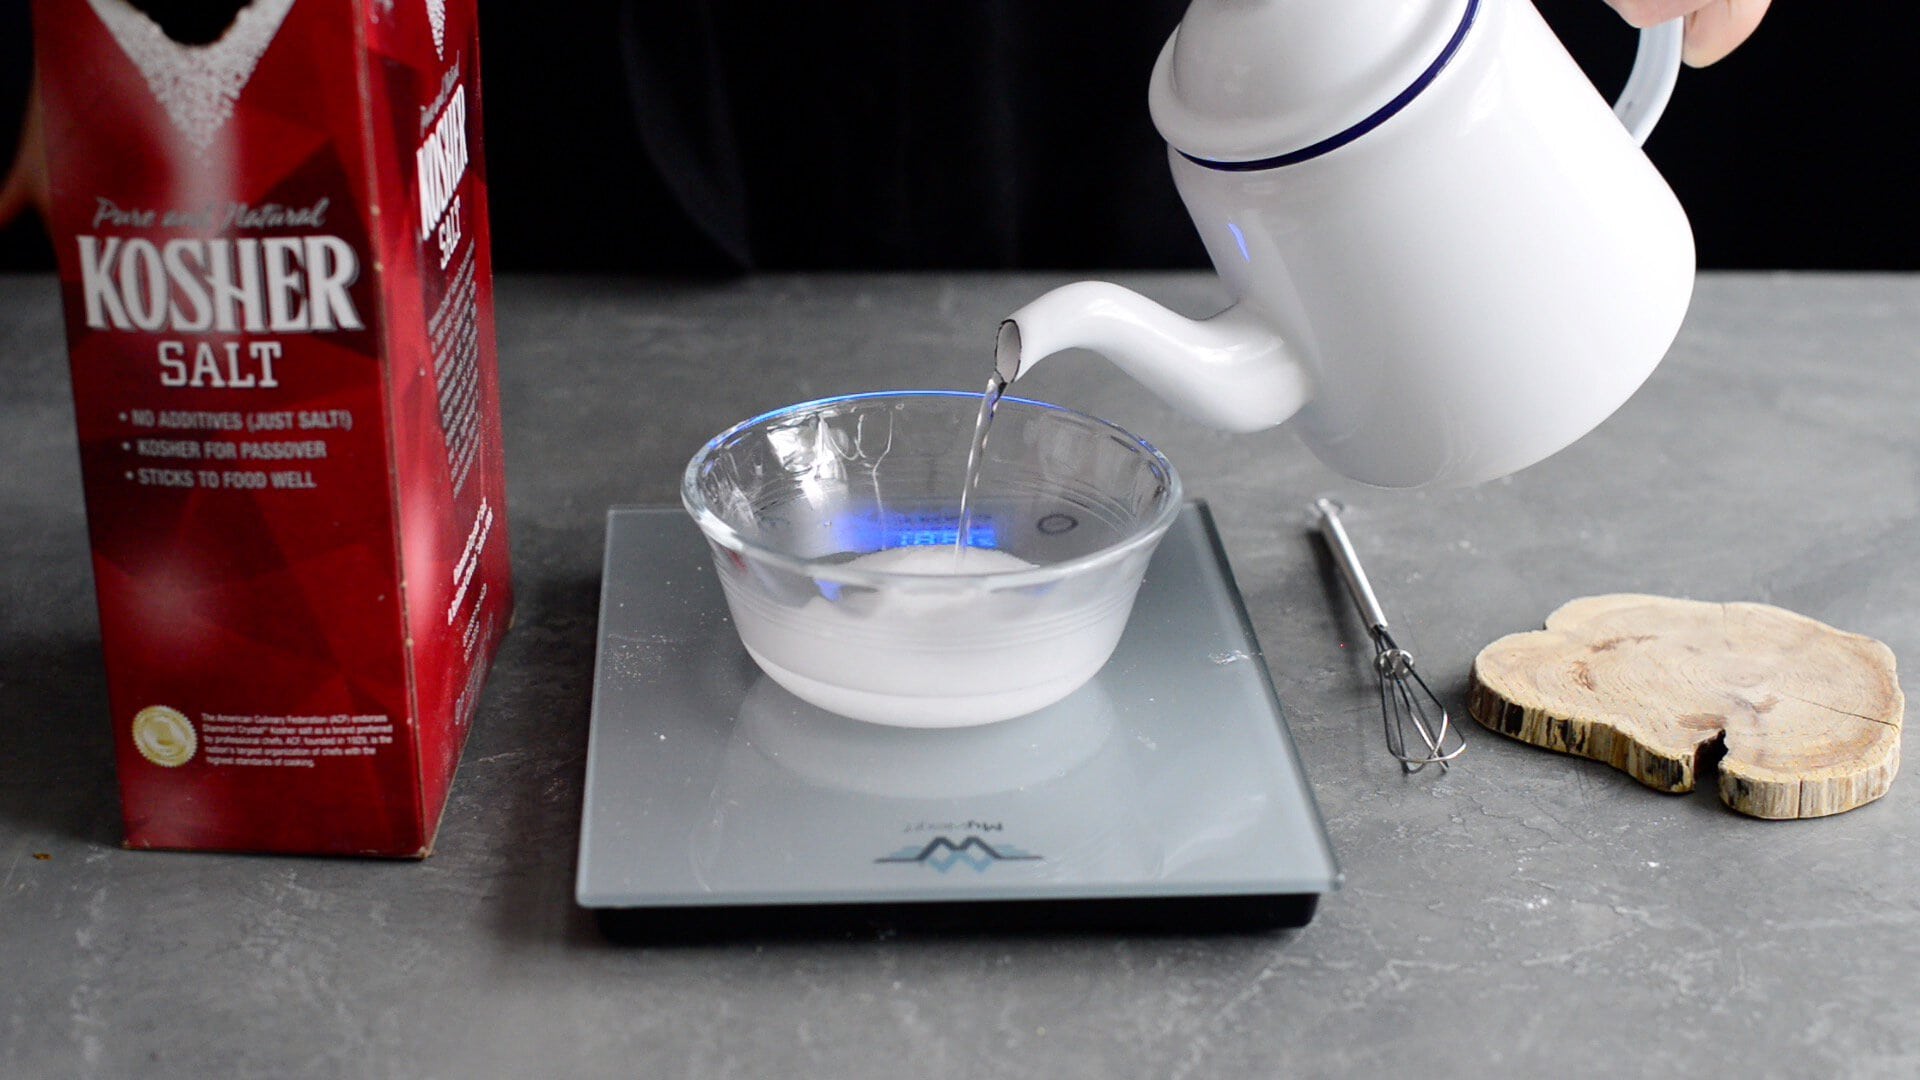
Step 4: Dissolve Salt in Remaining Water
- Dissolve kosher salt into 50 grams hot water in a small bowl.
- Whisk for about 2 minutes until most of the salt dissolves.
- Set aside to cool while the dough is resting.
Step 5: Add Salt Water to Dough (30 Minutes to 1 Hour Later)
- Stretch the dough outward in the bowl to make a well in the center.
- Swirl the salt water mixture and pour it into the well.
- Wet your hand, then fold the dough up and over the water to create a parcel.
- Squish the dough between your fingers for about 5 minutes to fully mix in the salt water.
- Use a bowl scraper to scrape down the sides and gather the dough together.
- Cover and rest for 15 minutes.
Pro Tip: Wet hands are the easiest way to handle sticky dough without adding too much flour.
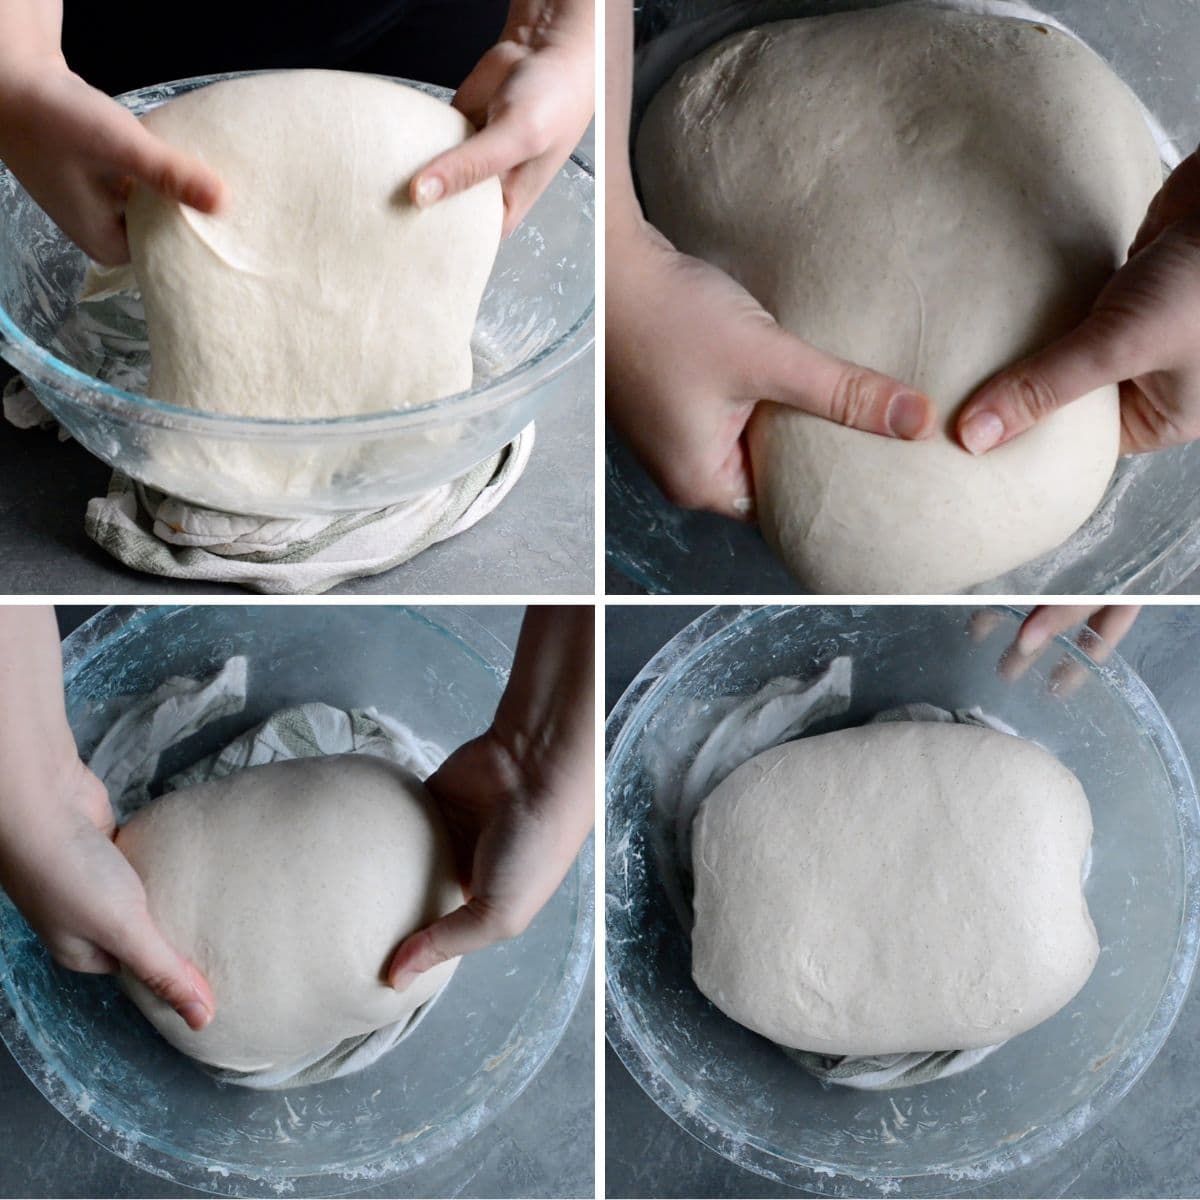
Step 6: Coil Folds (4 Rounds Over 1 Hour)
Coil folds build gluten strength without kneading. This is one of the best techniques for an easy artisan sourdough bread recipe.
- Keep a small bowl of water nearby to wet your hands.
- Loosen the dough from the sides of the bowl.
- Tuck both hands under the dough on the far side and lift gently to stretch.
- Coil the dough under itself.
- Repeat about 3 times, then turn the bowl 180 degrees and repeat.
- Turn the bowl 90 degrees and repeat again, like points on a compass.
Cover and rest for 15 minutes.
Repeat this process for a total of 4 rounds of coil folds over the next hour at 15-minute intervals.
After the final coil fold, transfer the dough to a clean bowl and cover.
Example: If the dough tears during the first stretch, do not force it. Let it rest and continue with the next round. The dough becomes stronger with time.
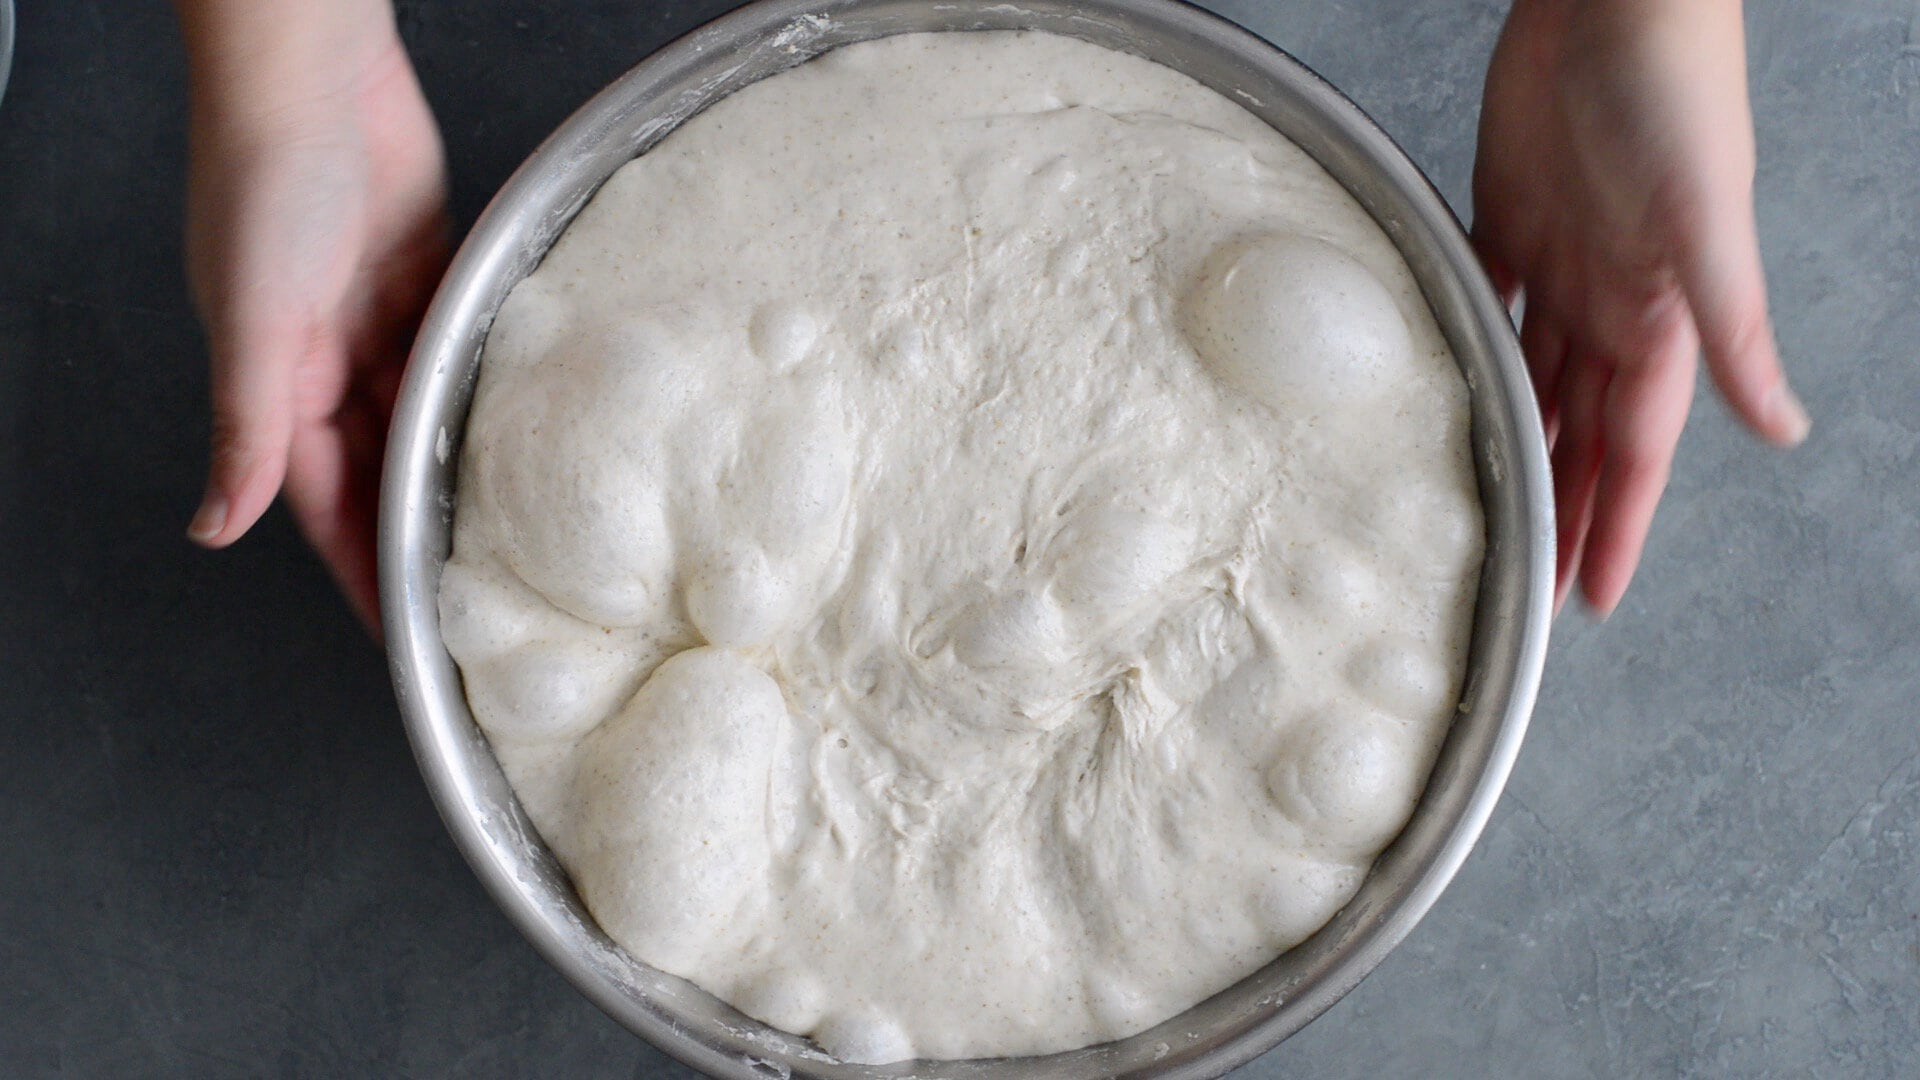
Step 7: Bulk Fermentation (8 to 12 Hours)
Bulk fermentation is where the dough rises and develops flavor.
- Cover the dough and leave it at room temperature.
- Let it bulk ferment until doubled in volume.
- Look for bubbles on the top of the dough.
- The dough should feel soft, airy, and jiggly.
Bulk fermentation will take about 8 to 12 hours, depending on dough temperature and the temperature of your kitchen.
How to Know Bulk Fermentation Is Done:
- Dough has doubled
- Surface looks domed and bubbly
- Dough feels lighter and elastic
- Large bubbles may appear on top and around the sides
Pro Tip: In a warm kitchen, bulk rise may finish faster than 8 hours. In a cooler kitchen, it may take longer than 12 hours.
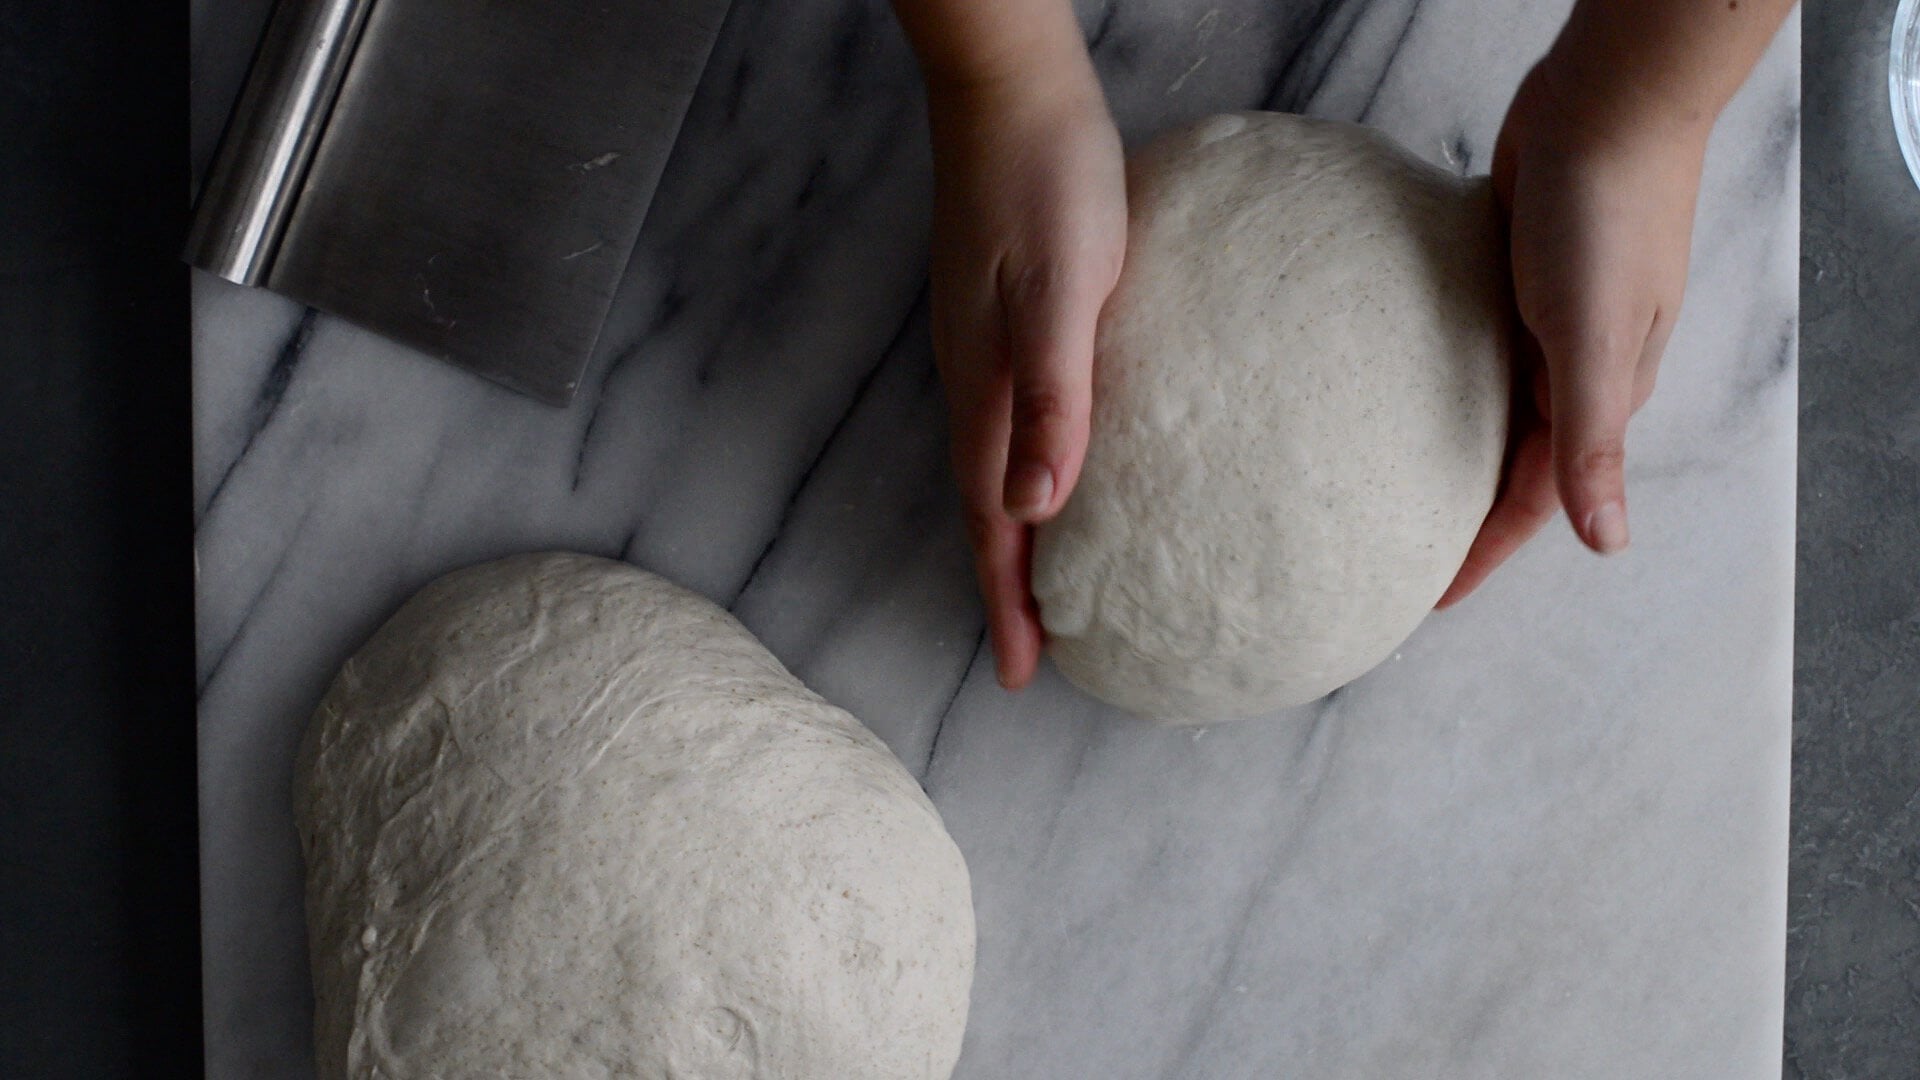
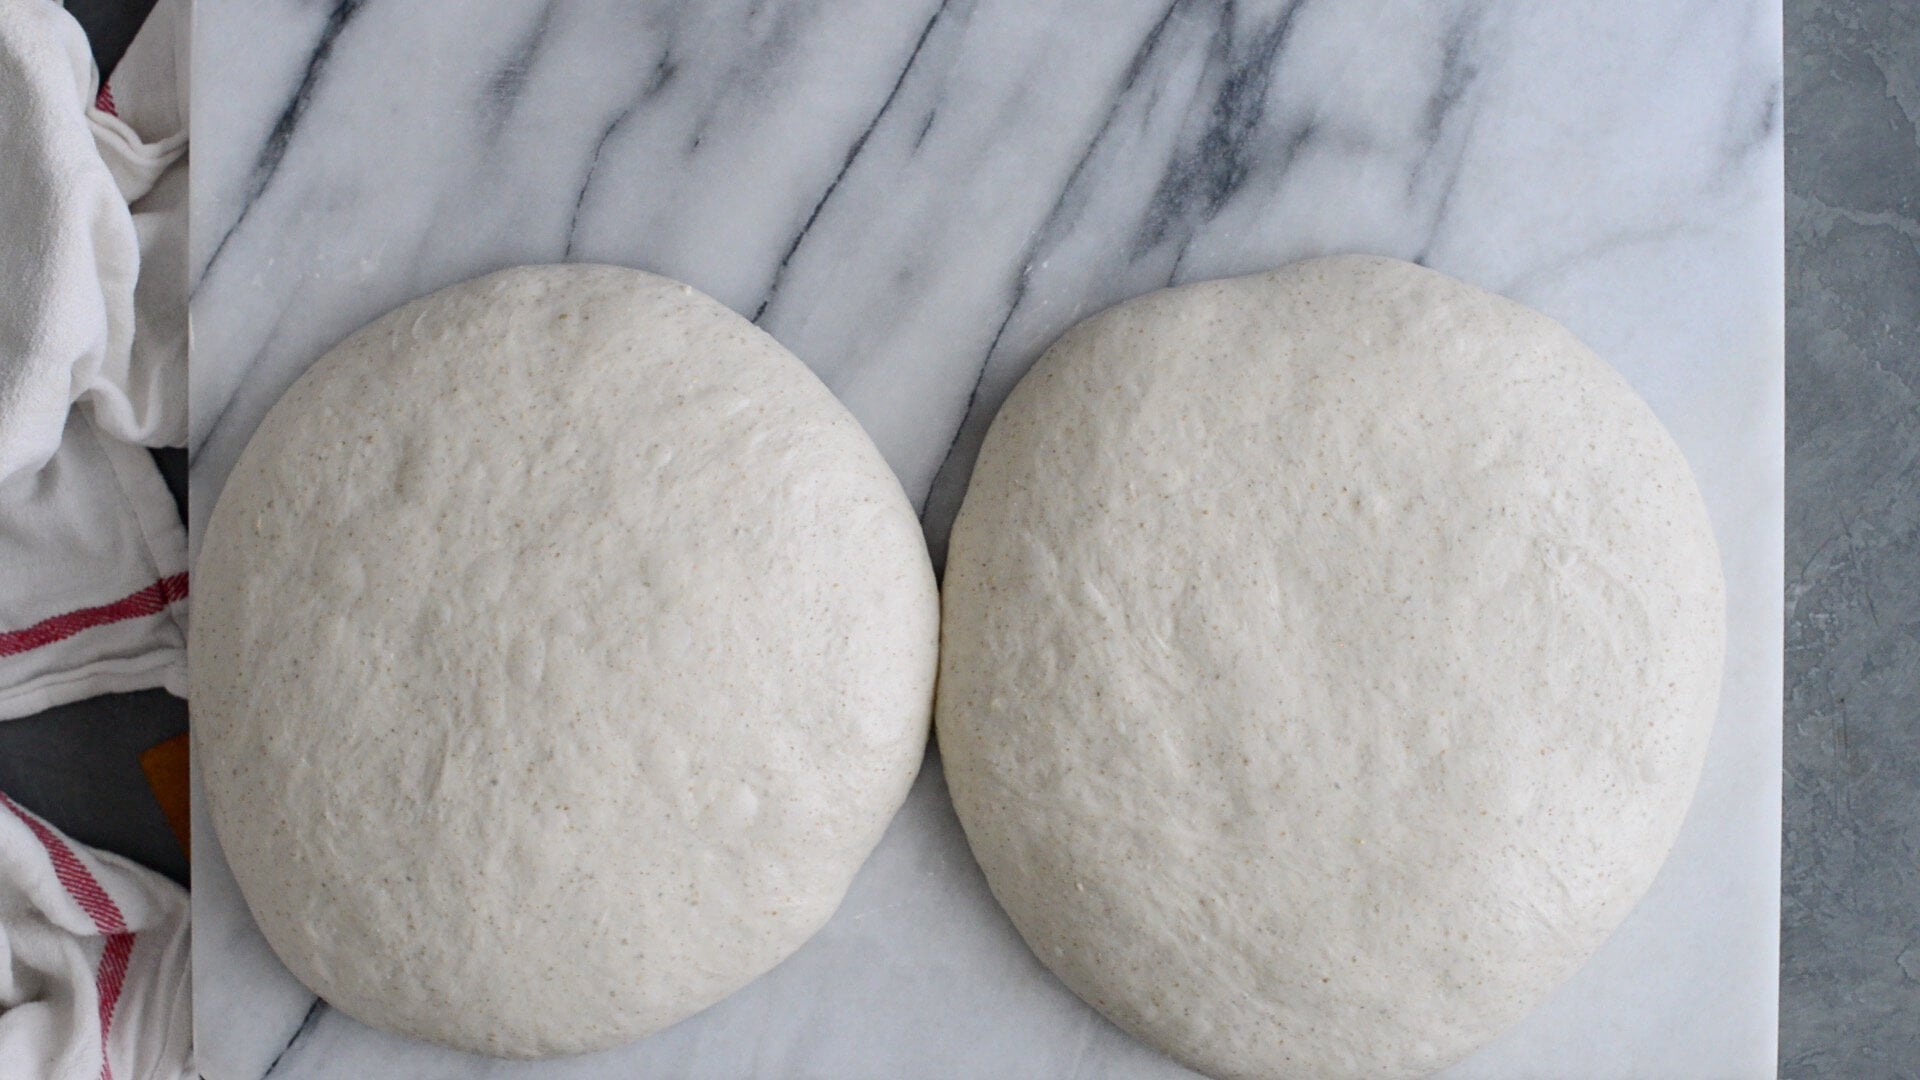
Step 8: Preshape Loaves
- Dump the dough onto a clean work surface.
- Use a bowl scraper to scrape out the bowl.
- Wet your hands to prevent sticking.
- Divide the dough into two equal parts by eye.
- Shape each half into a round using your hands and a bench scraper.
- Lift the dough and tuck underneath in a coiling motion to create surface tension.
- Repeat with the second dough piece.
Leave both rounds uncovered on the counter.
Step 9: Bench Rest (30 Minutes)
Let the dough rest uncovered for 30 minutes.
This dough rest allows a thin skin to form, which helps you create better surface tension during shaping. Good surface tension helps the loaf rise taller instead of spreading out.
Step 10: Shape the Loaves
Gather your shaping tools:
- 2 kitchen towels
- 2 bannetons or proofing baskets
- bench scraper
- flour for dusting
- small strainer for sifting flour
Prepare the proofing baskets:
- Lay a towel inside each banneton basket.
- Sift a thin, even layer of flour over the towel.
Pro Tip: Rice flour works better than purpose flour because it does not absorb as much moisture.
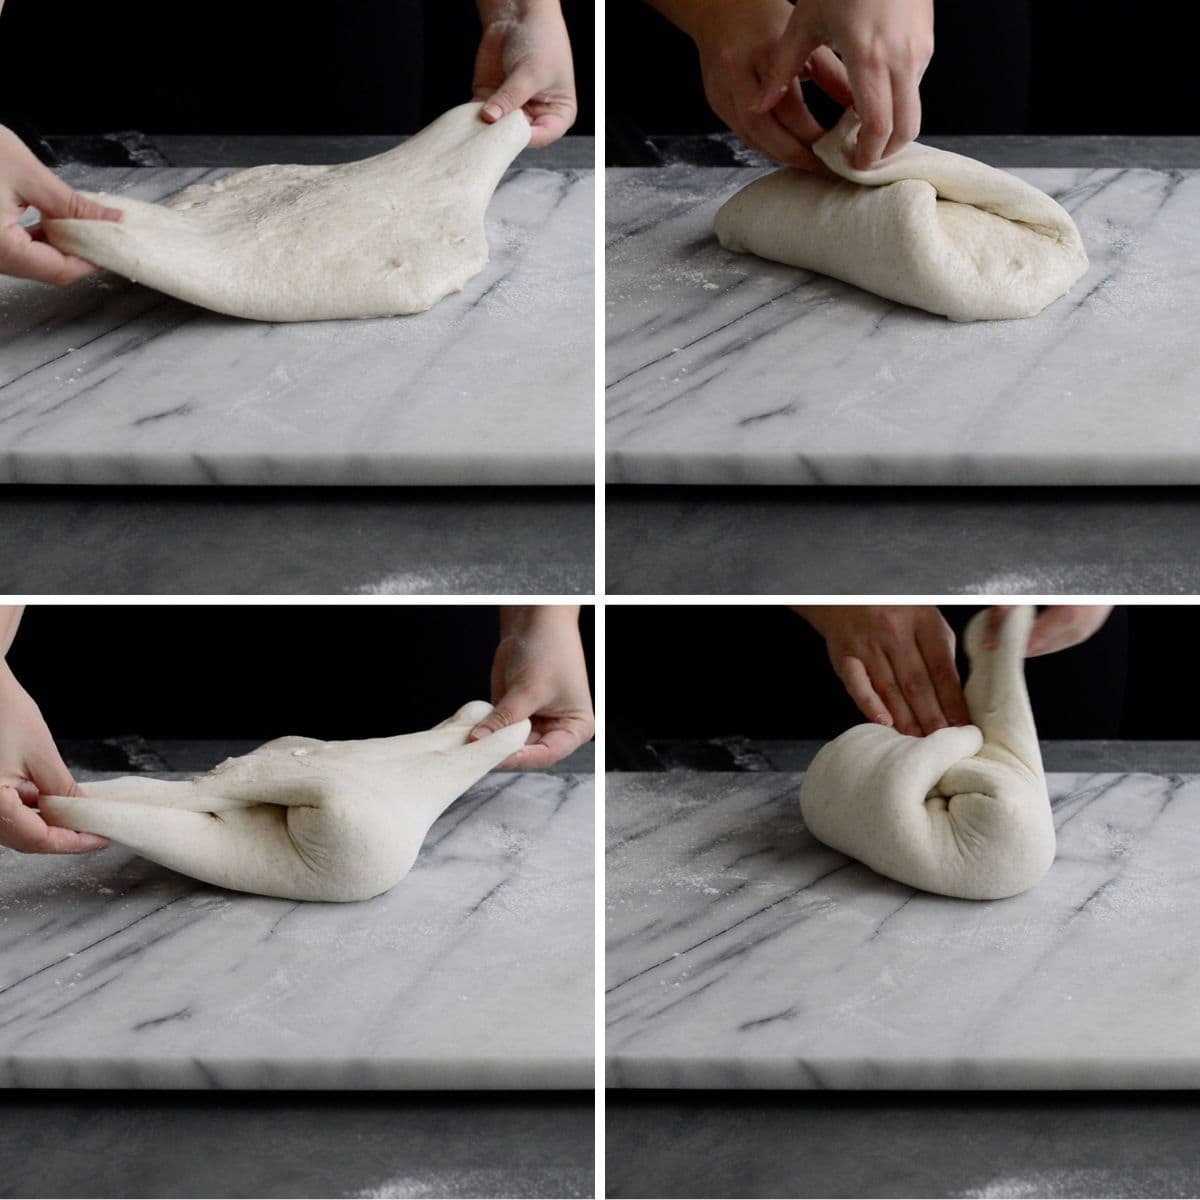
Shape each loaf:
- Lightly sift flour over the top of each dough round.
- Flour your hands and lightly flour your work surface.
- Flip the dough so the floured side is facing down.
- Stretch the dough out slightly and tuck it into the center, pinching to seal.
- Rotate the dough and repeat several times until it forms a tight round.
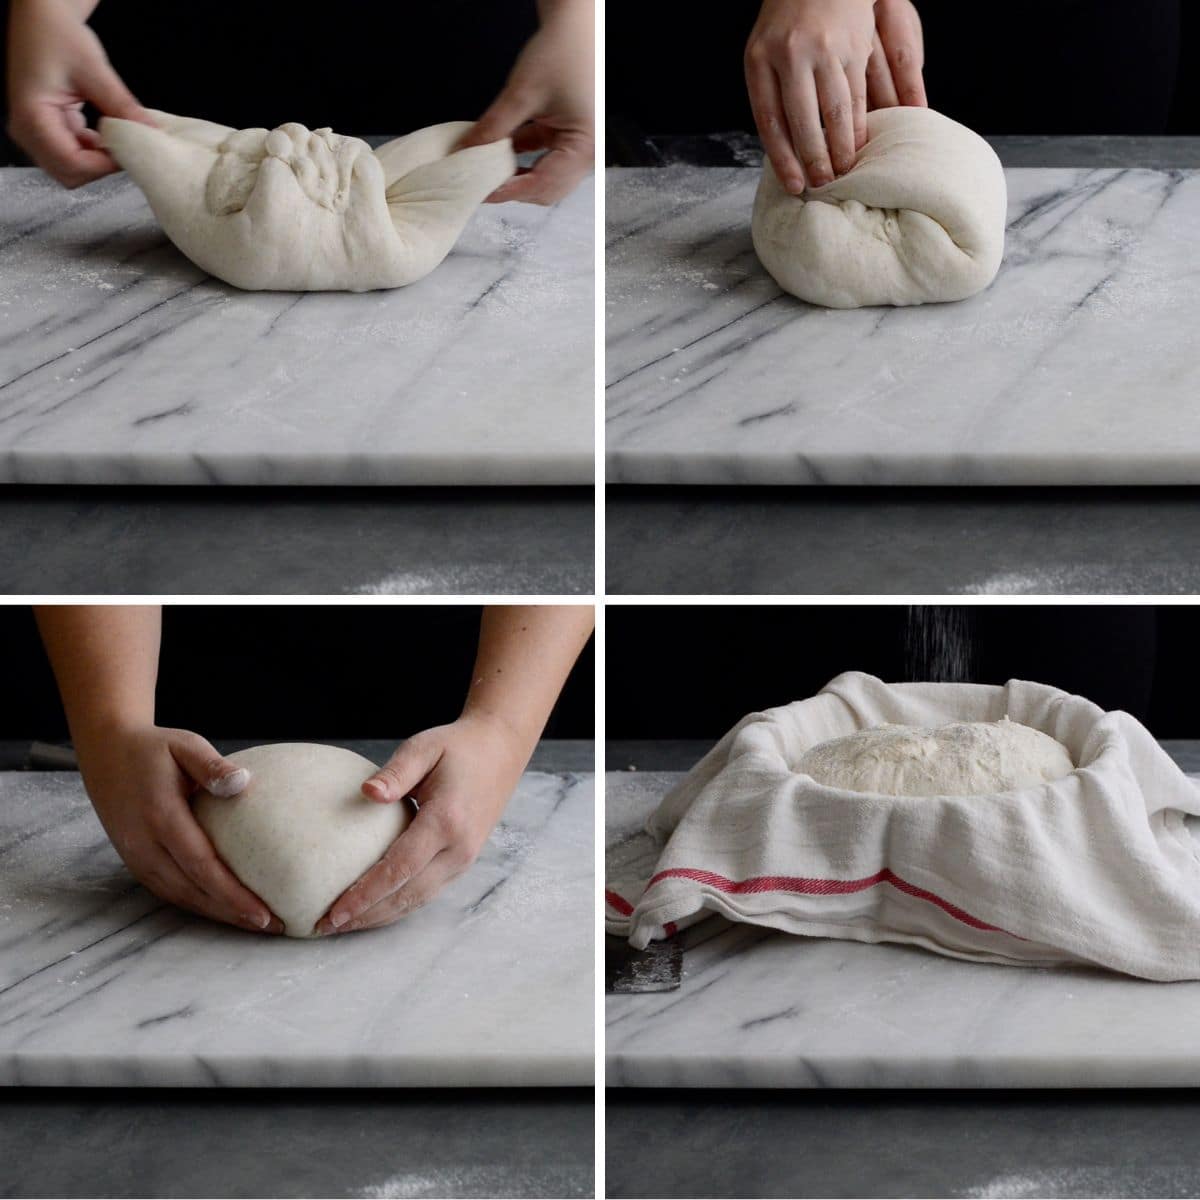
- Flip the dough seam-side down.
- Use floured hands to gently tighten the dough into its final shape.
- Place the banneton next to the dough.
- Use a bench scraper to lift and flip the dough seam-side up into the basket.
- Dust a light layer of flour over the seam.
- Fold the towel ends over to cover the dough.
Repeat with the second loaf.
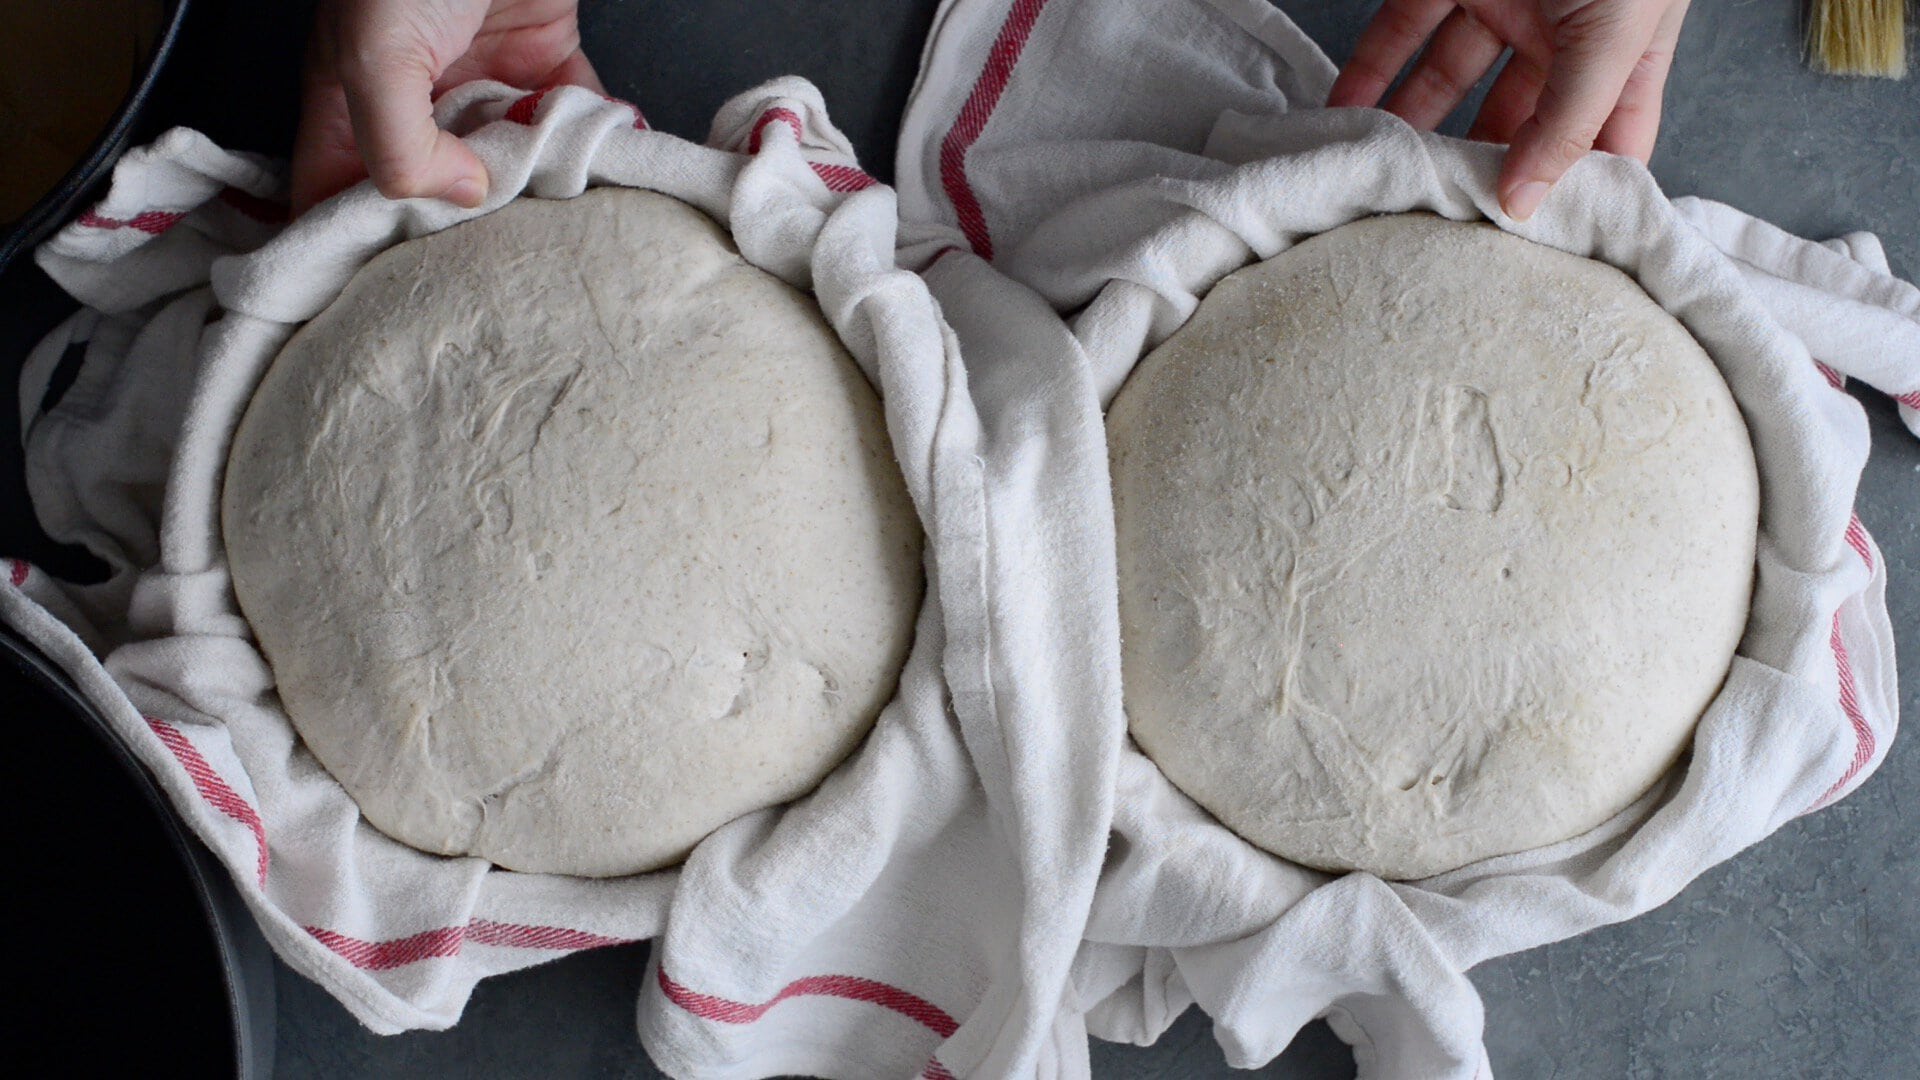
Step 11: Cold Proof (Second Rise) 8 to 24 Hours
Place both bannetons in the refrigerator for a slow cold fermentation.
Cold proofing improves:
- flavor
- crust texture
- scoring results
- oven spring
Refrigerate for 8 to 24 hours, depending on your schedule.
Quick Summary: Cold proofing is the final rise. A long cold proof improves flavor and makes the dough easier to score.
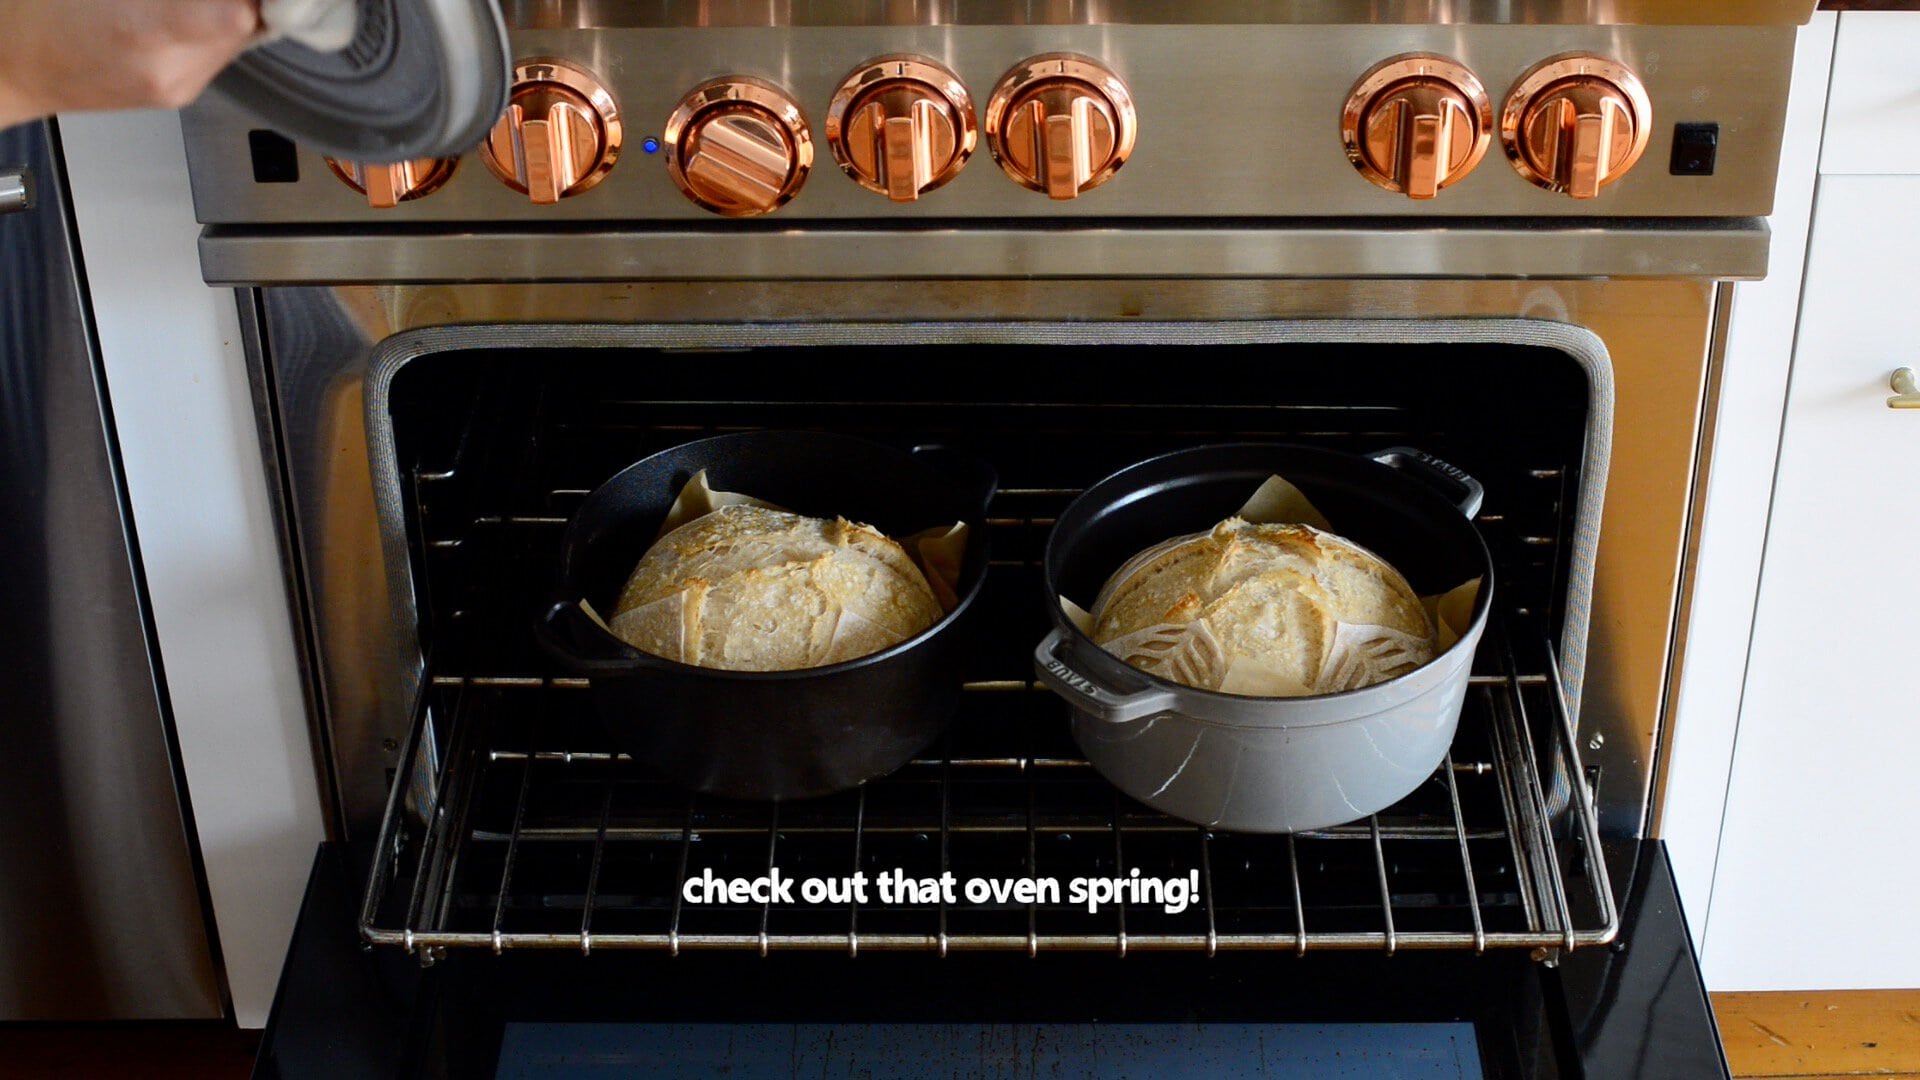
Step 12: Preheat Oven and Dutch Ovens
Preheat your oven to 500°F / 260°C at least 30 minutes before baking.
Place the cast iron Dutch ovens inside the oven to preheat.
A hot oven and a preheated Dutch oven are essential for the best rise.

Step 13: Score the Loaves
Gather:
- razor blade or bread lame (or sharp knife)
- parchment paper
- flour for dusting
- pastry brush
- Remove bannetons from the fridge.
- Unfold the towels.
- Place a piece of parchment paper over the banneton.
- Flip it over and remove the basket.
- Gently peel away the towel.
- Brush off excess flour.
If you want contrast, sift flour over the loaf before scoring.
Use shallow cuts for decorative scoring, then finish with one deeper slash to guide oven spring.

Step 14: Bake
- Lift the loaf by the parchment paper and place it into the hot Dutch oven.
- Cover with the lid.
- Repeat with the second loaf.
Bake covered:
Bake at 500°F (260°C) for 35 minutes.
Bake uncovered:
- Remove lids and release the steam.
- Reduce oven temperature to 450°F (230°C).
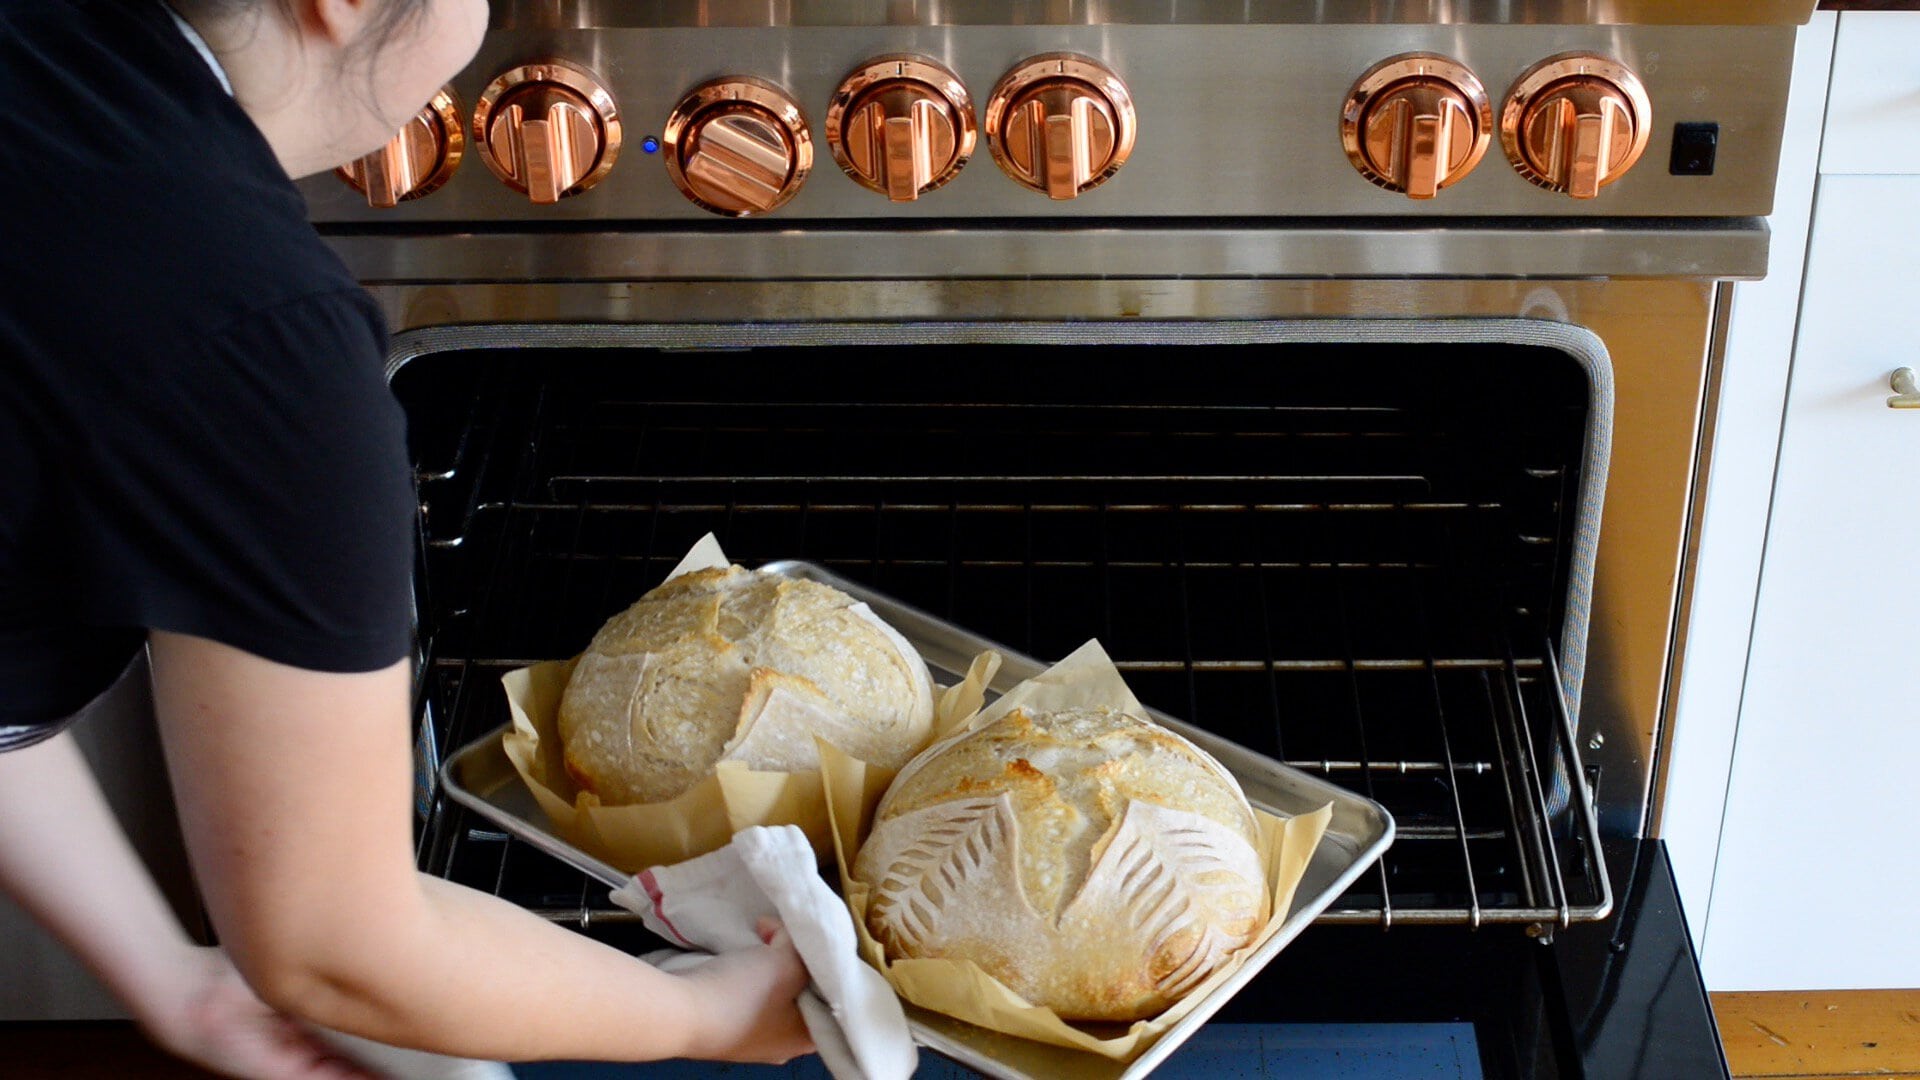
- Bake for 15 minutes more, or until the crust is deep golden brown.
Optional: Transfer loaves to a cookie sheet after removing the lids for a more even bake. Leaving them in the Dutch ovens can create a darker bottom crust.
Check Internal Temperature:
Your artisan sourdough bread is fully baked when the internal temperature reaches 205°F to 210°F.
Step 15: Cool Completely
Transfer loaves to a cooling rack and cool for at least 1 hour before slicing.
Cutting too soon can create a gummy crumb even if the bread is fully baked.
Fresh sourdough bread smells incredible, but cooling is worth the wait.

Artisan Sourdough Bread Timeline Tables (Multiple Schedules)
One of the most common questions people search is how to fit sourdough into real life. These schedules make it easier to plan.
Timeline Option 1: Morning Start, Bake the Next Morning (Most Reliable)
| Time | Step |
|---|---|
| 9:00 AM | Make leaven + start autolyse |
| 11:00 AM | Add leaven to dough |
| 11:30 AM | Dissolve salt |
| 12:00 PM | Add salt water |
| 12:15 PM | Coil fold #1 |
| 12:30 PM | Coil fold #2 |
| 12:45 PM | Coil fold #3 |
| 1:00 PM | Coil fold #4 |
| 1:00 PM to 9:00 PM | Bulk fermentation |
| 9:00 PM | Preshape loaves |
| 9:30 PM | Shape + refrigerate |
| Next morning | Score + bake |
Best for: beginner bakers, best results, predictable dough rise.
Timeline Option 2: Afternoon Start, Bake the Next Day
| Time | Step |
|---|---|
| 2:00 PM | Make leaven + autolyse |
| 4:00 PM | Add leaven |
| 5:00 PM | Add salt + coil folds |
| 6:00 PM | Bulk fermentation begins |
| Overnight | Bulk fermentation continues |
| 7:00 AM | Preshape + bench rest |
| 7:30 AM | Shape + refrigerate |
| Evening | Bake |
Best for: people who want a flexible baking window.
Timeline Option 3: Weekend Schedule (Maximum Flavor)
| Time | Step |
|---|---|
| Friday morning | Leaven + autolyse |
| Friday afternoon | Mix dough + coil folds |
| Friday night | Bulk fermentation |
| Saturday morning | Shape + refrigerate |
| Sunday morning | Bake |
Best for: deepest sour flavor, blistered crust, artisan bakery-style results.

Troubleshooting Artisan Sourdough Bread
Why Is My Sourdough Bread Dense?
A dense loaf usually means the dough did not ferment long enough or the starter was not active enough.
Common causes:
- Weak active sourdough starter
- Bulk fermentation too short
- Dough too cold
- Too much flour added during shaping
For best results, focus on the bulk fermentation stage. The dough should double and feel airy before shaping.
Why Did My Dough Spread Out Flat?
This usually comes down to surface tension or fermentation.
Common causes:
- Not enough surface tension during final shaping
- Overproofed dough
- Gluten not developed enough
Coil folds help strengthen dough, but shaping technique matters too. A tight final shape helps the loaf rise tall instead of spreading.
Why Is My Crumb Gummy?
Common causes:
- Bread sliced too soon
- Loaf underbaked
- Underfermented dough
Make sure the bread cools fully. Also check internal temperature. A fully baked loaf should be at least 205°F inside.
Why Did My Dough Stick to the Proofing Basket?
This is extremely common, especially for first time bakers.
The best solution is using rice flour instead of regular flour. Rice flour stays dry and prevents sticking during the second rise.
Why Did My Bread Crack on the Side?
If sourdough is not scored deeply enough, it will find its own weak spot to expand.
Use a sharp razor blade and make one confident deeper cut to guide oven spring.
Serving Suggestions
This artisan sourdough bread recipe is perfect served as:
- toast with butter and jam
- sandwiches
- grilled cheese
- bread for soup and stew
- olive oil and sea salt dipping bread
It is especially delicious the next morning toasted.
For another rustic sourdough bake that’s even easier to shape, try my sourdough focaccia topped with olive oil and flaky salt.
If you want a quicker sourdough recipe that pairs beautifully with soups and curries, my soft sourdough naan is a must-try.
Variations (Easy Ways to Customize This Loaf)
- Whole Wheat Version: Replace 200–300g of the bread flour with whole wheat flour for a heartier, more rustic loaf. If you love the flavor of whole grains, you’ll also enjoy my whole wheat sourdough sandwich bread, which is softer, sliceable, and perfect for everyday toast.
- Higher Hydration (More Open Crumb): Add 25–50g more water for a looser dough and airier crumb (expect stickier handling).
- Smaller Loaves: Divide the dough into 3–4 smaller sourdough loaves instead of 2 and reduce bake time slightly.
- Seeded Crust: Roll the shaped dough in sesame seeds, sunflower seeds, or flax seeds before placing into the banneton basket.
- Mixed-In Seeds: Add seeds during the first set of coil folds for even distribution throughout the bread.
- Olive Oil Variation: Add 1–2 tablespoons olive oil during mixing for a slightly softer crumb.
- Cinnamon Raisin Variation: Add raisins and a cinnamon-sugar swirl during shaping for a sweet breakfast loaf. For a sweeter breakfast-style loaf, my cinnamon raisin sourdough bread is a reader favorite and makes the best French toast.
- Same-Day Bake Option: Skip the overnight cold proof and bake after shaping once the dough has puffed slightly (flavor will be less developed).
- More Rye Flavor: Increase rye flour slightly for a deeper sourdough flavor (the dough may feel stickier).
- Longer Cold Proof: Extend cold proofing up to 24 hours for deeper flavor and a more blistered crust.
How to Store and Freeze Artisan Sourdough Bread
Room Temperature Storage:
- Store the loaf cut-side down on a cutting board for 1 to 2 days. If your kitchen is humid, loosely wrap it in a towel.
- Avoid airtight containers at room temperature since they soften the crust.
Freezing:
- Slice the loaf and freeze in a plastic bag.
- Toast slices straight from frozen for an easy breakfast.
If you enjoy baking sourdough in batches to freeze for breakfasts, you’ll love my chewy homemade sourdough bagels, which freeze beautifully and toast up perfectly.

Recipe FAQs
Artisan sourdough bread is typically made with natural fermentation, shaped by hand, and baked in a way that creates a thick crust, chewy crumb, and rustic appearance. It is usually baked with steam, often in a cast iron Dutch oven.
Bread flour is best because it has higher protein, which builds stronger gluten for a better rise. You can use purpose flour, but the loaf may spread more and have a softer structure.
Yes. You can replace a portion of the bread flour with whole wheat flour. The loaf will have a slightly denser crumb and more earthy flavor.
Yes. This recipe is designed for overnight bulk fermentation. The key is monitoring dough rise. If your kitchen is warm, bulk fermentation may finish sooner than expected.
Bulk fermentation usually takes 8 to 12 hours at room temperature, depending on starter strength and ambient temperature. The dough should double in volume and look bubbly and jiggly.
For best results, cold proof for at least 8 hours. A 12 to 24 hour cold proof produces deeper flavor and often creates a more blistered crust.
No. A banneton basket helps support the dough and creates a nice shape, but you can use a bowl lined with a kitchen towel. Dust heavily with rice flour so the dough does not stick.
Sticky dough is normal, especially in high hydration recipes. Autolyse and coil folds strengthen the gluten over time. Wet your hands instead of adding extra flour to keep the dough hydration consistent.
A Dutch oven traps steam, which allows the bread to expand before the crust sets. This creates better oven spring and a crisp crust. Baking without a Dutch oven is possible, but results may not be as dramatic.
Yes, but you will need steam for the best results. You can place a pan of hot water in the oven to create steam. The crust may be slightly thicker and the loaf may rise less than Dutch oven baking.
Sourdough bread is usually done when the internal temperature reaches 205°F to 210°F and the crust is deep golden brown.
A very long fermentation process can create extra acidity. To reduce sourness, shorten the cold proof time or bake sooner after shaping.
Yes. Using less starter will slow fermentation and extend bulk fermentation. It can improve flavor, but you will need to watch the dough closely.
You can, but it changes the fermentation process and the flavor. This recipe is designed to rise naturally using wild yeast from an active sourdough starter.
Final Thoughts
This artisan sourdough bread recipe is a classic, reliable method that produces two beautiful rustic loaves with a crisp crust and chewy interior. The combination of rye flour, long fermentation, and Dutch oven baking gives the bread that deep, bakery-style flavor and structure.
If you are a beginner baker, do not be discouraged if your first loaf is not perfect. Sourdough is a skill that improves with repetition. Once you understand fermentation timing, dough hydration, and shaping for surface tension, you will be able to bake a delicious loaf consistently.
With practice, you will develop your own rhythm and schedule. Before you know it, baking fresh sourdough bread will feel like second nature.
More Sourdough Recipes to Try Next
If you are enjoying this sourdough journey, here are a few other sourdough recipes to explore:
- Sourdough Focaccia (perfect for sandwiches and olive oil toppings)
- Cinnamon Raisin Sourdough Sandwich Bread (soft, swirled, and great for breakfast)
- Sourdough Scones (a faster sourdough project that is beginner-friendly)
- Whole Wheat Sourdough Sandwich Bread – a softer everyday loaf made with whole grains, perfect for toast and lunch sandwiches.
- Sourdough Bagels – chewy, bakery-style bagels made with a long fermentation for extra flavor and texture.
- Sourdough Naan – soft, skillet-cooked flatbread that’s perfect for scooping curries, soups, or dips.
- How to Make a Sourdough Starter from Scratch – if you’re still building your baking foundation, this guide walks you through creating your own active starter from day one.
Love This Recipe?
Please leave a star rating of the recipe and let me know what you think in the comments. Ratings and reviews help more people find and trust my recipes, and they are one of the best ways to support the food blogs you read and love.

Artisan Sourdough Bread Recipe (Easy Rustic Loaf)
Equipment
- 1 pint jar with lid
- 1 small silicone spatula
- 1 rubber band
- 2 large mixing bowls
- 1 bowl scraper
- 1 bench scraper
- 2 8.5" round bannetons or bowls
- 2 sheets of parchment paper
- 1 bread lame or sharp serrated knife
- 2 cast iron dutch ovens or bread pans
Ingredients
Leaven:
- 50 g active sourdough starter 100% hydration
- 20 g bread flour
- 5 g rye flour
- 25 g water
Dough:
- 900 9 bread flour
- 100 g rye flour
- 800 g water (divided)
- 22 g kosher salt
Instructions
- Make the leaven: In a jar, mix 50g active starter, 20g bread flour, 5g rye flour, and 25g water. Cover loosely and let rise in a warm place until tripled and bubbly, about 1–3 hours.
- Autolyse the dough: In a large bowl, mix 900g bread flour, 100g rye flour, and 750g water until no dry flour remains. Cover and rest while the leaven becomes active, about 1–3 hours.
- Add leaven: Add the active leaven to the dough and mix by hand until fully incorporated, about 5 minutes. Cover and rest 30–60 minutes.
- Mix salt water: Dissolve salt in 50g hot water. Let cool.
- Add salt: Pour salt water over the dough. Mix by hand until fully incorporated, about 5 minutes. Cover and rest 15 minutes.
- Coil folds: Perform 4 sets of coil folds at 15-minute intervals over 1 hour. Cover between each set.
- Bulk fermentation: Cover and let the dough rise at room temperature until doubled, soft, and bubbly, about 8–12 hours.
- Preshape: Turn dough onto a work surface and divide into 2 pieces. Gently shape each into a round. Rest uncovered for 30 minutes.
- Shape: Shape each dough into a tight round and place seam-side up into floured bannetons or bowls lined with towels.
- Cold proof: Cover and refrigerate for 8–24 hours.
- Preheat oven: Preheat oven to 500°F (260°C) with Dutch ovens inside for at least 30 minutes.
- Score: Turn dough onto parchment, remove towel, and score with a sharp blade.
- Bake covered: Transfer to hot Dutch ovens, cover, and bake for 35 minutes.
- Bake uncovered: Remove lids, reduce heat to 450°F (230°C), and bake 15 minutes more, until deep golden brown.
- Cool: Cool on a rack for at least 1 hour before slicing.
Video
Notes
- Homemade sourdough bread is best eaten fresh within 1 day.
- After the loaves are cooled you can slice the bread and freeze the slices in freezer bags to keep them fresh throughout the week. Defrost or toast slices as you need.
- Starter strength matters: For best results, use an active sourdough starter that doubles or triples within 4–6 hours at room temperature. A weak starter can lead to dense bread.
- Bulk fermentation timing varies: Bulk fermentation may take anywhere from 8–12 hours depending on the temperature of your kitchen. The dough should look doubled, bubbly, and jiggly.
- Use rice flour for dusting: Dusting your proofing basket or towel with rice flour helps prevent sticking better than all-purpose flour.
- Cold proofing improves flavor: Refrigerating the shaped loaves for 8–24 hours creates deeper flavor and makes scoring easier.
- Bake in a preheated Dutch oven: A hot Dutch oven traps steam and produces the best oven spring and a crispy crust.
- Cool before slicing: Let loaves cool for at least 1 hour before cutting to prevent a gummy crumb.
- Check doneness: Bread is fully baked when the internal temperature reaches about 205–210°F.
Kaity Farrell
Ask me any questions you have! – kaity
Hannah
You bake them way too dark. It’s unhealthy.
Kaity Farrell
ok Hannah