Learn how to make the best vegan pumpkin pie recipe with simple ingredients. The filling is made with thick fresh pumpkin puree, rich and creamy coconut milk, sweet maple syrup and the perfect amount of pumpkin pie spice.

This creamy pumpkin pie is a staple on our Thanksgiving table every year. Everyone who tries it says it’s the best pumpkin pie recipe. It’s made without eggs or dairy and is perfect family members that are vegan or may have a dairy or egg allergy. What sets this recipe apart is the simplicity of the ingredients and method combined with its rich flavor and perfect silky yet sturdy texture. The pumpkin pie filling is naturally gluten-free so swap the pie crust in this recipe with any gluten-free pie crust to make a vegan gluten-free pumpkin pie.
Serve it alongside all of your favorite Thanksgiving recipes or try some more delicious vegan-friendly dishes from our site like fluffy vegan cornbread, vegan apple galette, and the most delicious homemade cranberry sauce that is also sweetened with maple syrup. This pumpkin pie a must have dessert recipe for the holiday season!
Table of contents

Key Ingredients
Pie Crust – I’ve included steps to make my go-to flaky easy vegan pie crust recipe it the recipe card. The homemade pie crust can be made up to 3 days ahead and refrigerated before you are ready to use it or made weeks in advance and frozen. Just remember to take the frozen dough out and thaw it in the refrigerator a couple of days before you will bake the pie. Substitutions: As an alternative to flaky pie dough you can also make this vegan pumpkin pie with a graham cracker crust or a gingersnap crust. I’ve made it with a gingersnap and toasted pecan crust before and it was divine! Use your favorite gluten free pie dough recipe or a gf store-bought crust to make vegan gluten-free pumpkin pie. Feel free to use any store-bought pie crust for a time saving option.
Pumpkin – One thing I love about this easy pumpkin pie recipe is that you don’t have to make homemade pumpkin puree ahead of time. Because the filling is blended smooth you can add roasted pumpkin right to recipe without pureeing it first. The best pumpkin or winter squash to use for pumpkin pie mix are those that have dark orange flesh that is sweet and dry when cooked. I love buttercup squash (not to be confused with butternut), ambercup, koginut and honeynut squash for homemade pumpkin pie. You can also use canned pumpkin puree for a time saving alternative to homemade pumpkin purée. Make sure to use pure pureed pumpkin and not canned pumpkin pie filling which is already sweetened and spiced. Substitutions: Swap pumpkin with roasted sweet potatoes to make vegan sweet potato pie instead.
Pure Maple Syrup – Maple and pumpkin are a match made and heaven. Maple syrup adds a delicious sweet flavor that evokes the fall season and makes this recipe refined sugar-free. The liquid syrup also helps add moisture to this thick filling. Substitutions: You can use another sweetener of your choice instead of maple syrup. Other unrefined sweeteners tp try are honey, coconut sugar, or whole cane sugar. Regular light or dark brown sugar works well in this recipe too.
Pumpkin Pie Spice – The recipe card gives amounts for each spice to create pumpkin pie spice from scratch with your own spices. I love to use a combination of cinnamon, ground ginger, clove, allspice and nutmeg to get the best pumpkin spice flavor. Feel free to use 2-3/4 teaspoons store-bought pumpkin pie spice instead of adding the spices individually.
Vanilla – Vanilla brings out the sweetness and rounds out the flavors of all the spices, maple and pumpkin. Use vanilla extract, vanilla paste or the seeds scraped from a whole vanilla bean.
Agar Agar – This may be the only ingredient you don’t have in you pantry, but is the secret ingredient to make the best pumpkin pie. Agar agar is a sea vegetable that gels in a similar way to gelatin when it is introduced to heat. It is essentially the egg substitute in the pie filling and acts to bind the filling and create a thick and sturdy custard-like pie. The recipe calls for powdered agar agar and gives measurement for using agar agar flakes as an alternative. I’ve tried using other thickeners like cornstarch or arrowroot powder in and they just can’t compare to the creamy yet sturdy texture that agar agar creates.

How to Make the Best Vegan Pumpkin Pie
Step 1: Make the pie crust recipe
Start by mixing flour and salt together then cut in cubes of cold vegan butter to the mixture with a pastry blender or your fingertips. Coat each piece of plant based butter with the flour mixture then press them between you fingers to make small flat shards for the flakiest vegan pie crust.
Stir in ice water 1 tablespoon at a time with a fork or you hands until the dough holds together. The amount of water needed will vary depending on the weather and humidity that day.
Form the pie dough into a disc and wrap it in plastic wrap then let it rest in the refrigerator for at least 30 minutes to let the gluten strands relax so the dough will be easy to roll out.
Step 2: Roll out the pie dough
Preheat the oven while the dough is resting. Roll out the pie crust on a lightly floured work surface to about 1/4-inch thick with a rolling pin, dusting the surface and pie dough as needed to prevent it from sticking.

Roll up the pie crust around the rolling pin to transfer it to the pie dish. For a crimped crust, trim the edges of the dough to an overhang of about 1 inch from the edge of the pie pan then tuck the overhang under itself. Crimp the edges with your fingertips or with a fork.


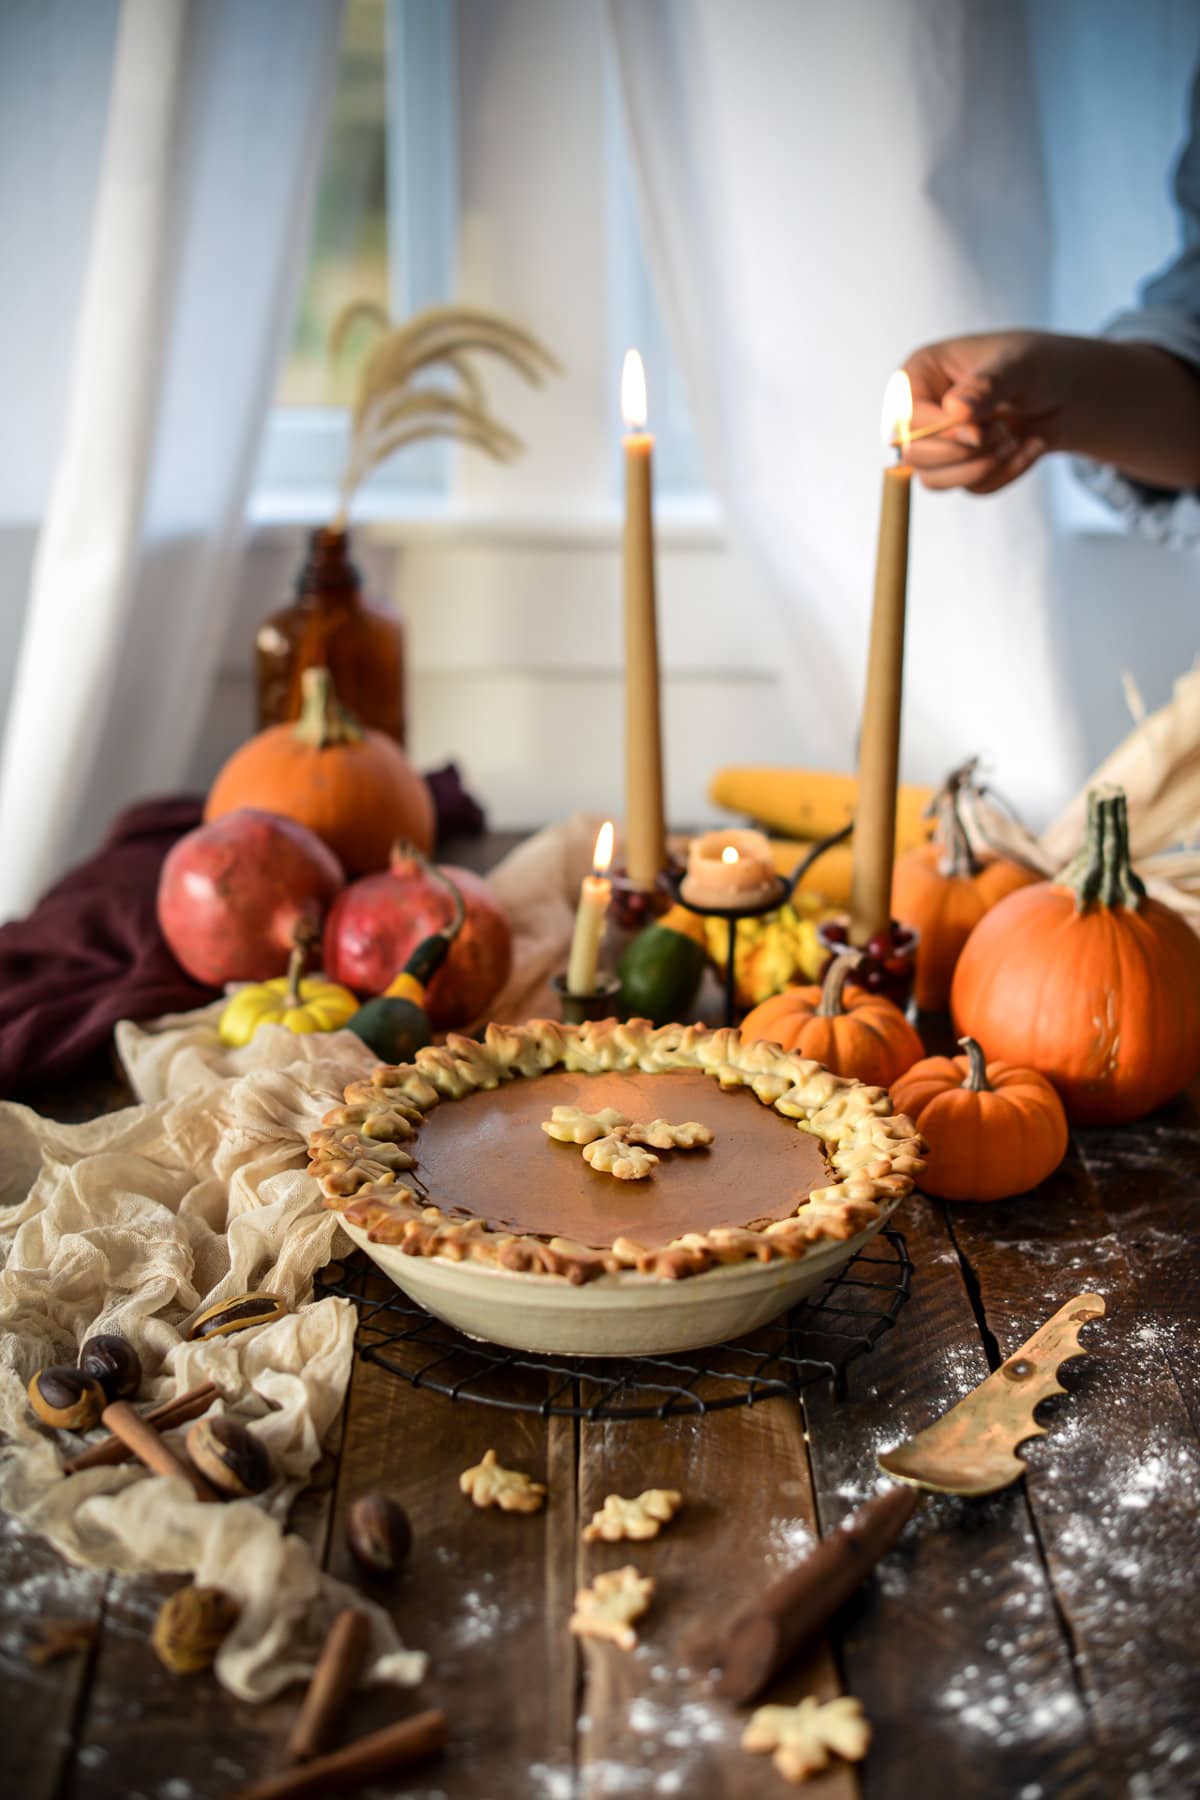
For a decorative leaf cut-out crust, trim the dough edges to the edge of the pie plate. Re-roll the dough scraps and cut out leaf shapes with small cookie cutters or leaf stamp cutters. Save the cutouts to add after blind baking the pie shell.
Step 3: Blind bake the pie shell

Line the pie shell with parchment paper and fill it to the top with pie weights or dried beans.
Pre-bake the pie crust in the preheated oven to ensure that you don’t end up with a soggy bottom crust. Remove the pie weights and parchment paper when done.
Step 4: Prepare the egg-free and dairy-free pumpkin pie filling

Add all of the pumpkin filling ingredients to a blender and blend them into a smooth, thick and creamy puree. Pour the filling into the pre baked pie crust and smooth it out with a rubber spatula or offset spatula.

Add the decorative leaf cutouts at this point so they sit on the filling. Brush their bottoms with non-dairy milk to help stick them to the edges of the crust.
Step 5: Bake the eggless pumpkin pie

Brush the crust with non-dairy milk as an egg-wash alternative. Bake the pie according to the instructions in the recipe card below then remove it from the oven and let it cool to room temperature on a wire rack. If the crust starts to brown too fast you can use a pie shield to protect the crust from getting too dark. Bake extra decorative pie crust cutouts to decorate the top of the pie. Chill the pie in the refrigerator overnight for the best taste and texture.

Tips for making a perfect pumpkin pie
- Blind bake the pie crust to avoid a soggy bottom.
- Use a metal or ceramic pie plate for the best heat distribution to help avoid a soggy crust. Avoid glass pie pans.
- Use full fat coconut milk or coconut cream for the best creamy texture and rich flavor.
- Use agar agar to bind and thicken the pie filling to create a thick and sturdy texture.
- Make the pie dough ahead and refrigerate or freeze it so it’s ready to use.
- Make the pie the day before and refrigerate it overnight to let the filling set and the flavors develop for the best taste and texture.
Storage
Wrap leftover pie in plastic wrap or place it in an airtight container and refrigerate it for up to 3-4 days. Serve it cold or at room temperature.
To store the pie dough wrap it in a couple of layers of plastic wrap and refrigerate it for up to 3 days before using it or place the wrapped dough into a freezer bag and freeze it for up to 6 months.
What to Serve with Pumpkin Pie
Serve eggless pumpkin pie with whipped cream or ice cream. Use non-dairy whipped cream alternatives or vegan ice cream for vegan friendly options.

Recipe FAQs
Yes, unbaked pumpkin pie is well suited to freezing. If you plan to freeze pumpkin pie, follow the recipe instructions up to the point of spreading the filling into the pie crust then wrap it well in several layers of plastic wrap and place it into a large freezer bag. Make sure to use a metal or disposable foil pie tin when freezing unbaked pies. Freeze the pie for up to 3 months. The quality of the pie will deteriorate the longer it is frozen. When you’re ready to bake the pie bake it frozen, do not thaw it first. Preheat the oven to 425˚F with a cookie sheet or sheet pan in it. Place the frozen pie onto the hot cookie sheet. The heat from the cookie sheet helps cook the bottom pie crust. Bake the pie at 425˚F for the first 15-20 minutes and lower the oven temperature to 375˚F until its done. The total baking time will be around 1 hour.
This vegan pumpkin pie filling recipe is already gluten free so you can use any gluten free pie crust with it. Swap the all-purpose flour in the pie dough with a gluten free flour blend. Or use gluten free graham crackers or gingersnaps to make a gluten free cookie crumb crust instead.
Baked and cooled pumpkin pie will last up to 4 days in the refrigerator wrapped in plastic wrap or in an airtight container. The flavor improves the day after it is baked so make it ahead for the best results.
Pumpkin pie should cool to room temperature in roughly 2 hours after it is baked. Cool it in the pie plate set on a wire rack.
Vegan pumpkin pie is done when the crust is golden brown and the filling looks dry and slightly puffed. Once the pie cools down and is chilled the top will become shiny and look wet.
You shouldn’t have leftover pie filling when making this recipe in a standard pie tin. If you make a smaller pie and have leftover filling you can mix it with vegan cream cheese to make a vegan pumpkin cheesecake or add it to pancake batter to make pumpkin spice pancakes or waffles.

More Cozy Fall Pumpkin Recipes
- Easy Gluten Free Pumpkin Bread Recipe (Dairy-Free)
- Easy Vegan Pumpkin Muffins Recipe
- Vegan Pumpkin Sage Agnolotti
- Vegan Pumpkin Lentil Stew
- Pumpkin Sweet Brown Risotto with Maple Glazed Carrots & Wild Mushrooms
- Easy Vegan Roasted Buttercup Squash Soup Recipe
- Vegan Stuffed Butternut Squash Recipe
- Maple Walnut Pear Sage Stuffed Squashes with Sage Labneh
- Vegan Roasted Delicata Squash Salad with Orange Maple Vinaigrette
Love this recipe?
Please leave a star rating of the recipe and let me know what you think in a comment below. This small act is a great way to show your support for the food blogs you read and love.
Tag @fareisle in your photos on Instagram with #fareisle so I can see your creations!

Easy Vegan Pumpkin Pie Recipe
Ingredients
Pie Crust
- 210 g all-purpose flour 1-1/2 cups
- 1/2 teaspoon kosher salt
- 114 g vegan butter 1/2 cup or 1 stick
- 1 tablespoon extra-virgin olive oil
- 4-6 tablespoons ice water
- 2 tablespoons non-dairy milk soy milk or almond milk
Filling
- 480 g pumpkin puree or roasted pumpkin 2 cups
- 400 ml full fat coconut milk or coconut cream 13.5 oz can, chilled and separated *see notes
- 180 g maple syrup 3/4 cup
- 1 1/2 teaspoons ground cinnamon
- 1/2 teaspoon ground ginger
- 1/4 teaspoon fresh grated nutmeg
- 1/4 teaspoon ground cloves
- 1/4 teaspoons ground allspice
- 1/4 teaspoon kosher salt
- 1 tablespoon vanilla extract
- 1 teaspoon agar agar powder or 1 tablespoon agar agar flakes
Instructions
- Preheat oven to 350˚F
- In a mixing bowl, stir together flour and salt. Cut vegan butter into 1/2 inch pieces and coat them in the flour. Flatten butter pieces between your thumb and fingers. Add olive oil and then rub the butter pieces and olive oil into flour with your hands until mixture resembles coarse breadcrumbs with some larger pieces.
- Add ice water about 1 tablespoon at a time, stirring with a fork or your fingertips, until dough holds together when squeezed in your palm. Note: The total amount of water needed will vary on the humidity and air temperature at the time.
- Turn dough out onto a work surface and gently work it into a disc then cover it in wrap. Refrigerate and let the dough rest for 20 minutes before rolling it out to relax the gluten.
- Roll out dough to 1/4″ thick on a well-floured surface.
- Roll up crust onto the rolling pin and transfer it to a pie plate. Gently guide the dough into the pie plate with your hands so that there is no space between the pie plate and the dough. Trim overhanging dough to 1". Tuck the outer edge under itself and crimp crust all the way around. If making a leaf cutout crust as shown in photos, trim off all of the overhanging dough and proceed with blind-baking in the following step. Gather the scraps of dough into a ball and set aside to use while crust is blind-baking.
- Place a piece of parchment over the pie shell and fill with pie weights or dried beans to hold crust in place and to keep it from puffing. Bake pie shell for 20 minutes then remove from oven, remove parchment and pie weights/beans then set aside on a cooling rack. Pie shell will only be partially baked.
- While pie shell is baking, optionally re-roll gathered dough scraps to 1/4″ thickness and cut out leaf shapes for a decorative pie border. Use a sharp knife or bread lame to score “veins” in the leaf cutouts. Leave them on work surface until final assembly.
- Next prepare the filling by adding all filling ingredients to a blender. Blend on high until smooth and creamy, about 1 minute.
- When the crust is done blind-baking, adjust oven temperature to 375˚F.
- Pour filling into pre-baked pie shell. Smooth out top with a spatula and tap pie plate a couple of times on a board or counter top to release air bubbles. Brush the crust with non-dairy milk.
- If creating a decorative leaf crust, brush bottoms of cutouts with non-dairy milk and arrange them one by one around the border of the pie. Then brush the tops with more non-dairy milk.
- Arrange extra cutouts on a parchment lined baking sheet and brush them with non-dairy milk, then pop them in the oven for the last 10 minutes of bake time in the following step.
- Bake at 375˚F for 35-45 minutes until the crust is golden brown and the filling puffs up but is still jiggly. Remove from oven and allow to cool to room temperature on cooling rack. The filling will continue to set up as it cools. Decorate the top with extra leaf cut-outs. Cool the pie completely and refrigerate it overnight for the best texture and glassy top.
Notes
- To prepare pumpkin from scratch:
- Preheat oven to 425˚F and line a baking sheet with parchment paper.
- Cut squash or pumpkin in half horizontally. Scoop out the seeds. Place on parchment cut side down.
- Bake on center rack for about 30-40 minutes until fork tender. Remove from oven and scoop out flesh.
- Note: There is no need to puree the roast pumpkin as the filling will be blended until smooth.
- For this recipe you want thick coconut cream. It is best to chill a can of coconut milk or coconut cream in the fridge overnight so the cream separates from the water. When you open the can, scoop out the thick cream and discard the water/liquid in the can. Pro tip: keep some cans if coconut milk the fridge at all times to use for recipes like this or for making whipped coconut cream.
Vanessa
Excited to try this! Thanks as always Kaity ?
Kaity Farrell
Yay! Thank you, Vanessa! xx Kaity
Kaity Farrell
If you’ve tried this recipe please don’t forget to leave a star rating with your comment. Simply click the stars right above where you type your comment before publishing it. Star ratings help my recipes reach more people in search results. Thank you so much!
Ms. Bear
I made this pie for Thanksgiving, and it was so easy under your expert direction and delicious even though I might have over baked the pie a tad, since I was worried that it wouldn’t set (it did). Thank you.
Kaity Farrell
Thank you so much! So happy you enjoyed it!